Many PCs in homes today don't have the processing power to play/Edit AVCHD video. The software included with the camcorder will allow playback at a reduced frame rate for simple editing.
Please note that playback will not be HD quality when viewed on a PC.
Please review our Studio system requirements for AVCHD:
- Intel Core2 Duo 2.4 GHz or higher required for 1440x1080 AVCHD editing Intel Core2 Quad 2.66 GHz or higher required for 1920x1080 AVCHD editing (most AVCHD cams are 1920x1080 format)
- 1.5 GB of Ram required for AVCHD (2 GB required on Windows Vista)
- 256 MB of Ram on your video card required for AVCHD editing (ATI Radeon9600+ or NVIDIA GeForce 6 or higher recommended)
If your system does not meet these requirements you will not be able to edit AVCHD video on that system.
In order to view the AVCHD video on XP, you must first install the software that was included on the CD that came with your camcorder. That software will allow you to first download the video files from your AVCHD camcorder, to your PC's hard drive. The files can be viewed from your PC's hard drive using the same software. They will also need to be copied to the hard drive for use in Studio.
To import an AVCHD files into Studio perform the following steps:
- Make sure you access your camcorder's DVD/HD drive. If you get an error that the OS does not support the type, then you didn't install the software for your camcorder properly. Please see the owner's manual that came with the camcorder for further instructions on how to do this.
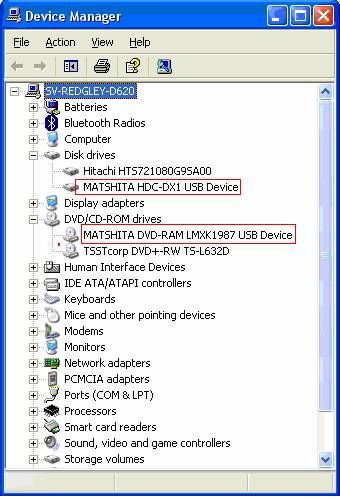
- To make sure the AVCHD camcorder is showing up in Windows XP go to the device manage by right clicking on the My Computer icon, then going to Properties, then Hardware, then Device manager. You should see a window like the image displayed below.
- The entry labeled Matshita HDC-DX1 USB device is the SD card reader on the camcorder.
- The Matshita DVD-RAM LMXK1087 USB device is the DVD drive of the camcorder.
- If your AVCHD camcorder has an internal hard drive, the drive would show under disk drives.

(Note: Vista users should not have to install this software since Vista has the drivers preloaded)
(Note: Your drive entries in the device manager will not match the entries in the FAQ unless you have a Panasonic HDC-DX1 AVCHD camcorder)
- Copy the files to your hard drive (You will want to copy the files to the hard drive because Studio needs to make a Scene file, and can not write this file to the camcorders DVD Drive. It is also a good idea to copy the files to your hard drive if the camcorder has a hard drive, due to the limited size of the drives built into camcorders)
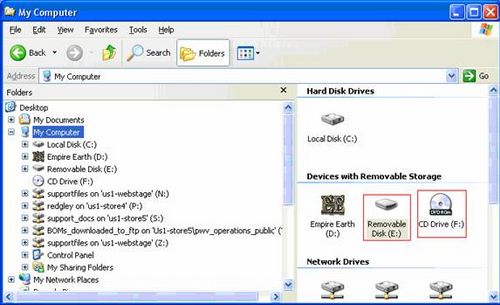
- To do this browse to the units drive. In the picture below, the Removable drive E: is the SD card reader listed above as HDC-DX1 USB device.
- CD-Rom Drive F: is the Camcorders DVD drive listed as DVD-RAM LMXK1087 USB device
- If your camcorder has a Hard drive, it would be listed as a Removable or Local disk.
- To find the video you have recorded on the camcorder double click on the drive that contains it, in this example, that would be drive F.

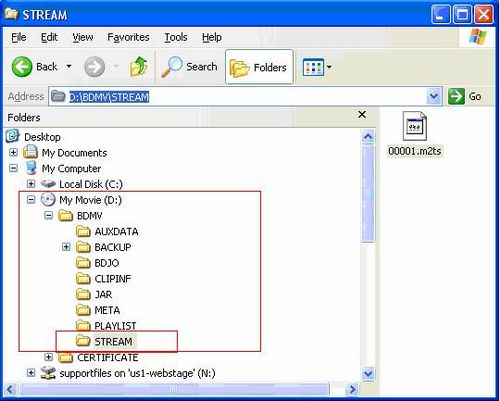
The image below is an example of what you will see when you double click on the drive. The video files you want to copy to your hard drive are contained in the "stream" folder. Copy the files from there, to a location on a local hard drive you will be able to find again.

- Use the File Import feature in Studio to import the files from the folder you chose on the hard drive.For more information on how to use the File import tool, see this Link
NOTE: You cannot use the DVD import since this is not a video DVD but a Blu-ray disc.
Was this article helpful?
Tell us how we can improve it.