If you are experiencing no audio while previewing video in the Edit mode of Studio, this FAQ should help to resolve this problem.
Step 1: Does the rest of the computer have audio?
Confirm that you are able to hear audio from other applications. There may be a general system problem causing the issue. If the system has no audio at all, please refer to the computer manufacturer to resolve the problem. If Studio is the only application that does not have audio, please continue.
Step 2: Volume levels in Studio
It is possible that the volume levels in Studio have been changed. Directly under the preview window is a volume slider and a mute button. Make sure that the audio is not muted and the volume is turned up.
The following image shows the preview window volume is maximized and is not muted:

The following image shows the preview window volume is lowered and is muted. Make sure it does not look like this:
It is also important to make sure that a Timeline audio track is not muted. On the right side of the timeline are some small buttons that can lock or mute the audio track. Make sure that audio track you are trying to preview is not muted. The following image shows an audio track that is muted.

Note: The following control is only available in Timeline view. You will not see this in Storyboard.

Make sure that the following volume controls are not turned down. You can access the controls in the following screenshot by going to Toolbox > Change Volume:
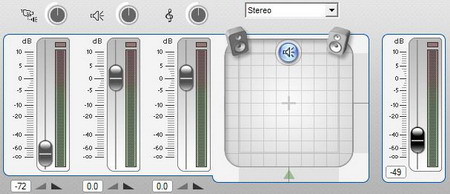
The above screenshot shows some of the volume levels have been lowered. The slider on the far right is the master volume slider. If this slider has been lowered audio will be lowered or gone completely.
You can also see that the volume for a clip or series of clips has been lowered in the Timeline. In the following image, note that the orange line has been lowered toward the bottom of the clip. This can be raised by clicking on the small orange node on the left side and dragging it upward.
Note: The following control is only available in Timeline view. You will not see this in Storyboard.

If you want the audio to be heard, this is how the clip should appear on the timeline (note that the orange line is raised up):

Step 3: Windows Audio Mixer
First, make sure Studio is running.
Next, open the soundcard audio mixer by right-clicking on it's icon in the windows system tray as shown below.

From the menu that opens, select "Open Volume Mixer"
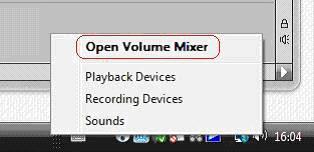
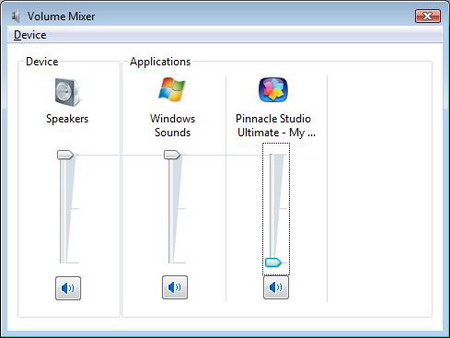
The Volume Mixer will now be displayed. The following screenshot shows that the volume for Pinnacle Studio Ultimate is too low. Increase the volume and try to preview the audio again.
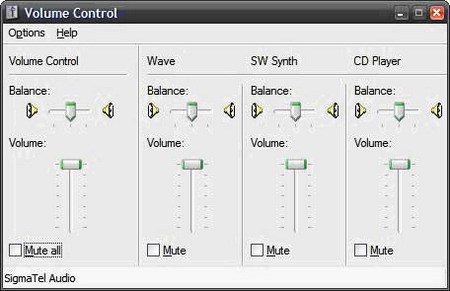
In Windows XP the process is similar, but you do not have separate audio levels for different applications, in XP audio is more of a "global" level setting in the mixer.
Open the sound mixer in the same way as mentioned above and it will look something like the following picture (it will vary a bit depending on the soundcard used). Make sure the options for "Volume Control" and "Wave" are set high enough, and do not have ticks in the "mute" boxes below the level sliders. If in doubt which level slider does what, just raise them all.
Step 4: Sound Card Drivers
Make sure that you have the latest drivers installed for your sound card from the manufacturer's website. You can determine what sound card you have by checking in Device Manager. You can get to Device Manager by right clicking on the My Computer icon and selecting Properties.
If you are using Windows XP you can select the Hardware tab then click the Device Manager button. If you are using Windows Vista, just select the Device Manager button directly from the System window. In Device Manager the sound card is displayed in the Sound, video and game controllers section. To determine the manufacturer and date of the video card driver, double click on the video card name. Now click the Driver tab and you will see all the driver information including Driver Provider and Driver Date.
Step 5: Other Media Playing Software
Please shut down other media playing software while trying to use Studio. It is possible that the other applications may have control of the sound card and have locked out Studio.
Step 6: Other Devices
Other devices like Bluetooth adapters and modems can have their own audio function integrated and can sometimes be used instead of the system soundcard.
Windows XP: Go to Start > Settings > Control Panel > Sounds & Audio devices > Audio
You see the following window.
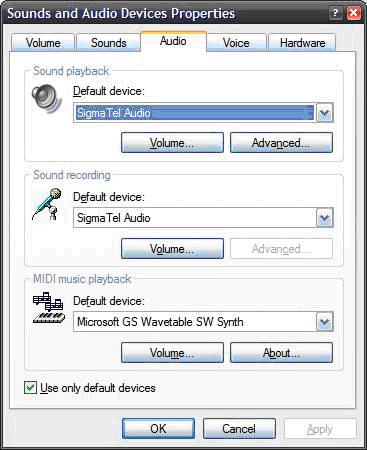
Make sure that the default Sound Playback device is set as the system sound card and not something else like a Bluetooth adapter. Tick the option in the bottom left corner of the screen called "Use only default devices". Now press "Apply" and "OK" at the bottom of the screen to close the settings window.
Windows Vista: Go to the Windows Start button > Control Panel > Sound
You see the following window, showing your system soundcard and any other audio devices in the system. (What you see exactly will vary from system to system)
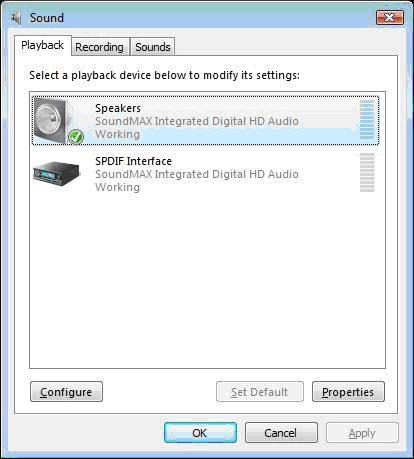
Your speakers / soundcard should be listed as the default device. You will see this indicated by the green "tick" icon. If another device is set as default device, simply select the correct device and press the "Set Default" button at the bottom of the window.
Press Apply and OK to close the settings window.
Note: If after making any of these changes you still have no audio in Studio, please restart the computer and then check again in Studio if you have audio or not.
Step 7: Multiple Sound Cards
If there are multiple sound cards in the system, please see the following FAQ:
No audio preview when multiple sound cards are installed.
Step 8: Check your audio connections
Check what ports you have your speakers connected to. Even if you hear audio in other programs this could be the cause. It is possible that they are connected to a port which will not direct audio to your speakers in Studio. To test this, connect headphones to the computer, if you hear audio through the headphones, but not through the speakers, it is possible that the speakers are connected in such a way that you cannot hear audio.
If you have stereo speakers make sure that they are connected to the Line Out port, which is generally green in color.
Was this article helpful?
Tell us how we can improve it.