This document will help to explain the capture settings in Studio.
In the capture mode, you will see one of two interfaces:
- The DV Camcorder Interface
- Analog Capture Interface
1. The DV Camcorder Interface:
This screenshot shows what is displayed when DV Camcorder is selected as the capture device.
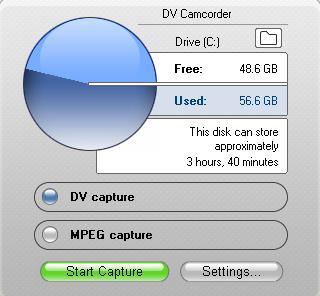
This interface gives you 4 options:
- You can click the File Folder icon in the upper-right to change the capture file location.
- You can change the file type you are going to capture to, either DV AVI or MPEG.
- You can click the Settings button to view more detail about the capture format.
- You can start the capture process by clicking the green Start Capture button.
DV Capture Format Settings
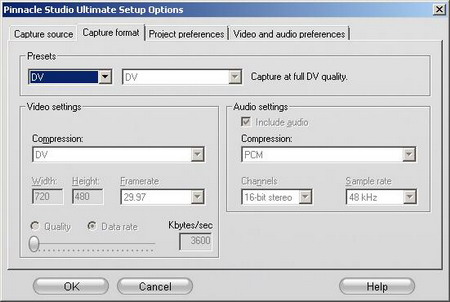
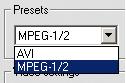
You can get to the Capture Format settings either by clicking the Settings button in the above screenshot or by going to Setup -> Capture Format. With DV Capture you can either select the DV or MPEG 1 / 2 Preset.
The following screenshot shows the capture settings with the DV Preset selected. The grayed out settings are not changeable, but they are active. This means that when you capture, these are the audio and video settings that will be used.
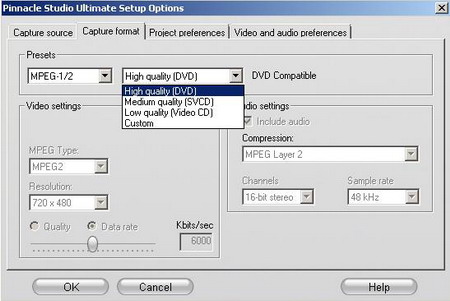
The following screenshot shows the capture settings with the MPEG 1 / 2 preset selected. With this preset you can choose from High, Medium, Low, and Custom presets. The audio and video settings will change depending on the quality preset selected. For example, in the screenshot below the High Quality (DVD) quality is selected. The corresponding data rate for that quality is 6000 Kbits/sec. This is the data rate that will be used for capturing the MPEG-2 file. In this case the video resolution is 720 x 480, this will change with different quality presets.

'
2. Analog Capture Interface
This screenshot shows what is displayed when an analog capture device is selected as the capture device.

This interface also gives you 4 options:
- You can click the File Folder icon in the upper-right to change the capture file location.
- You can change the capture quality using the 4 buttons in a horizontal row. In the above screenshot, the 3rd button from the left is selected. As you can see, when the 3rd button from the left is selected, the button is highlighted blue and "DVD Compatible" is displayed above it. The tool-tip shows "Set BEST capture quality." The 4 options are Good (Video CD), Better (SVCD Compatible), Best (DVD Compatible), and Custom.
- You can click the Settings button to view more detail about the capture format.
- You can start the capture process by clicking the green Start Capture button.
Analog Capture Format Settings
You can get to the Capture Format settings either by clicking the Settings button in the above screenshot or by going to Setup -> Capture Format. With Analog Capture, the available presets are determined by the capture hardware that you are using. Not all capture hardware can capture in every format. For example, with the 710 USB, AVI and MPEG 1 / 2 are the available presets, see below:
If you are using a different capture device, such as a DVC 170 you will have MPEG 1 / 2, MPEG-4, and DivX as the available capture presets.
The following screenshot shows the capture settings with the MPEG 1 / 2 preset selected with the 710 USB. With this preset you can choose from High, Medium, Low, and Custom presets. The audio and video settings will change depending on the quality preset selected. For example, in the screenshot below the High Quality (DVD) quality is selected. The corresponding data rate for that quality is 6000 Kbits/sec. This is the data rate that will be used for capturing the MPEG-2 file. In this case the video resolution is 720 x 480, this will change with different quality presets.
Was this article helpful?
Tell us how we can improve it.