Markers are a new feature introduced in Studio 12. Markers can be manually added in a project at any desired location to simplify navigation within a project. This can be especially useful with a project that is long or complex.
Controls relating to clip markers appear in the Movie Window title bar. In a new project, the only visible control in the group is the add marker button. The remaining controls appear only after the first marker has been added.

In a new project, the only visible clip marker control is the Add Marker button Œ. Clicking the button (or pressing your 'M' key) creates a marker at the position of the Timeline scrubber.

Once a marker has been added, the Add Marker button changes to Delete Marker, and the remaining controls appear �. Notice marker tab '01' at the scrubber position Ž.

As more markers are added, the Previous Marker and Next Marker buttons are enabled as needed �. Studio renumbers markers to keep them in sequence �, but leaves unchanged the name you provided, if any ‘.
A clip marker represents a particular frame in a particular clip. Even if that clip is moved around within the project, or trimmed, the anchor location remains unchanged. However, the marker itself can be moved, even to a different clip, by dragging it with the mouse.
The clip marker controls include:
· Add marker, Delete marker: In Timeline view, the add marker button is enabled whenever a clip is selected, provided there is not already a marker at the scrubber position. If a marker is present, the delete marker button appears instead.

· Previous marker, Next marker: These buttons allow you to step through the markers in your project. Unlike the add marker and delete marker buttons, these buttons are enabled in all Movie Window views, not just Timeline view.

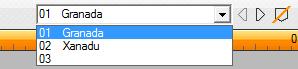
· Clip marker title: If there is a clip marker at the Timeline scrubber position, its number and name are displayed in this text field (otherwise the field is uneditable). The displayed marker number is assigned automatically, and cannot be changed, but the optional name can be modified at will.

· Clip marker title list: Click the arrow button at the right of the clip marker title to open this list, which shows the number and name of each marker in your project. Selecting a marker moves the Timeline scrubber to the corresponding position.
Note: Once you have more than a very few markers in your project, managing them becomes simpler if you give them meaningful names. However, names are optional and, as noted above, Studio helps out by automatically keeping the list in time order.
Was this article helpful?
Tell us how we can improve it.