

What you will learn:
- What is a RAW file?
- Loading the Camera RAW Lab and how to convert your RAW images to other types
- Navigating the Camera RAW Lab workspace
- Restoring RAW image data using Highlight Recovery
- Batch converting your RAW files to another format
What is a RAW file?
Most higher-end cameras allow you to shoot in an unprocessed RAW format, which contains more information than a standard image format like JPEG. RAW files allow you more detailed and subtle control over image elements, such as color temperature, exposure, hue and saturation, but require special tools for initial adjustments.
Opening the Camera RAW Lab
The Camera RAW Lab is a powerful yet easy-to-use tool that gives you complete control over your RAW images.
To open the Camera RAW Lab, do one of the following:
- Click the Manage tab, choose File menu Open, and select a RAW file.
- Click the Edit tab, and drag a RAW file from the Organizer palette to the image window.
Camera RAW Lab layout
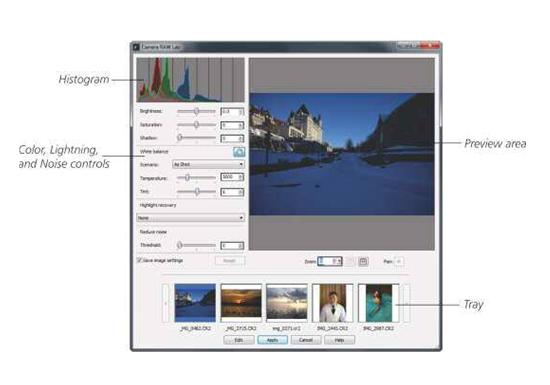
You can speed up your work by loading multiple RAW files in the tray or saving image settings for future use.
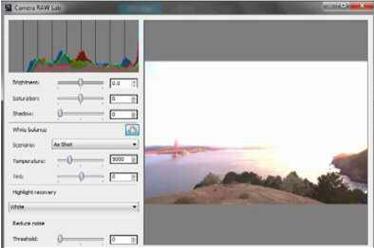
Restoring RAW image data
The Highlight Recovery feature lets you to restore detail in a RAW image that may have been lost due to overexposure, allowing you to save and restore an otherwise perfect shot.
By simply choosing an option from the Highlight Recovery drop-list, blown-out areas of the image are restored. If you compare the Histogram on the corrected image with the over exposed image, you’ll see how the balance of color tones has changed.
When you’ve made your adjustments and are satisfied with the results, click the Edit button to bring the image into PaintShop Pro for further editing.
Batch converting RAW Images
You can convert a large number of RAW images to a different file format, such as JPEG, in one step.
- Click the Manage tab.
- With your RAW files in the Organizer palette, select the images to convert.
- Right-click, and choose Convert RAW. The Batch Process dialog box opens.
- Choose the format you want to covert the RAW files to from the Type drop-list.
- Click the Browse button, and choose a folder in which the converted files will be saved. You can rename converted files by clicking the Modify button, choosing an option from theRename Options list, and clicking the Add button.
- Click the Start button to initiate the conversion.
If you found the Camera RAW Lab useful and want to do even more with your RAW images, check out Corel AfterShot Pro, a fast, flexible photo workflow solution that combines robust photo management, advanced non-destructive adjustments and complete RAW processing.
If you enjoyed this tutorial, be sure to check out the other tutorials that are available in the Discovery Center. If you have any ideas for additional tutorials or projects that you would like to see in the future, email Discovery.Center@corel.com.
Was this article helpful?
Tell us how we can improve it.