

What you will learn:
- Resizing images
- Blending images using the Eraser tool
- Merging layers
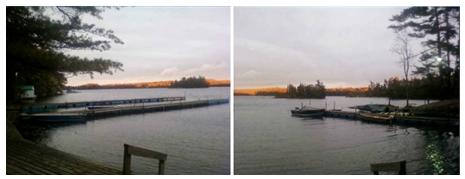
Panoramic images are a great way to show off a wide, deep landscape simply by merging multiple images. You’ll need two shots of the same scene taken from different angles. For best results, use a tripod when you are capturing the images. For this example, we’ll use two pictures that were taken from a dock overlooking a lake. Keep in mind that you’re not limited to two shots — you can use as many as you want.
1. Open the images, select their thumbnails in the Organizer palette, and click the Edit tab.
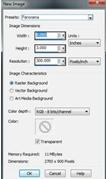
2. Now create the canvas for the panorama by selecting File menu > New
In the New Image dialog box, you can set the canvas dimensions in the Width and Height controls. You can also use a preset image size designed specifically for panoramas by choosing Panorama from the Preset drop-list. Then, click OK. This gives us a 9 in. (W) by 3 in. (H) background.
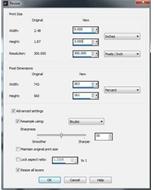
3. Next, resize the photos so that they’re the same size as the canvas by selecting Image menu > Resize. In the Resize Image dialog box, unmark the Lock Aspect Ratio check box, and set width to 9 inches and the height to 3 inches.
4. Now, add the two photos to the canvas. To make this easier, tile the images by selecting Window menu >Tile Vertically. Then, right-click the first image, and choose Copy. Go to the background, right-click, and choose Paste > Paste as New Layer. Do the same for the second image. Now, you can close both photos and work exclusively in the canvas image.
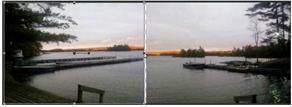
5. Next, resize the layers by dragging the side handles on both images to the middle of the background until they just overlap. You might also have to drag a top or bottom handle to get elements in the two shots to line up
6. If there’s a noticeable line between the photos, you can blend the two image areas by choosing the Erasertool on the Tools toolbar, adjusting the setting on the Tools Options palette. Start off by lowering the Opacity,Density, and Hardness, and adjust accordingly. It’s a good idea to erase slowly and a little bit at a time, so you don’t lose all your work if you have to undo a mistake.
You can make the panorama look even more seamless by adjusting the brightness and contrast. First select one of the images on the Layers palette. Then select Adjust menu > Brightness and Contrast >Brightness/Contrast, and adjust the settings. You can also match the backlighting by selecting Adjust menu >Backfill Lighting, and adjusting the settings.
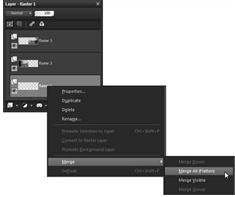
7. Merge all the layers to finish off the panorama by right-clicking any layer in the Layers palette, and choosingMerge, Merge All (Flatten).
Lastly, Save the image, and your panorama is complete.
If you have enjoyed this tutorial, be sure to check out the other tutorials that are available at the Discovery Center. If you have any ideas for tutorials or projects that you would like to see in the future, please leave us some Feedback.
Was this article helpful?
Tell us how we can improve it.