Welcome to this tutorial on the basics of saving files in Corel PaintShop Pro. PaintShop Pro has dozens of different options when it comes to saving your work. In this demonstration we will go over some of the most common export types and what their advantages are.
In this tutorial you will learn:
- How to resize a file to send via e-mail
- How to optimize a file while saving
- How to save an image with a transparent background
Resizing a Photo
When you open an image in PaintShop Pro or many other photo applications, what you see depends on whether that program is set up to automatically zoom out so as to display the entire image.
In PaintShop Pro, when you open an image you will notice that on the tab there is a number followed by a % sign beside the title of the picture. This is the % for how zoomed in you are.

To get an idea of how large the image really is and how it may show up in someone's e-mail, set the Zoom to 100%.
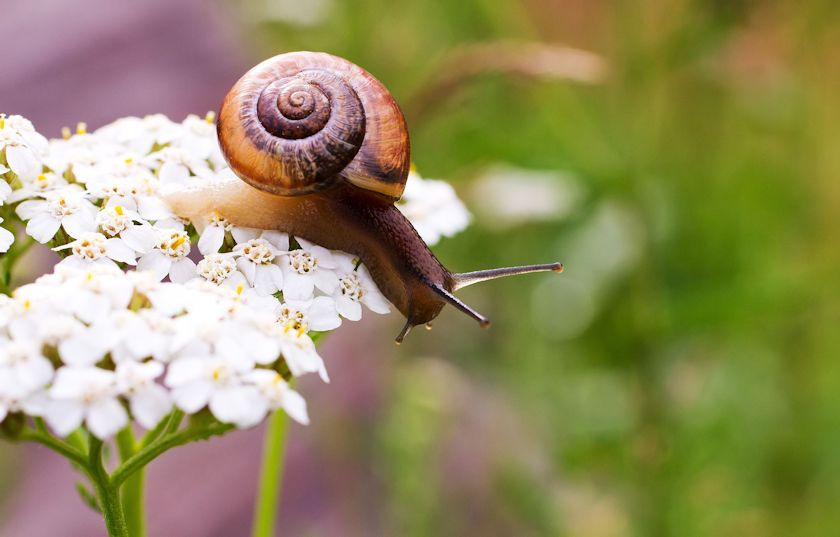
As you can see, the image is very large. Higher quality images are larger than lower quality ones, but most photos taken with digital cameras produce images that will appear something like this example. If a picture like this was sent to a person who doesn't have a program that can automatically zoom out, it may be like putting a puzzle together for them to even see the whole thing!
Luckily, resizing images to send via e-mail is very easy.
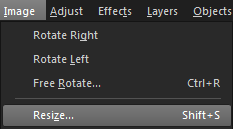
1. Go to the Image menu and select Resize.
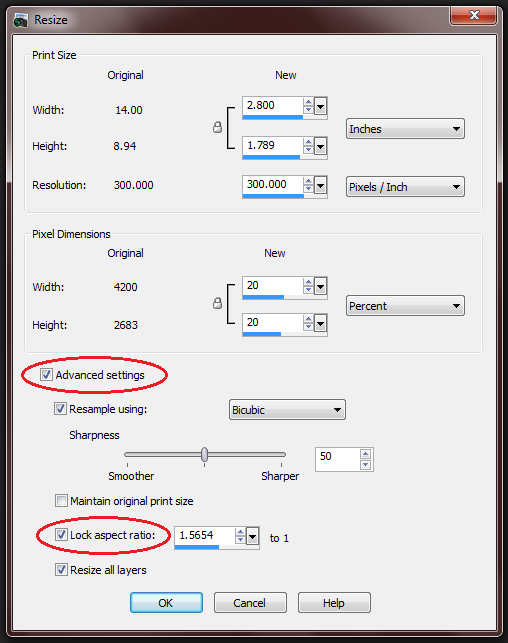
2. In the Pixel Dimensions settings make sure that Percent is selected from the drop-down list.
3. Put a check mark in Advanced Settings and make sure that Lock Aspect Ratio is checked. If it is, you can un-check Advanced Settings.
4. Enter a number in the Width Percent field and it will automatically copy that number below for the height. A rule of thumb is to zoom out in PaintShop Pro until the image appears how you would like it to when you send it by email; in this case it looked just right at 20%, so all we have to do is enter 20 as the percentage to resize and click OK.
5. Go to File > Save As and give the image a new name so that you know that it's the smaller version.
Optimizing an Image
If you're creating a web site where you will be displaying multiple photos, simply making the dimensions smaller may not be enough to have the page load quickly. In this case you will need to Optimize your images.
1. To optimize a Jpeg image in PaintShop Pro, open the image and then select File > Save As.
2. Choose Jpeg from the drop-down list if it is not already selected.
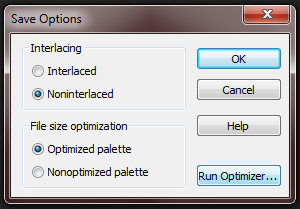
3. Click on the Options button and the Save Options window will pop up.
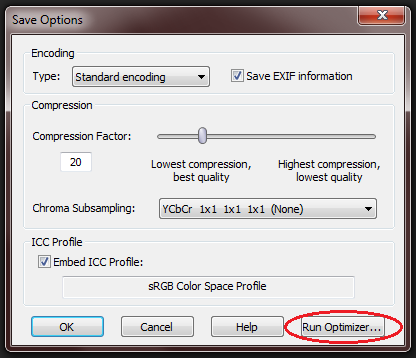
4. Click on Run Optimizer and the Jpeg Optimizer window will appear.
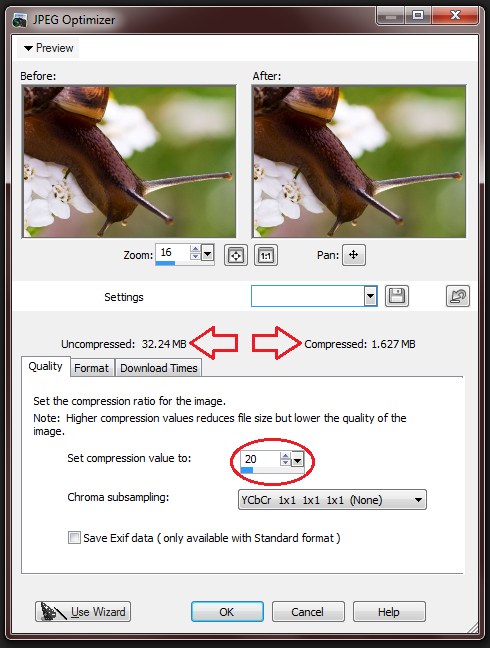
5. If you do not see Before and After images at the top of the window, click on Preview in the upper left corner and then they will appear. This will allow you to see the quality of the final image. You can also zoom in and out of these images and pan to get a closer look at any particular location on the picture.
As you can see, the uncompressed version is significantly larger than the compressed version, even though there is little visible change in the quality between the two images.
The default compression value is set to 20 but you can increase it to as much as 99 and to as little as 1. Even a compression of 1 makes a huge change in the file size. However, you should note that if you make the compression very high you will start to notice poor quality.
In the Format tab you will be able to preview how the image will load.
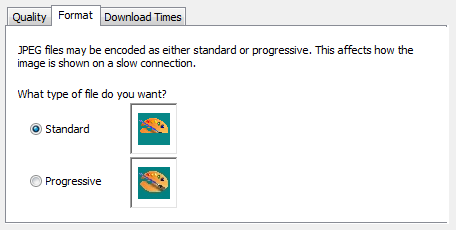
Standard is set by default and you will probably recognise the preview as the way in which most images load. If you have ever had a slow internet service in the past, you will likely recognise this top-down loading as the way most images load.
Progressive is an alternative method of loading where the entire image is displayed but gets better and better in quality as it loads; if you've never seen progressive encoding on images, you may recognise it as the way satellite maps often load as you zoom into locations.
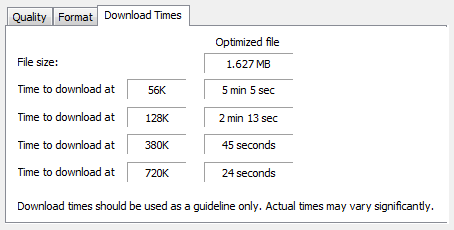
The Download Times tab will show you, roughly, how long it should take for the image to load based on the internet connection being used. The more optimized the image, the quicker the download time.
6. When you have chosen a compression, click OK and once again save the image with a new name so that you know that it is the copy that has been optimized for the internet. Always keep your originals as those are the versions you will want to use for printing purposes.
Optimizing an Image
Often people have an image that isn't a rectangle and they want to save it with a transparent background. There are two formats that allow saving with transparency, GIF and PNG. Since PNG files are better quality and the more popular choice in recent years, we'll use that format in this example.
With your image open you will see a transparent background appear as grey and white checkerboard. If you do not see the checkerboard the chances are very high that the background is not transparent.

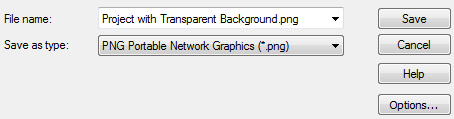
1. Go to File > Save As and select PNG as the Save As type.
2. Click on Options and then Run Optimizer.
3. Make sure that you have zoomed out enough on the preview image to see the checkerboard background.
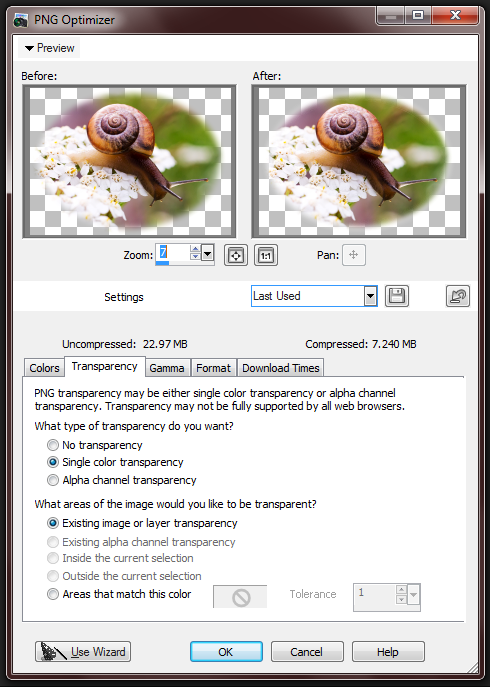
4. Click on the Transparency tab and choose Single Color Transparency.
5. Select Existing image or layer transparency and click OK.
6. Name the file and click Save to continue.
Now the image will be saved with a transparent background

If you have enjoyed this tutorial, be sure to check out the other tutorials that are available in the Discovery Center. If you have any ideas for tutorials or projects that you would like to see in the future, please leave us some Feedback.
Was this article helpful?
Tell us how we can improve it.