

The HDR Exposure Merge feature lets you combine photos taken with different exposure settings to create perfectly exposed images. Ideal for high-contrast scenes with backlighting, such as sunsets and interior window shots, HDR Exposure Merge' lets you bring out color and detail in the foreground, midground, and background areas.
In this tutorial, you will learn:
- What HDR Exposure Merge is.
- How to adjust HDR Exposure Merge.
- How to use HDR Exposure Merge.
What is HDR Exposure Merge?
The HDR Exposure Merge feature lets you combine photos taken with different exposure settings to create perfectly exposed images. Ideal for high-contrast backlit scenes, such as sunsets and interior window shots, HDR Exposure Mergelets you bring out color and detail in the foreground, midground, and background areas.
Accessing HDR Exposure Merge
You can access the HDR Exposure Merge feature by doing any of the following:
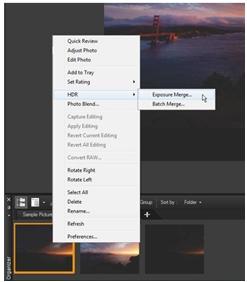
- Right-click a photo in the Organizer Palette, and choose HDR Exposure Merge.
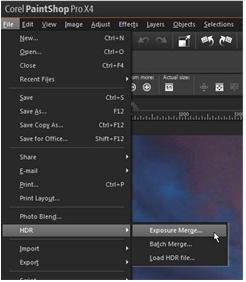
- Click Edit menu > HDR > Exposure Merge.
HDR Exposure Merge has 3 steps, each with its own window: Step 1: Merge, Step 2: HDR Adjustments, and Step 3: Fine-Tune.
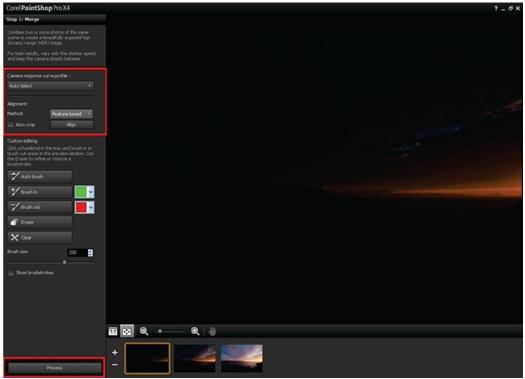
Step 1: Merge
1. Choose a profile from the Camera response curve profile drop-list to apply a curve adjustment to the image, based on the known characteristics of the sensor in your camera. If you are not sure what to choose, select "Auto Select". If theEV interval slider displays, set the exposure value that you used between photos.
2. In the Alignment area, choose an alignment type from the Method drop-list. Feature-based detects features in the photos; Edge-based detects edges within the photos. If you want to crop any edges that don't overlap, mark the Auto cropcheck box.
3. Click Align. You can also use the Custom Editing tools to choose image areas you want to keep (Brush in) or remove (Brush out). Often, custom editing is applied to remove 'ghosting' - the semitransparent effect caused by merging photos that captured moving objects.
4. Click Process to go to Step 2: HDR Adjustments.
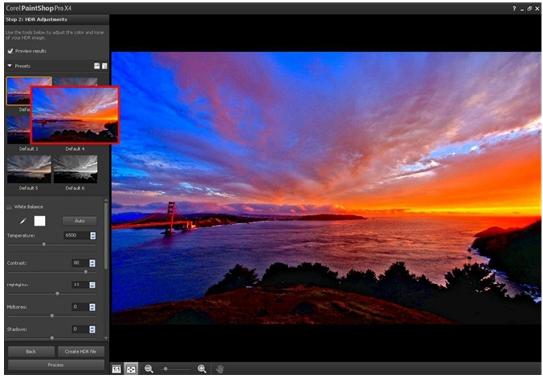
Step 2: HDR Adjustments
1. In the Presets area, click a preset thumbnail.
2. Mark the White Balance check box, and click Auto or click the Dropper tool and click the image to set the white point.
3. Drag the Temperature slider to warm or cool the colors in the image.
4. Drag Contrast, Highlights, Midtones, and Shadows sliders to adjust the overall tone and contrast.
5. Drag the Vibrancy slider to saturate or desaturate the colors.
6. From the Detail drop-list, choose Natural detail or Creative detail, and drag the respective sliders to adjust the amount of local detail. You can save your HDR image for further editing by clicking Create HDR file, navigating to the folder you want, typing a file name, and clicking Save.
7. Click Process to go to Step 3: Fine-Tune.
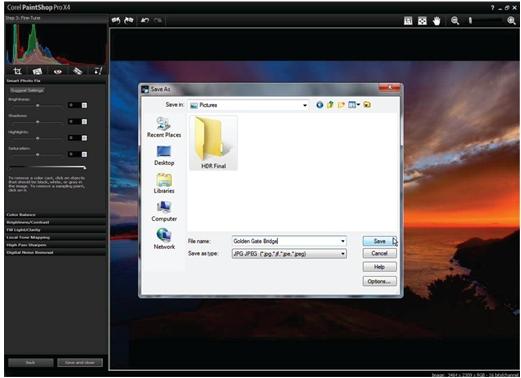
Step 3: Fine-Tune
1. Apply any of the following tools or adjustment options to adjust the final image:
- Digital Noise Removal is a great tool for cleaning up noise that can result from merging photos.
- High Pass Sharpen can help reduce blurred areas that may result from movement between photos.
- Smart Photo Fix and Color Balance let you tweak the colors.
- To brighten the entire image, try adjusting Brightness/Contrast. To brighten only the dark areas, try Fill Light/Clarity.
- Local Tone Mapping and Fill Light/Clarity can be used to further enhance details in the image.
2. Click Save and close.
3. In the Save As dialog box, navigate to the folder that you want, type a file name, and choose a file type from the Save As type drop-list.
The file is saved to a standard, 16-bit file and the Exposure Merge window closes.
If you have enjoyed this tutorial, be sure to check out the other tutorials that are available in the Discovery Center. If you have any ideas for tutorials or projects that you would like to see in the future, please leave us some Feedback."
Was this article helpful?
Tell us how we can improve it.