Remind your dad he's your number #1 this year with our tutorial on making a Father’s Day card in Corel PaintShop Pro.
Since June is right around the corner, I'm going to go into PaintShop Pro to show you how to create a greeting card that you can use for Father's Day. This is a really fun project and quite easy to do, so let’s get started.
The first thing you’re going to need to do is launch PaintShop Pro in the Edit workspace and then, from the File menu, select New.
Now, most print shops that do personalized greeting cards have the option to upload your own image, which is very useful, so you’re going to want to make sure that the card you create here has the correct dimensions. Since the size that most of these shops use is 5X7 inches for the cover, let’s enter those numbers into the Image Dimensions in this window.
Cards can be displayed either in landscape or portrait, so keep that in mind when you’re entering this information. If you want the card to stand upright, like an open book, enter in 5 inches for the Width and 7 inches for the Height. In this example I’m going to make the style of card that stands horizontally
so I’ll enter 7 inches for the Width and 5 inches for the Height.
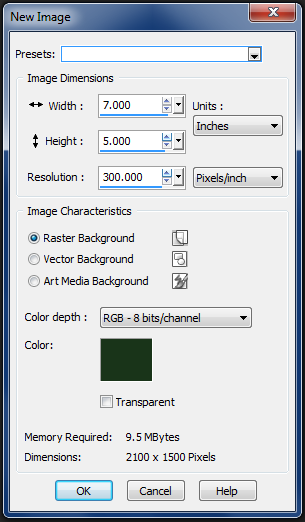
You may also want a background color for this card, so I’ll just un-check Transparent and that will activate the Color option. One click of the eyedropper tool on the white square and the Material Properties window will pop up with options to create a custom background.
In this example I have selected a nice dark forest green – this is my dad’s favorite color, so you can choose whatever color works best for you. Just click OK, and OK again and here we have this lovely background to work with.
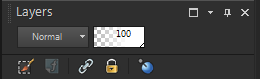
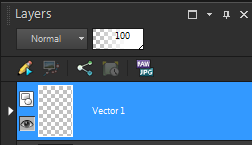
Since the rest of this video is going to use layers you’re definitely going to want to see those layers. So if you don’t see this area over here with these options it probably means you closed your layers palette at some point, and all you have to do to view it is hit the F8 key on your keyboard.
So now we have the background, let’s add a little something to it. Here’s a beautiful image, this is actually a photo that was converted into a painting using another great Corel product, Painter and then saved as a Jpeg so it will open in PaintShop Pro just like any other photo.

Alright, so now we have a picture in our Edit work space. I want to add that image to my project, and that is very simple. I’ll just use the key combination Ctrl + A to select all, Ctrl + C to copy, and then if I go back to my project here, from the edit menu, I can select Paste As New Layerand that’s going to create a layer just for the photo.

Using layers is definitely a habit you’ll want to get into if you’re working on projects in PaintShop Pro. It'll transform the way you use different elements such as backgrounds, photos, text, and so on.
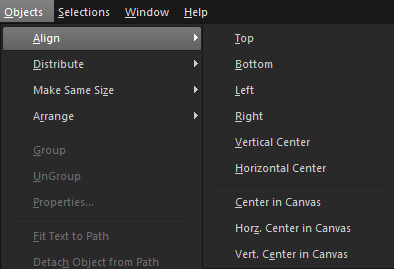
Next, re-size the image so that it fits on the background and leaves a nice border around the edges. If you’re not sure if the picture is centered properly, go to Objects, Align, and there’s a variety of options to choose from. For this project I’ll choose Center Horizontally because I do want to leave some room at the bottom here for the text.
Now to add the greeting.
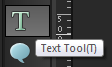
This'll only take a few minutes. Navigate over to the Text tool, click, and you’ll get a cursor that looks like a letter T. Click on the project and take a look over on the right. You’ll see that a new Vector layer has been added to the layers palette.
This is going to happen any time you add Text or Shapes to a project in PaintShop Pro and that’s because these are vector objects. If you want to learn more about the difference between vector and raster images there are literally hundreds of useful web sites and articles that cover that topic, but to really
simplify it for this video: photos are raster - graphics and text is vector... and that’s really all you need to know when you’re working with layers in PaintShop Pro.
Next thing you’re going to want to make sure you see on your work space in the Materials palette. This lets you choose colors. Again, much like the layers palette, it’s very simple to bring this up if it’s not on your screen, just hit the F6 key on your keyboard to view or hide the Materials.
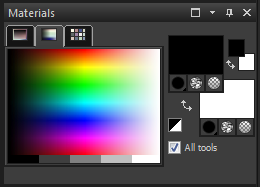
Take a look at the Materials, you’ll see that there’s two overlapping color swatches on the left. The top color is the outline, the bottom color is thefill. So in this case, if I want to make my text gold with a black outline, I’ll click here and select black and click OK. Now, click up here and change that to a nice deep gold color.
Let's lay out this text. If you’re not sure exactly how large to make the text or what font to use, you can just type the text first and make the alterations after. This way, you can see them take place on the screen.
Let’s highlight this and choose a font, I’ll make it 36 point for now, increase the stroke width to 4 so there’s a nice bold outline. If you’re not sure about the exact font size, you can always just drag the corner handles out and this will manually re-size the text.

That’s all there is to it!
Now that you're done the card, you’ll want to make sure you save one version of this in the PaintShop Pro format so that all these layers remain intact – that way you can change them later if you need to.

So go to File, Save AS and select PSPImage as the file type.
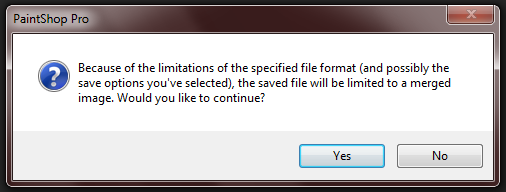
Since most print shops and store web sites only use Jpeg images, you’re definitely going to want a version saved in that format so now that your project is backed up, go to File, Save As and select Jpeg.
Was this article helpful?
Tell us how we can improve it.