Spring Cleaning in WordPerfect
by Laura Acklen
www.wpwriter.com
The flowers are blooming, the birds are singing - it's springtime! Seeing everything burst into bloom is a great motivator to do a little computer "spring cleaning". It's a great time to clear out the old and get ready for the new. In this case, it's time to look at ways to improve the managing of files on your computer.
Are you storing everything in the My Documents folder? Did you know that you can create links to frequently-used files and folders so you can select them from a special list? Do you know how to use the Timed Backup feature to prevent you from losing important data if your system crashes? Do you install the latest WordPerfect® Office service packs?
Moving Files out of the My Documents Folder
When you install WordPerfect®, the default save location is the Windows® My Documents folder, which is buried in the Documents and Settings folders for each user. It is supposed to make things easier for you to save documents because a storage area is automatically created. By default, WordPerfect saves your files to this folder.
Not everyone is a fan of this system, myself included. I prefer to develop my own filing system and tailor it to a specific project or client. While I am free to do this under the My Documents folder, it leads to exceedingly long path names and a lot of unnecessary navigating through folders. If you recall, the My Documents folder is 3 levels deep (i.e. \my documents and settings\laura\my documents). Therefore, any folders created within the My Documents folder will be 4 levels deep and beyond.
What is the solution? You can create a filing system, in the location of your choosing, and then tell WordPerfect where to save your files. It's a simple thing to do once you've decided how you want to organize your files. To begin, look at how you organize your paper documents. Most of us have our files organized by client or project. Within a specific project folder, you might create several subfolders to manage the different aspects of the project. It's the same system, except you are creating folders and subfolders on a disk.
Don't worry about making all of the file management decisions now. All you need is a good start-you can create additional folders as they are needed. In addition, you can set up your own filing system and tell Quattro Pro® and Presentations™ where you want to store your files by default. WordPerfect, as the most popular application in the suite, is used for this example.
Creating folders
If you never created a folder from within WordPerfect, let me assure you that it is a very simple process. Choose File > Open to display the Open File dialog box. Now, navigate to the location where you want to store your documents. For example, you might want to create a folder called Work on your local hard drive. If someone has already created an area for you on a network, go ahead and navigate to that area.
Right-click in the file window to open the shortcut menu. Move the mouse pointer down through the shortcut menu to highlight the New option (see Figure 1).
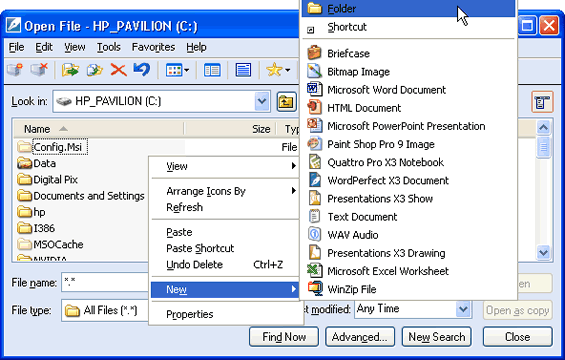
Using options on the shortcut menu is the fastest way to create folders and subfolders.
Choose Folder. A new folder appears at the bottom of the file list with the text "New Folder" selected (see Figure 2). Simply type a name for the folder and press Enter. Now, to add a subfolder in this folder, double-click the new folder to open it. Right-click in the (blank) file window, choose New > Folder. And so on and so forth.
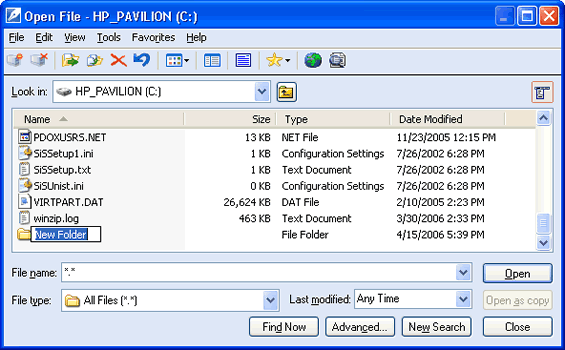
The default name "New Folder" can be quickly replaced with the name of your choosing.
Note: You can perform file management tasks in any file management dialog box in WordPerfect; the Open File dialog box is used in this example.
Renaming folders
You may find that the filing system that you devise when you first get started may not make sense to you later. For example, you may find that referring to clients by name is much easier than referring to them by number. If this happens, you can easily rename the folders. The contents of the folder are not affected by the name change.
In a file management dialog box, select the folder name. Choose File > Rename, or click the folder name again. This places an outline around the folder name and the name is selected (see Figure 3). Type a new name, then press Enter.
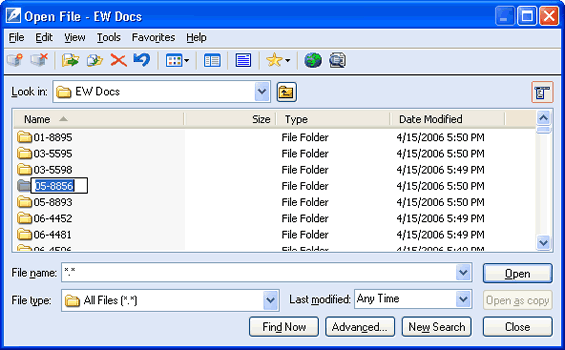
When the folder name is selected, you can type a replacement name.
Moving files
Once you've created a few folders, you're ready to start moving your files out of the My Documents folder. Navigate to the My Documents folder and select the files that you want to move. In the file management dialog box, choose Edit > Move. Navigate to the new folder, then choose Edit > Paste.
Changing the default save folder
After you've moved your files into the new set of folders, you are ready to tell WordPerfect where you want to save your files by default. It is best to choose the location that you use the most. You are always free to navigate to a different folder before you save a file. In WordPerfect, choose Tools > Settings > Files to display the Document page of the Files Settings dialog box (see Figure 4).
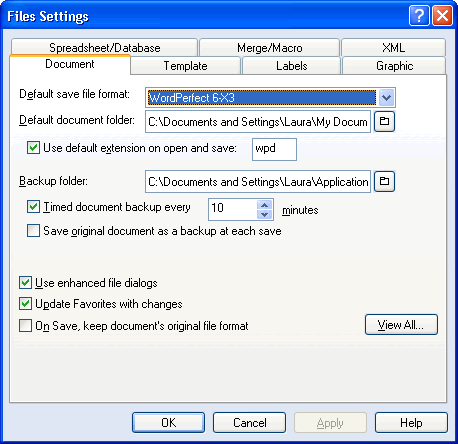
The timed backup interval can be adjusted in the Document page of the Files Settings dialog box.
Click the Browse button next to the Default document folder text box to display the Select Folder dialog box. Use this dialog box to navigate to the folder where you want to save your documents by default. This might be the folder for a client that you work with the most, or your current project. Select the folder, then choose Select. Choose OK > Close. The next time you start WordPerfect, your default save folder will be set to the new folder.
Note: If you want to avoid changing the default save folder every time you work with a different client/project, select a more generic folder, perhaps one closer to the top of the list. Doing so will speed up the process of drilling down to the specific client or project folder.
Creating Favorites
It took a while, but I finally "got it". During a recent project, I found myself navigating back and forth between file folders with financial files and file folders with marketing materials. It was a laborious process and one that I repeated many times a day. Finally, I decided to set up Favorites for these file folders. A Favorite is a link that you create to a frequently-used file, folder, or drive. In other words, it's a shortcut to the files and folders you access the most.
To add a folder to the Favorites list, open a file management dialog box. Select the folder that you access often, then click the Favorites button on the toolbar (the gold star). Choose Add Favorites Folder. Repeat this process for the other folders that you use often.
To add a file to the Favorites list, open a file management dialog box. Select the file, click the Favorites button, then choose Add Favorites Item.
Now then, when you are ready to use the Favorites list, click the Favorites button and choose Go To Favorites. The file list changes to the Favorites list (see Figure 5). Double-click one of the Favorites to switch to that folder, or open that document. To return to the regular file list, click the Favorites button and choose Return From Favorites.

The Favorites list is a Windows feature so you may see entries in the list that you added from other Windows applications.
Using Timed Backup
When I'm working on a critically important document, I like having a safety net if something should happen to my computer. WordPerfect's safety net is called the Timed Document Backup feature. If something causes your system to lock up, or if you are unable to exit WordPerfect correctly, you will be able to open the backup file and recover most of your work, within a specified interval. For example, if you set the timed backup for 5 minutes, the most you'll lose is 5 minutes of work.
This is an important point because if you work on lengthy documents, you may not want to set the backup interval for anything less than 5 minutes. When WordPerfect saves a backup copy of the document, you may experience a slight delay. The longer the document, the longer the delay. You can adjust the interval as often as you like, depending on the type of project you are working on.
To adjust the timed document backup interval, choose Tools > Settings > Files to display the Document tab of the Files Settings dialog box (refer back to Figure 4). Enable the Timed document backup every checkbox, and type a value in the minutes box.
Note that when you exit WordPerfect correctly, the backup file will be deleted. The purpose of the Timed Document Backup feature is to protect you in the event of a lockup. If you accidentally save a blank document over an existing document, there will not be a backup file to fall back on. The same goes for erroneous changes. If you accidentally save a modified document on top of an original, the only way to bring the original document back is to manually reverse the changes you made.
Tip: When you are working on important documents, get into the habit of saving the document whenever you stop typing. Press Ctrl+S or Alt+F, S , whichever you prefer, to quickly save your changes to disk. It only takes a second and it provides an extra measure of security.
Updating Your Copy of WordPerfect
Is your copy of WordPerfect up-to-date? Corel® regularly releases service packs and patches to resolve issues and improve features. This message on WordPerfect Universe explains how to check your WordPerfect version and has links to the necessary service packs and patches. This thread explains how to preserve your customization when you upgrade your WordPerfect installation.
Are you considering upgrading to WordPerfect Office X3? This upgrade matrix (in PDF format) details the differences between WordPerfect Office versions 8, 9, 10, 11, 12 and X3. The WordPerfect Office X3 Reviewer's Guide (also in PDF format) will answer any questions you have about the latest version of WordPerfect. And as always, you can find lots of helpful links to third-party resource materials, template packs, lists of compatible software, information on the different editions of WordPerfect Office X3 (i.e. Standard, Professional, Student & Teacher, Home) at wordperfect.com.
If you would like to take a closer look, download a trial version of WordPerfect Office X3 that you can try free of charge, for 30 days. Download the trial version.
Was this article helpful?
Tell us how we can improve it.