In WordPerfect® 11, you can create and print envelopes of different sizes. You can add return addresses and mailing addresses to your envelopes by typing them or, to save time, by inserting them directly from your address book.
To print an envelope
1. Click Format, Envelope.
WordPerfect may prompt you to personalize your template by entering information about the address book you want to use.
2. In the Return address area, type your name and address in the From box.
3. In the To box, type the mailing address. If you have the address in your address book, click the Address book button  and insert the address.
4. In the Options area, choose the standard envelope size you want from the Default envelope list box.
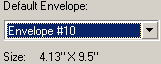
The envelope size you choose is displayed below the Default envelope list box.
5. Click Create new.
The envelope displays in the document window.
6. Click File, Print.
7. On the Main tab of the Print dialog box, click Properties, and make sure the printer tray you want is set as the paper source.
If you do not have an envelope feeder, choose a manual feed option.
8. Click Print.
Was this article helpful?
Tell us how we can improve it.