Writing a Book with WordPerfect
By Laura Acklen
www.wpwriter.com
If you've always wanted to write a book, and have a copy of WordPerfect®, you already have everything you need to get started. Just add your ideas and your unique sense of creativity. While you may not realize it, you have in your possession a collection of the most powerful tools on the market to help keep long, complex documents organized, easy to navigate, and easy to read.
Researching Your Topic with WordPerfect® Lightning™
Whether you're researching a potential topic, or merely organizing your thoughts, the recently unveiled Corel® WordPerfect® Lightning™ can help you keep everything in one place. Simply put, WordPerfect Lightning makes it easier than ever to capture, use, and reuse ideas, information and images.
It's the perfect tool for writers because you can start with a skeleton of ideas and then flesh them out as you continue your research. Each idea or thread in a story can be assigned to a folder with the underlying material stored within that folder. Elements that are likely to be used multiple times in your manuscript can be quickly located and inserted where appropriate.
Are you collaborating with someone else on your book project? You'll be thrilled to learn that WordPerfect Lightning comes with 200MB of free online storage, plus shared calendaring, contacts, and e-mail functionality. Files, notes, and Web clippings associated with WordPerfect Lightning are available to view and share, so it's a breeze to exchange information.
While you can add light formatting to notes in Lightning, you'll want to send your notes to WordPerfect for the heavy stuff. When you're finished conducting your research on a topic or chapter, you can send your Lightning notes to WordPerfect, where they are assembled into a document.
And, here's the best part — WordPerfect Lightning is free. Seriously.
Go to wordperfect.com/lightning for more information and a link to a tiny, 20MB downloadable file. The March 2007 issue of the WordPerfect® Expert is dedicated to this exciting new application so be sure to take a look.
Adding Page Numbers
Okay, you've moved your research notes over from Lightning and you're ready to start putting your manuscript together. One of the very first things you should do is to number your pages. It's simple — just turn on page numbering and let WordPerfect take care of the rest. As you add to the document, WordPerfect automatically increments the page numbers and if you decide to pare things down a bit, the page numbers are adjusted to accommodate the sections that you eliminate.
To start numbering your pages, choose Format > Page > Numbering to open the Select Page Numbering Format dialog box (see Figure 1). The option to insert a page number at the bottom of every page is selected by default (see the Position list box), so you simply have to click OK.
Alternatively, you can choose a different position from the Position list box, and then click OK.
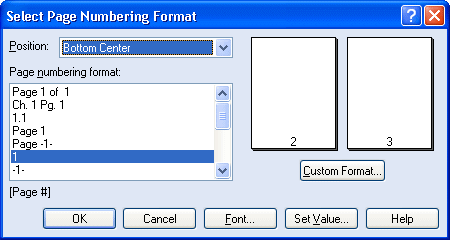
The most popular page number position, bottom center, is selected by default in the Page Numbering dialog box.
In addition to the convenience of page numbering, you can also create headers or footers with information that you want to appear on every page. For example, you can create a header that appears at the top of every page with the chapter name and number. This will help your reader keep track of where they are in the book.
Creating a Table of Contents
A table of contents is a routine addition to a long document, which makes the document easier to navigate. The steps to create a table of contents are simple: you mark the text, define the table of contents, then generate the table of contents. Actually, you can reduce it to 2 steps by using WordPerfect's heading styles to mark the text.
WordPerfect has a collection of built-in styles that you can take advantage of when you don't have the time or inclination to create your own. The heading styles can be used to quickly format headings and subheadings in a larger, boldface font, with the table of contents marking already in place. All you have to do then is define the table of contents and generate.
To apply WordPerfect's heading styles, select the heading, then choose Format > Paragraph > Indent to open the Styles dialog box. Select Heading 1 from the list of Available styles to see a preview of how the text will look with that style applied (see Figure 2).
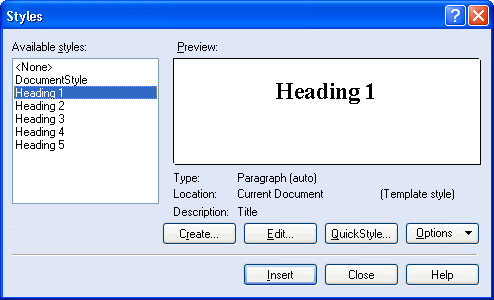
The built-in heading styles are a quick way to format text and mark it for a table of contents.
Heading 1 marks the text for table of contents level 1; Heading 2 marks the text as level 2, and so on. When you are ready, select the heading style for the selected heading, then click OK.
If you prefer more flexibility, and have a little time, it's super easy to mark text for a table of contents. All you do is select the text and pick the table of contents level. The trick is to make sure you aren't accidentally selecting formatting codes, like bold or italics, otherwise the text will show up in bold or italics in the table of contents. It's a good idea to turn on Reveal Codes (press Alt+F3) so you can see exactly what you are selecting.
With the text selected, choose Tools > Reference > Table of Contents to open the Reference Tools dialog box. Click the Mark 1button to mark the text for level 1, Mark 2 to mark the text for level 2, and so on. Continue selecting text in the document and marking it for the appropriate level.
If the Reference Tools dialog box is displayed across the bottom of the screen, you can click and drag the title bar to release it into a floating palette (see Figure 3) that you can move out of your way.
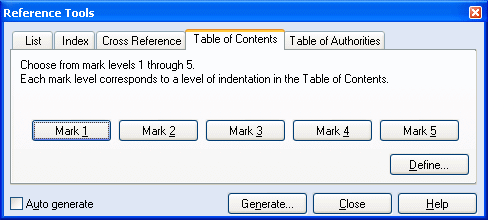
The Reference Tools dialog box can be anchored to the top or bottom of the screen, or released into a floating palette.
Now, whether you used the built-in heading styles, or marked the text yourself, the next step is to define the table of contents. First, create a page for the table and center the title "Table of Contents" at the top of the page. Insert a couple of blank lines, then choose Tools > Reference > Table of Contents. Click the Define button to open the Define Table of Contents dialog box. The simplest method is just to select the number of levels you want in the Number of Levels drop-down list, then click OK. Otherwise, you can customize the formatting for each level of the table.
When you click OK, WordPerfect inserts the dummy text. If the placement looks good, choose Tools > Reference > Generate, then click OK to build the table.
Creating an Index
Not every book will need an index so it's your call if you want to include one or not. It's fairly straightforward to create one — you select the text, and then click one of the buttons in the Reference Tools dialog box to mark the text for the index. Indexes have two levels, so you can mark an entry as a heading or as a subheading (underneath a heading).
Every instance of an index entry has to be marked. Otherwise, the list of page numbers next to the entry won't be complete. After you mark the first occurrence, use the Find and Replace feature to locate the other occurrences in the document, and then move on to the next index entry.
Choose Tools > Reference > Index to display the Index tab of the Reference Tools dialog box (see Figure 4). Select the text for the entry, then click in the Heading text box to mark this entry as a heading or click in the Subheading text box to mark this entry as a subheading – WordPerfect inserts the selected text in the text box. If you are marking this entry as a subheading, type the heading that you want it to fall under in the Heading text box, then click Mark.
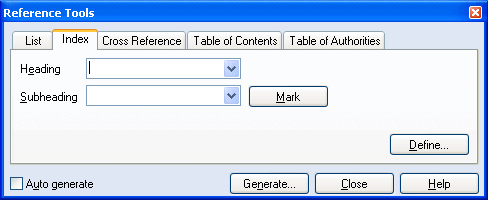
The Index tab has buttons to speed up the process of marking the entries and creating the index.
Tip: The heading and subheading text don't have to match the text that you selected in the document. You can type exactly what you want to appear in the index heading (and subheading). This is helpful when the text in the document doesn't fit well in the index.
Defining the index is similar to defining a table of contents, except an index is assembled at the end of a document. To set up and create an index page, move to the end of the document and press Ctrl+Enter to create a new page. At the top of the new page, type a heading for the index.
Choose Tools > Reference > Index to display the Index tab of the Reference Tools dialog box. Click the Define button on the Index tab of the Reference Tools dialog box to display the Define Index dialog box (see Figure 5).
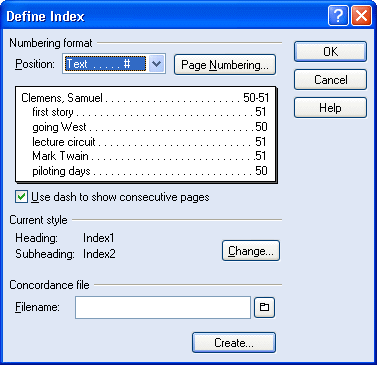
You can use the Define Index dialog box to select a page number format and position. You can also edit the heading and subheading styles and specify a concordance file.
If you want to use the default settings, you can simply click OK. Otherwise, make the necessary adjustments, then click OK. The following text is inserted at the insertion point: < >. Click Generate (in the Reference Tools dialog box). Click OK to build the index.
The Document Map feature is the perfect companion to the table of contents and index features. Document Map builds a roadmap of your document using table of contents, table of authorities, list, or index markers. You can then navigate through the document by clicking the entries in the document map. In your case, you'll be able to jump to a particular section of your manuscript when you click a table of contents or index entry.
Choose View > Document Map to display the document map. You can click a marker in the left pane to jump to that text in the document (see Figure 6).
The Document Map offers a convenient method to navigate through a lengthy document.
Working with Master Documents and Subdocuments
If you're lucky, you have friends who will share the writing responsibilities. Should you choose to collaborate on your work, you'll really appreciate the Master Document feature. It enables you to break your large document into management pieces and work on each one separately.
A master document is essentially a document that is full of links to other files. Each of the "other files" is called a "subdocument". You and your co-authors can divide up the chapters and work on them individually. Whenever you like, you can compile all of the individual chapters into one big work. When you "expand" the master document, each of the subdocuments is opened into the master document, which results in one huge document. Now, you can work with the entire manuscript, searching and replacing and making global formatting changes.
For more information, see the tutorial titled "Working with Master Documents and Subdocuments".
Was this article helpful?
Tell us how we can improve it.