Upgrading to a Newer Version of WordPerfect
by Laura Acklen
www.wpwriter.com
Before you put that brand new WordPerfect® Office CD in the drive and fire up the setup program, take just a minute to answer three questions.
- Have you customized your current version of WordPerfect®?
- Do you want to transfer over the customization to the newer version?
- Do you have enough disk space to keep both versions of WordPerfect on your system?
The answers to these questions will determine the best course of action so that you can upgrade without losing any of your hard work.
Customization in WordPerfect
You may not think you've customized WordPerfect, but if you've done anything on this list, you have! Take a look and then decide if you're interested in preserving anything.
- add names to the Address Book
- add words to the user word list (also known as a custom dictionary)
- create or edit QuickWords™ (also know as Abbreviations)
- add words to the QuickCorrect™ list
- create or edit toolbars, keyboards or menus
- change the default template
- create custom templates
- create custom macros
- edit shipping macros
- create or edit styles
- create custom label definitions
- create custom paper size/type definitions
Removing the Older Version of WordPerfect First
If you don't have any customization that you want preserved, there is no reason to keep an older version of WordPerfect on your system, so by all means, remove it before you install the newer version. Remember, a "clean install" is a good install!
Before you get too excited about cleaning off a big space on your hard drive, take a minute or two to look around! Browse through the \program files\WordPerfect Office folders and make sure there isn't anything in there that you need to keep.
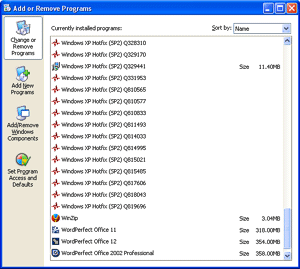
When you're ready to remove the older version of WordPerfect, choose Start, (Settings,) Control Panel, Add/Remove Programs. Select Corel® WordPerfect® Suite 8, Corel WordPerfect Office 2000, WordPerfect Office 2002, or WordPerfect Office 11, depending on the version you are removing.

Figure 1 - Use Add or Remove Programs to uninstall WordPerfect.
Cleaning out the Windows® Registry
If you're comfortable (and I mean extremely comfortable) editing the Windows registry, you can move one step closer to a "clean install" by deleting the WordPerfect entries. Just be sure to make a backup of the registry first, in case your finger on the mouse slips and you delete something important. These articles in Microsoft's knowledge base explain how to backup and restore the registry inWindows XP, Windows 95/98/ME, Windows NT4.0 and Windows 2000.
Caution: I wouldn't recommend cleaning out the Corel entries if you have other Corel programs installed on your system. It's very easy to accidentally delete an important key.
Transferring Your Customization
Okay, you've customized WordPerfect and you want to transfer that customization over to the new version. If you have enough room, keep the older version of WordPerfect on your system.
When you install WordPerfect Office 2000, 2002, or 11, the setup program looks for a previous version of WordPerfect and transfers most of the customization for you. It's not foolproof though, so you'll need to make backup copies of important files whether you keep the older version of WordPerfect on your system or not.
To help users of WordPerfect Office 2002 make the transition, Corel developed the Corel® Migration Manager, which can be used to transfer customization from WordPerfect 6.1, 7, 8, or 9 to WordPerfect 10. The only caveat is that if you've moved the files from their default locations, the Corel Migration Manager won't be able to transfer the information. See the second post in this WordPerfect Universe thread for more information.
WordPerfect Office 12 offers a handy "move customization" tool for home and small business installations that are upgrading from previous versions. It is not as powerful as the Corel Migration Manager, which can be used at the corporate level. You'll see an option to migrate your settings only if there is a previous version of WordPerfect present on the system when you install WordPerfect Office 12.
If there isn't enough space for both programs, you can still transfer everything over — you just have to do it manually. In other words, you have to make copies of certain files and copy them to the correct locations.
Making Backup Copies of Important Files
It might sound complicated, but it's not — as long as you take it one step at a time. Fortunately, the concepts that you'll find in these articles can be applied to other versions with only minor modifications to the folder and file names.
There is an excellent FAQ on WordPerfect Universe (www.wpuniverse.com) that explains which files you need to back up before an upgrade. In one of the last posts, there is a series of links to knowledge base articles that cover migrating QuickWords, the QuickCorrect list, address books and the default template to WordPerfect 11.
If you are removing an early version of WordPerfect 9 in preparation for the Service Pack 4 installation, there is an FAQ on WordPerfect Universe that summarizes advice from several different sources, including advice from several Corel C-Techs.
As you may recall from reading knowledge base articles and/or the FAQs on WordPerfect Universe, most of your customization is contained in the default template. There is an excellent FAQ that gives detailed steps on moving customized settingss from one default template to another.
Installing the Newer Version of WordPerfect Alongside an Older Version
Since newer versions of WordPerfect are installed into their own folder subtree, it isn't a problem to have more than one version on your system at the same time. Whenever you're ready to install the new version, be sure to close all the open applications and remove all programs from memory (except for Windows itself).
It's very important that you temporarily disable your anti-virus programs. Another common recommendation is to disable applications, such as Norton AntiVirus™, Norton Internet Security™, Norton SystemWorks™, Norton™ Personal Firewall, and any other program that resides in memory.
To close open applications, press Ctrl+Alt+Del. In the Close Program/Windows Task Manager dialog box, Select an entry, and then choose End Task. Do this for all of the entries (except Windows Explorer and Systray on Win98 systems).
As I said before, the setup program will look for evidence of customization and if it finds any, it will automatically transfer that information over to the newer version. For example, if you've added names to the Address Book, those names will be copied over for you.
Caution: If you (or someone else) have changed the default location of the files that contain your customization, the Setup program may not be able to locate the files. If Setup can't find the files, it can't transfer over the customization.
Insert the WordPerfect Office CD into the drive. Wait a few seconds and see if Setup starts automatically. If it doesn't, choose Start, Run, browse to the CD drive, locate the intro.exe (or setup.exe) file and double-click it.
Removing the Older Version of WordPerfect
After you've assured yourself that everything you needed has been transferred over, you can go ahead and remove the older version of WordPerfect from your system. Remember, this is optional. You can leave an earlier version of WordPerfect on your system until you are comfortable with the newer version, or you can leave it there indefinitely. The only issue would be disk space since different versions of WordPerfect co-exist very nicely with each other.
Choose Start, (Settings), Control Panel, Add/Remove Programs. In the Add/Remove Programs dialog box, select the old version of WordPerfect, choose Remove, and then follow the prompts.
Refreshing a New Installation After Removing a Previous Version
Corel C-Techs are a group of very friendly and extremely helpful volunteers who answer questions on the WordPerfect newsgroups. The C-Techs all agree that when you remove one version of WordPerfect while another is still installed, you should refresh the installation of the remaining version. This is due to the fact that there are registry entries common to all WordPerfect versions, which may be removed or set back to the default setting when you remove a version.
For example, let's say you are upgrading from WordPerfect Office 2000 to WordPerfect Office 11. After you install WordPerfect Office 11 and transfer over your customization, you opt to uninstall WordPerfect Office 2000. It's important that you now refresh the installation of WordPerfect Office 11, to make sure all of the registry entries are up-to-date.
To "refresh" an installation, insert the WordPerfect Office CD and select to refresh (or repair) the installation. The terminology in the Setup program will vary depending on which version of WordPerfect you are refreshing, but it should be a fairly straightforward process. Follow the prompts to refresh the installation, then restart your computer.
Installing Service Packs and Updates
Depending on when you purchased WordPerfect Office, there may be a new service pack available. There is a very comprehensive FAQon WordPerfect Universe that will help you determine which version of WordPerfect you have and what updates are available for that version. It covers WordPerfect 7, 8, 9, 10, and 11 as well as the Family Pack 4 and 5, and the various OEM and Productivity Pack editions. I'm sure we'll be updating it for the WordPerfect 12 editions when the information becomes available.
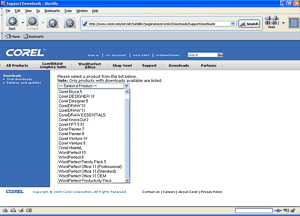
In addition to the information provided in the FAQ, you can find links to service packs and hot patches for WordPerfect on Corel's Support Downloads page. When you open the Support Downloads page, click the drop-down list arrow to open a list of products (see Figure 2).

Figure 2 - Corel has links for downloading patches and updates for the latest versions of WP.

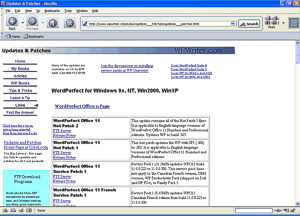
Figure 3 - The Updates & Patches page on wpwriter.com has a complete list of downloadable service packs, hot patches and other resources.
If you think this is a lot of trouble to go through just to install an update...you're right. It is. But it's the whole "ounce of prevention..." thing. If you're willing to invest a little more time up front, you'll save hours of frustration later.
Laura Acklen is a freelance author and technical writer. She is the author of Que's Special Edition Using WordPerfect 9 (and 10)and the Absolute Beginner's Guide to WordPerfect 10 (and 11 and 12). A complete table of contents for each book is available on her web site at www.wpwriter.com.
Was this article helpful?
Tell us how we can improve it.