Working with Master Documents and Subdocuments
by Laura Acklen
www.wpwriter.com
Writers are among the most loyal fans of WordPerfect®, and the Master/Subdocument feature is one of the most useful tools of these die-hard users. This feature allows an unwieldy book manuscript to be broken into manageable parts, usually chapters, which are then combined for final editing tasks, such as creating cross references, generating a table of contents, and creating an index.
Although the book/chapter analogy is the one used most often to describe this feature, any lengthy document can be broken up into smaller, more manageable documents. If you are collaborating on a project, the smaller documents are more easily edited and shared with others.
Other projects that can benefit from the Master/Subdocument feature are those in which standard sections of text are used to build documents. For example, contracts, reports, and proposals are all composed of boilerplate sections of text with the appropriate information filled in. The boilerplate sections of text can be stored as subdocuments and used over and over again in a variety of master documents.
Creating Subdocuments from Existing Documents
Even if you've already started on your project, you can start using the Master/Subdocument feature immediately by breaking up your existing document into subdocuments. If you haven't yet started on your project yet, then you can skip to the next section.
Breaking up an existing document into subdocuments is easy. Use your favorite selection technique to select a section of text. With the text selected, click the Save button. In the Save File dialog box, type a name for the new file, and then choose Save.
Although a typical book project is divided into chapters, you can divide a document into as many logical or manageable sections as you want. Remember that you may want to use these subdocuments in more than one master document.
Inserting Subdocuments into a Master Document
A master document is just a regular WordPerfect document with one notable exception: it contains subdocument codes. When you insert the codes to embed a subdocument, an ordinary document is transformed into a master document.
If you have just finished breaking up a document into subdocuments, you already have a "shell" that you can use as the basis for a master document. You can go ahead and type whatever headings or introductory material you need before you insert the text of the first subdocument.
Position the insertion point where you want to insert the subdocument text, and then choose File > Document > Subdocument. TheInclude Subdocument dialog box appears (see Figure 1). Select the subdocument file, and then click Include.
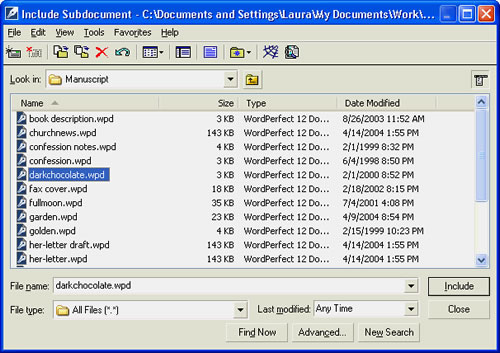
Figure 1
Select a file from the Include Subdocument dialog box to insert the subdocument codes.
WordPerfect uses icons to show you where your subdocuments have been inserted. If you're in Page view, you have to scroll over to the left (using the horizontal scroll bar) to see the subdocument icon in the margin (see Figure 2). If you don't see the subdocument icon, the margin icons may have been turned off. Choose Tools > Settings > Display, and then enable the Margin icons check box.
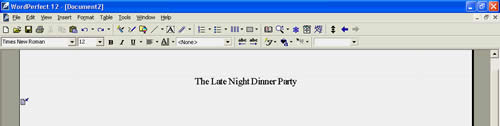
Figure 2
In Page view, a subdocument icon can be seen in the left margin space.
If you're in Draft view, the name and path of the subdocument are displayed in a comment (see Figure 3). Many users recommend working with subdocuments in Draft view because the comment code indicating a subdocument is easier to locate than the margin icons.
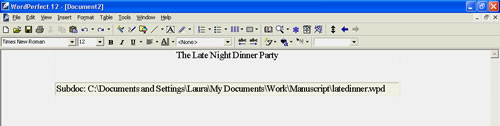
Figure 3
In Draft view, a subdocument code is displayed as a comment.
Expanding and Condensing a Master Document
When you expand a master document, each subdocument is inserted into the master document, so you can work with all of the text at once. You can search and replace globally, mark entries for an index or a table of contents, apply styles, and check for consistent formatting.
To expand a master document, choose File > Document > Expand Master. The Expand Master Document dialog box opens, with a list of the subdocuments (see Figure 4).
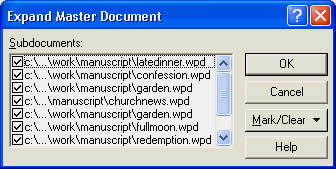
Figure 4
You can select the subdocuments you want to expand in the Expand Master Document dialog box.
Subdocuments that are opened and inserted in the master document appear in the Expand Master Document dialog box with their check boxes enabled. Subdocuments do not open if you disable their check boxes. Enable the check boxes for the subdocuments that you want to work with, and click OK to expand them.
Caution: If one of the subdocuments has been moved or deleted, an error message appears. You can either type a new path and filename or browse for the file. If you're not sure where the file is, choose Skip. Network users must ensure that they are mapped to the drive where the subdocuments are stored.
When you condense a master document, you can select which subdocuments are condensed and which are saved. By selectively condensing certain subdocuments, you can work on related sections of a document without "wading through" the rest of the text. Even a tremendous 500-page legal brief can be easily revised: just break it up into subdocuments, and then expand and condense only those sections that you want to work with.
To condense a master document, choose File > Document > Condense Master. The Condense/Save Subdocuments dialog box appears (see Figure 5).
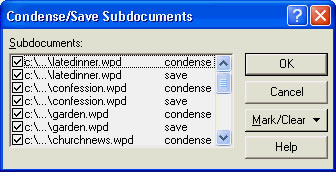
Figure 5
In the Condense/Save Subdocuments dialog box, you can place a check mark next to a file to save or condense it.
The Mark/Clear button opens a drop-down menu of options that you can use to condense or save all subdocuments, or to clear these settings for all subdocuments. To condense or save specific files, you can enable individual check boxes.
You must carefully consider which subdocuments should be saved, especially if the subdocument belongs to a colleague. To save your changes without overwriting the original file, move or copy the original file before you condense and save the subdocument.
Tip: You should always condense a master document before you save it. Otherwise, you save the same information twice and consume twice the disk space. Because you've already saved the subdocuments, you don't need to save that same information in the master document.
If you are working in both master documents and subdocuments, you may run into a situation whereby changes that you have made to a subdocument and saved do not show up in the expanded master document. These changes will appear in the master document only if you follow this procedure:
- Condense and save the master document.
- Make changes to the subdocument.
- Save and close the subdocument.
- Open and expand the master document.
The changes now appear in the expanded master document. At this point, you should generate the document to update the index, table of contents, table of authorities, and so forth.
The 'Reference toolbar has buttons for easy access to the Insert Subdocument, the Expand Master Document, and theCondense/ Save Subdocuments dialog boxes. To display the Reference toolbar, right-click the toolbar, choose More, and then scroll down and enable the check box next to Reference. Choose Close to clear the dialog box. There are three buttons on the right side of the toolbar: Subdocument', Expand Master, and Condense Master (see Figure 6).

Figure 6
The Reference toolbar gives you quick access to tools for master documents and subdocuments.
Formatting Subdocuments
The key to working with master documents and subdocuments is learning how to create subdocuments that can function independently of the master document. The formatting codes that are necessary in a subdocument can cause problems in the master document, and vice versa.
The "behind-the-scenes" Auto Line Formatter feature in WordPerfect strips out redundant codes, resulting in a subdocument that can no longer stand on its own. For example, let's say that you have a double-spaced master document. When you expand a subdocument with a double-spacing code in it, the Auto Line Formatter strips out that code, because it's redundant. When you save the subdocument, it is saved without the double-spacing code, so it is saved as a single-spaced document.
What can you do to prevent this from happening? You can place most of the formatting codes in the document style. As long as the codes are stored in the document style of the subdocument, they won't be deleted by the Auto Line Formatter. Here are some items to consider as you format your master documents and subdocuments:
Numbering Pages, Chapters, and Sections
- If you want each subdocument to start on a new page, insert a hard page between each subdocument code in the master document. Alternatively, you can insert a hard page at the top of each subdocument. To insert a hard page, choose Format > Page > Force Page, or press Ctrl+Enter.
- To number an expanded master document sequentially, place a page numbering code to start numbering pages with 1 immediately after the introductory pages (such as the table of contents).
- If you're working on a manuscript, you probably want to increment the chapter numbers in each subdocument. Place a chapter number increment code at the beginning of each subdocument. At the beginning of the master document, insert a page number position code and a chapter number method code.
- If a document is to be printed on both sides of the paper, it's common practice to begin a new chapter or major section on the right side. You can accomplish this by placing a [Force: Odd] code in an open style at the top of each subdocument.
Styles
- Styles in a master document override subdocument styles with the same name, so the subdocuments are reformatted according to the master document's styles. Same-name styles are saved with the subdocument, whereas styles with unique names are added to the master document's list of styles. Consider creating a template that contains the styles for your project and then distributing the template among your colleagues so that they can use the styles when they create master documents.
- If you make a change to a style in a subdocument, make sure that you copy that style over to the master document, or the change will be overwritten by the former style in the master document. You can avoid this problem by making all changes to styles in the master document.
Code Conflicts
- Formatting codes in a subdocument can cause conflicts with codes in the master document. For example, if the master document has Header A defined, that header remains in effect only until another Header A code is reached. If the first subdocument has a Header A defined, the subdocument Header A replaces the Header A you defined in the master document. This can work to your advantage, however, if you want new header text at the beginning of each chapter or section.
Footnotes and Endnotes
- Don't place footnote or endnote option codes in the subdocuments. Place these codes only in the master document.
- In most cases, footnotes should be numbered sequentially throughout a document. If you decide to restart the numbering in each subdocument, however, you need to place a footnote numbering code in an open style at the top of each subdocument.
- You can place all endnotes at the end of the document or at the end of each subdocument. For the former method, insert an endnote placement code at the end of the master document, and choose Insert Endnotes at Insertion Point in the Endnote Placement dialog box. For the latter method, insert an endnote placement code at the end of the subdocument, and choose Insert Endnotes at Insertion Point and Restart Numbering in the Endnote Placement dialog box.
Marking Text
- You can mark text for a table of contents, table of authorities, list, index, or cross-reference in both the master document and in subdocuments. You might find it easier to mark document references in an expanded master document. If you're marking headings for a table, list, or index, you should define a style for your headings with all of the formatting plus the mark text codes.
- Marking text for cross-references in subdocuments is tricky because you have to remember the target names. Because expanding the master document compiles a list of all the marked targets, you might prefer to mark targets and references in an expanded master document.
Was this article helpful?
Tell us how we can improve it.