Creating Forms with Tables
By Laura Acklen's
www.wpwriter.com
When a friend suggested that I use tables to create my fill-in-the-blank forms, I thought she was crazy. Tables have lines, and all of the cells are the same size. They look like spreadsheets, not forms! After showing me a few tricks, she convinced me that tables are the way to go.
Whether you are filling out the form on-screen, or printing it out, tables offer huge advantages over the other methods. For a start, you can format each table cell independently of the others. That means you can format a cell with bold, or a larger font. Also, when you type in a table cell, the text wraps within the boundaries of a cell, and you can create "boxes" for information that are as small or as large as you need.
Most forms have titles that you don't want changed–you can protect them. All forms have lines–you can add lines with varying thickness, color and style. In a nutshell, you get exactly what you want with a minimum of fuss.
Using the QuickMenu
Before you go any further, allow me to show you the fastest way to get to table commands–the QuickMenu. To display the table QuickMenu, right-click in any table (see Figure 1). The list of commands is so comprehensive that you may not need to use the Table menu at all.
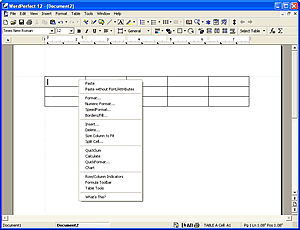
The Table QuickMenu gives you access to the most frequently-used commands in just one right-click.
Removing the Lines
Without a doubt, the secret to creating an attractive form is removing the lines. When you do, it's transparent to anyone using the form that they are actually working in a table. It's a neat trick. You get all the advantages of tables, without the "grid" look.
When you create a table, there are single lines on the left, right, bottom and top sides of the cell. There is no table border, so the lines you see around the edges are actually the left, top, right and bottom lines of the perimeter cells. This is important, because you need to know which line(s) to remove to achieve the intended effect.
To remove lines from a cell (or group of cells), click in the cell (or select the group of cells). Right-click in the cell (or selected cells) and choose Borders/Fill. If necessary, click the Cell tab. Now, click the Left, Right, Bottom or Top button to open the palette. Click the big X to choose No Line. The sample cell shows you which lines you have removed (see Figure 2). Click OK when you are done.
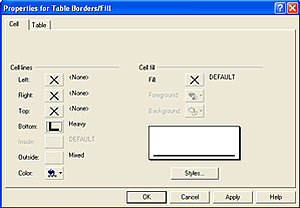
The sample cell in the Properties for Table Borders/Fill dialog box shows you how the lines in a cell will look with your selections.
To remove all of the lines in a table at once, right-click in the table and choose Borders/Fill. Click the Table tab. In the Default Cell Lines section, click the Line button to open the palette. Click the big X to select No Line. Click OK.
Turning on Table Guidelines
Now, after you remove table lines, you'll need a way to mark the boundaries of the cells (so you can see what you are doing). The simplest way to do this is to turn on table guidelines. Choose View, Guidelines, and then put a check mark next to Tables.
An added advantage is that you can click and drag these guidelines to adjust the margins of a cell. If you hover over a guideline, you'll see a double-sided arrow with a thick border between the arrows. When you see this pointer, click and drag the guideline to resize the cell.
You'll notice that if you increase the height of a cell, the height of the row increases as well. The same goes for the width of a cell–if you increase the width of a cell, the width of the column increases as well. Remember, the row height will always be as high as the tallest cell (in that row) and the column width will always be as broad as the widest cell (in that column).
Caution: If you turn on guidelines, but they don't show up onscreen, choose View, Table Gridlines to disable the gridlines and reveal the guidelines. It's a bit confusing, I know.
Joining and Splitting Cells
What if you need a really long cell so that the information stretches from the left to the right side of the form? Or maybe rather than one "wide" cell, you need three smaller cells. No problem. You can join selected cells together in just a few clicks. A single cell can be split into multiple cells in much the same way.
To join selected cells, select the cells, then right-click in a selected cell. Choose Join Cells. To split a cell, right-click in the cell and choose Split Cell to display the Split Cell dialog box (see Figure 3). Type in the number of columns and/or rows that you want and choose OK. Remember, you can always choose Undo (Ctrl+Z) if you don't like the results.

You can split a cell into multiple rows, multiple columns, or both, in the Split Cells dialog box.
Fixing Cell Height and Width
Forms that will be filled in on-screen present different challenges than forms that will be printed and filled out with a pen. One of the challenges is limiting the amount of information that can be entered for a specific item. For example, let's say you only want a single line entry for an item. Since the text wraps within the cell margins, someone could type an entire paragraph, with the cell height expanding to accommodate the text.
So, how do you control the amount of text that can be entered? By setting a specific row height, or column width. Right-click in the column or row, and then choose Format to display the Properties for Table Format dialog box (see Figure 4).
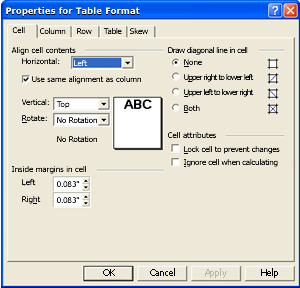
The options in the Properties for Table Format dialog box control virtually every aspect of the table structure.
To set a column width, click the Column tab. In the Column Width section, type the size for the column in the Width text box. Enable the Always keep width the same check box.
To set a row height, click the Row tab. You have a couple of options here. In the Lines of text per row section, you can chooseSingle line only if you want to keep the entry to one line. For more flexibility, enable the Fixed option in the Row height section, and then type in a specific height. The At least option allows you to set a minimum height so even if the entry doesn't fill the entire space, the row height will maintain the minimum size.
Adding an Underline
While not as much of an issue with forms that will be filled out on-screen, lines are essential for forms that will be printed and filled out by hand. They keep everything neat and orderly, and they help the person filling out the form to keep the information in the correct place.
In most cases, the line is placed next to the title and it extends as far as you want the entry to be. One method is to type the title in one cell, then join the adjoining cells until you have a cell that is as long as you want the entry to be. Select the new cell you created and add a line just to the bottom of the cell (see the steps given above for removing lines, except choose a line style from the Bottompalette, instead of the big X).
When you open the line palette, notice that you have a bunch of different line styles to choose from. An easy color change from Black to Gray gives the lines a very professional and polished appearance. Just click the Color button to open the color palette, and then choose a shade of gray.
For really short entries, like a birth date or zip/postal code, you could split a cell into two sections, type the title in the left cell, and then add a line to the bottom of the right cell.
Caution: If you add lines to cells, but they don't show up onscreen, choose View, Table Gridlines to disable the gridlines and reveal the table lines.
Locking Cells
Printed forms are immune to tampering, but an on-screen form is not. In theory, anyone working in a table can make changes to it. You do have a secret weapon though. You can lock a cell (or group of cells) to prevent editing. To lock a cell, right-click in the cell (or group of cells), and then choose Format. If necessary, click the Cell tab. Enable the Lock cell to prevent changes check box.
When you lock a cell, you can't click in it. The mouse pointer will show a circle with a line through it, meaning you can't get into that cell. The insertion point will just skip over it.
Now you're probably wondering, "How do I unlock the cell when I need to edit it?". By temporarily unlocking the cells. If you have more than one locked cell, you'll be pleased to learn that you unlock all of the cells at once–you don't have to unlock them one at a time.
To unlock cells, right-click in the table, then choose Format. Click the Table tab. Put a check mark next to Disable locks in all cells (allow changes).
Caution: Be sure you leave at least one cell in a table unlocked, or you won't be able to unlock any of the cells later. Why? Because you have to click in the table to get to the Table Format command and if all of the cells are locked, you can't click in the table.
Rotating Text in a Cell
Okay, maybe you haven't thought about rotating text in a cell yet. Let me give you an example so you can decide if you are interested. Let's say you are working on a survey form that has a list of items and you want to rank those items in terms of importance.
One way to set this up would be to split the cells into smaller "check boxes". The first cell in the row has the title of the item, and the top row has ranking information (not important, neutral, important, very important). You can rotate the ranking information so that it fits over the small box. Think sideways on top of the box and you've got rotated text.
To rotate text in a cell, right-click in the cell, then choose Format. If necessary, click the Cell tab. Open the Rotate drop-down list and choose one of the options. The preview shows you how the text will look with that setting. The 270 Degree option is the most popular because it's easy to read (see Figure 5).
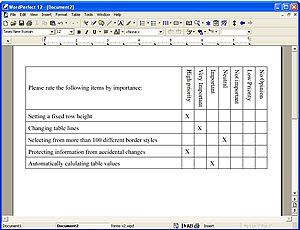
This survey form illustrates the use of rotated text in the column headings.
Miscellaneous Advice
Here are a couple of things to keep in mind as you create and use the forms:
- For forms with dissimilar sections, consider creating multiple tables. A form might be divided into multiple sections with each section in a table. You may find it easier to format the form this way, rather than struggling to format a single table in multiple sections.
- If the form will be filled in onscreen, you may want to turn off the option to automatically create new rows at the bottom of the table. Otherwise, it is entirely too easy to add a new row to the bottom of the table by pressing Tab in the last cell. Right-click in the table, then choose Format. In the Properties for Table Format dialog box, click the Table tab. Remove the check mark next to Insert new rows automatically.
Creating a form requires a lot of trial and error to get it right. The pay off is that once you've got it just right, you're done. You can protect your hard work from accidental changes, and you can use the form as a basis for other, similar forms. Give it a try. You'll learn valuable skills that you can use for other table projects.
Was this article helpful?
Tell us how we can improve it.