Creating and Publishing Pleadings with WordPerfect
Laura Acklen
www.wpwriter.com
A legal pleading sets out the facts and legal arguments that support a party's position. Each year, law offices prepare thousands of pleadings for lawsuits, petitions, motions, and hearings. Automating the tedious process of preparing these documents reduces expenses and improves consistency.
WordPerfect provides two wizards to automate the process of preparing pleading documents. The Pleading Expert Filler helps you create cases and generate pleading documents. The Pleading Expert Designer helps you create customized pleading styles, so that the pleadings you generate meet strict filing requirements.
First, you need to ensure that the Legal Tools are installed. Open the Tools menu. Do you see an entry for Legal Tools? If not, you'll need to update your installation and add the WordPerfect Legal Tools. You'll find them listed under the WordPerfect tree in the installation wizard.
Running the Pleading Expert Filler
This wizard walks you through the process of creating cases and generating pleading documents. With the built-in styles, you can start creating pleadings right away.
Choose Tools > Legal Tools > Pleading Expert Filler to start the Pleading Expert Filler wizard (see Figure 1). If the Pleading Expert Filler dialog box doesn't appear on-screen, look for a button on the Windows® taskbar. Sometimes, the dialog box opens behind the document editing screen.
Choose Next to move to the Case Selection page. If you are creating a new case, enable the New Case option, and type a name for the case in the New Case Name text box. Otherwise, select the case from the Existing Cases list. Choose Next to move to the next step.
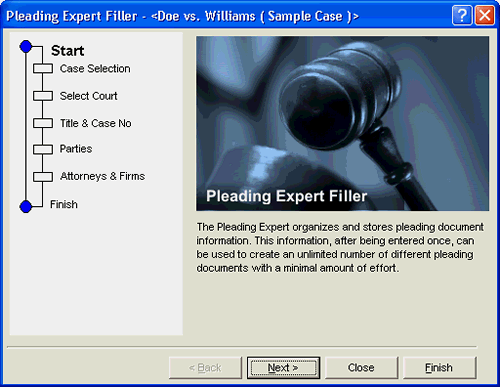
The Pleading Expert Filler wizard automates the process of creating cases and generating pleading documents.
In this step, you select a style to use for the pleading. There are two built-in styles. Later in this tutorial, you'll see how you can create your own styles with the Pleading Expert Designer. Choose a style, and then click Next to move to the next section.
The remaining steps are self-explanatory. You'll be filling in relevant information, such as title and case number, parties involved, and attorneys of record. You can quickly jump to any section by clicking the title in the left pane (see Figure 2). For example, to go straight to the attorney information, click Attorneys & Firms.
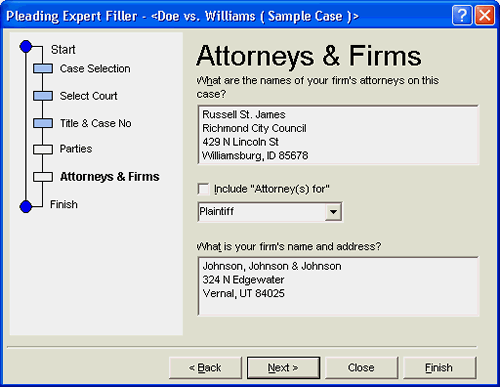
In the Attorneys & Firms section, you enter the contact information for the law firms involved.
When you have completed the necessary steps, choose Finish. The wizard inserts the information into the proper places and creates a pleading document (see Figure 3).
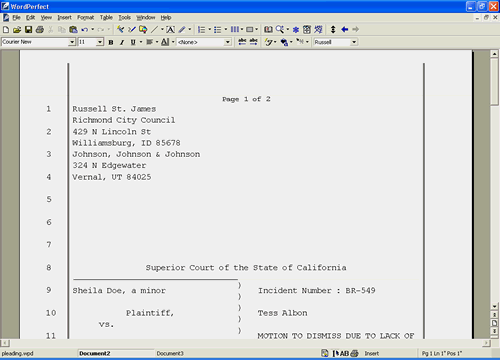
In the completed pleading document, all of the information is plugged into the right places and appears in the correct format.
The completed pleading document has all of the formatting set up for you, which is great if it meets your filing requirements. You can make adjustments or add lines of text, but you'll need the nitty-gritty details on how to work with the formatting. See "Formatting Tips" at the end of this tutorial.
Tip: If all you need is a blank pleading paper with vertical lines and line numbers, choose Tools > Legal Tools > Pleading Paper.
Running the Pleading Expert Designer
Pleadings must adhere to a strict set of formatting rules. Some state and federal statutes require a particular form and format, and court rules must be followed. The key to meeting these requirements and maintaining consistency is to create pleading styles that you can use with the Pleading Expert Filler. The Pleading Expert Designer can help you do this.
Choose Tools > Legal Tools > Pleading Expert Designer to start the wizard. The Pleading Expert Designer dialog box and the pleading paper preview window appear. Choose Next to move to the first step in the wizard (see Figure 4). In the Create/Edit Pleading section, choose New Pleading Style, and then type a name for the style in the New Pleading Style Name box. Alternatively, choose Edit Style, and then select an existing style from the Available Court Pleading Styles box. Choose Next to move to the next section.
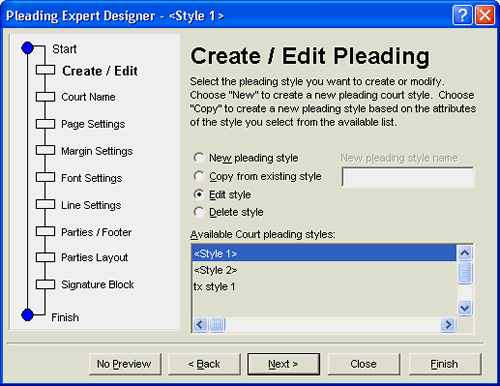
The Pleading Expert Designer wizard takes you through the process of creating and editing pleading styles.
From this point forward, the steps are self-explanatory. Type in, or edit, the relevant information and move to the next section. You can skip to a specific section by clicking the section name in the left pane. Notice that as you work, the pleading in the preview window is updated dynamically so that you can see how a completed pleading will look.
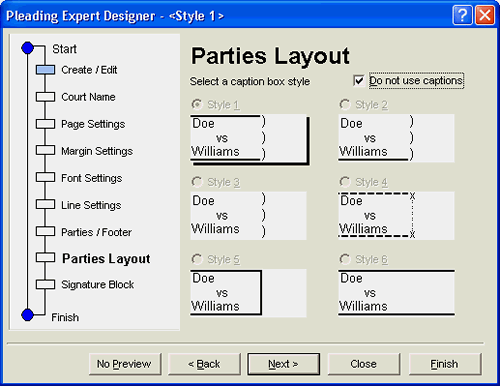
Note: On the Parties Layout page, the caption options may be grayed out. Remove the check mark in the Do Not Use Captionscheck box. You should be able to select a caption box style now. You may notice the same situation on the Signature Block page — simply enable the Include a Signature Block check box.
Choose Finish when you are done. You can select the new (or edited) style from the list of pleading styles in the Pleading Expert Filler.
Publishing to PDF
Many law offices have found that documents sent in PDF format are the easiest for their clients and work associates to open and print. WordPerfect has a Publish-to-PDF feature.
To publish a document to PDF, choose File > Publish to > PDF. If necessary, click the General tab to reveal the initial options (see Figure 5). If necessary, type a name for the file in the File Name box. From the Compatibility list box, select the version of Acrobat. If you want to publish the entire document, you're all set. Otherwise, select a portion of the document in the Export Range section. Choose OK.
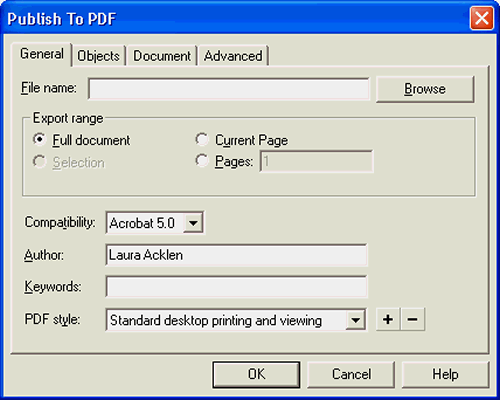
The default options for publishing to PDF are set up to generate smaller PDF files.
Tip: The Legal toolbar has a button for Publish to EDGAR™, but not for Publish to PDF. You can easily add this button yourself. ChooseTools > Settings > Customize. Select Legal from the list of toolbars. Choose Edit. Scroll down through the list of commands until you can select Publish to PDF. Choose Add Button > OK > Close > Close.
Publishing to EDGAR™
An increasing number of courts require that you file your pleadings electronically. The standard format developed for this purpose is called EDGAR (Electronic Data Gathering, Analysis and Retrieval). In some courts, pleadings sent electronically must be in EDGAR format with the appropriate document header file attached. WordPerfect publishes a pleading to EDGAR format, but it's up to you to generate the header file — in ASCII text (TXT) format.
To publish a pleading to EDGAR, choose File > Save As. Type a name for the pleading in the File Name text box. This file name should be different from the original pleading file. Open the File Type list box, and choose EDGAR. Choose Save.
Note: If you save a document in EDGAR format, that document cannot be restored to a WordPerfect file. You must edit the original pleading document and resave it in EDGAR format.
Formatting Tips
The pleading wizards are fantastic time-savers, but there will still be occasions when you need to manually adjust the information or the formatting, or both. The following observations were made during the testing process:
- The wizard adds a Line Height code [Ln Height] at the top of the document. This setting increases the spacing between lines, no matter which line spacing option you choose in the wizard (single, 1.5, or double). For example, single spacing would normally be about 0.19", but with the Line Height code, it goes up to 0.32". Double spacing goes from 0.38" to 0.63". If you don't want the increased space between the lines of your text, you can just delete the Line Height code. The quickest method is to move to the top of the document, turn on Reveal Codes (Alt + F3), and then drag the [Ln Height] code out of the Reveal Codes window, which deletes it (see Figure 6).
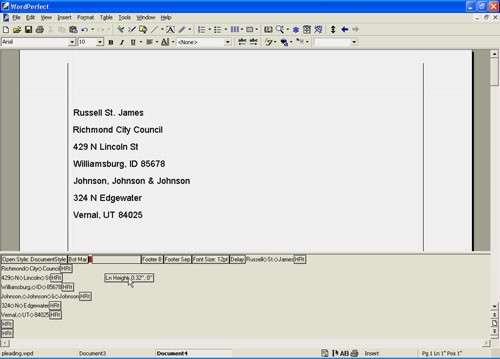
The quickest way to delete a code is to drag it out of the Reveal Codes window.
- The caption box is formatted as a table. The wizard inserts a pair of Vertical Advance codes [VAdv VAdv] around the table. The first code appears immediately before the Table Definition code [Tbl Def], and the other appears right after the Table Off code [Tbl Off]. These two vertical advance codes can cause problems if you need to add text to the top part of page 1. Adding additional text and hard returns to these areas can cause the caption to print on top of the body text. If this happens, turn on Reveal Codes and look for the vertical advance codes [VAdv VAdv]. You need to delete only the second vertical advance code, but it won't hurt to delete the first one as well.
- The second part of the pleading is formatted into two columns. If you start adding text underneath the signature block, and it's formatted into columns, you need to turn the columns off. This is easily done. Click where you want to start typing, and chooseFormat > Columns > Discontinue.
- Depending on which one of the built-in pleading styles you selected, the footers are formatted in an 11- or 12-point font, rather than the default footer font size of 10 points. To restore the 10-point size, click in the footer space on the first page. Turn on Reveal Codes (Alt + F3), and delete the Font Size code (drag it up into the document).
- Watermarks are commonly used to customize pleadings with company names and other information. The built-in pleading styles use Watermark B, so if you want to create your own watermark, use Watermark A.
Was this article helpful?
Tell us how we can improve it.