Creating Formulas in a Table
by Laura Acklen
www.wpwriter.com
As you may already know, the Table feature is one of the most powerful features in WordPerfect®. You can use tables in a variety of situations, but most of us turn to them when we need to position text and numbers in columns. What you may not yet realize is that you can create formulas in WordPerfect tables and do some pretty fancy calculations on those numbers.
And if you can do calculations in WordPerfect tables, why turn to another program for simple tasks such as adding a series of numbers? Many users find that they construct small spreadsheets in WordPerfect and turn to Quattro Pro® for larger, more complex spreadsheets.
In this tutorial, I'll show you how to create formulas in tables. I'll start with a simple formula that totals a column (or row) of numbers. Next, we'll talk about how to create formulas that calculate a value (rather than typing it in). After that, you'll learn how to create formulas using one of the 500 built-in spreadsheet functions. And finally, I'll explain how to import information in a Quattro Pro (or Microsoft® Excel) spreadsheet into a WordPerfect table.
Using QuickSum
Adding a column or row of figures is such a common task, there is a shortcut for it. The QuickSum feature adds the values in all the cells above the formula in a column, or, in all the cells to the left of the formula in a row.
To use QuickSum, click in the cell where you want the total to appear. Press Ctrl + =, or choose Table ? QuickSum. The little blue triangle that appears in the lower right corner indicates that a cell has a formula in it.
A QuickSum formula in a column adds all the numbers in cells directly above it; a QuickSum at the end of a row adds all the numbers to the left of it. If a cell is empty, QuickSum doesn't calculate any cell above the empty one. The workaround is to make sure you have numbers in all the cells, even if some of the numbers are zero.
Turning off Automatic Calculate
You may notice that as you edit numbers in cells that are included in a QuickSum, the total is automatically updated while you work. In a large table, the recalculating process can slow down the operation of your system. When this happens, you can turn off the "automatic recalculate" and then calculate manually when you are finished editing.
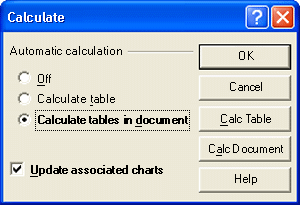
- To turn off the automatic recalculate, choose Table > Calculate. WordPerfect displays the Calculate dialog box (see Figure 1). Choose Off in the Automatic calculation section.
- When you are ready to manually calculate the table, right-click in the table and choose Calculate. Or, choose Table > Calculate > Calc Table.

Creating Formulas with Math Operators
The same math addition and subtraction operators (+, -) that you learned in elementary school are used to build formulas in WordPerfect tables. An asterisk (*) is used as a multiplication symbol instead of an (x), and the slash (/) is used as a division symbol instead of a dash and dots (÷). Here are some examples:
- To add the contents of two cells together, your formula might look like this: D8+H2.
- To multiple the contents of a cell by 75%, your formula might look like this: M21*.75.
- To multiply two cells and divide by a third, your formula might look like this: J5*H14/B3.
To create a formula in a cell, you first have to tell WordPerfect that you are creating a formula, not just typing in a bunch of cell addresses. This is done by preceding a formula with either a plus sign (+) or an equal sign (=).
So, to create a formula, click in the cell where you want the result to appear, type a plus sign (+) or an equal sign (=), then type the formula.
Using the Built-In Functions
Setting up formulas with operators and using QuickSum may be all you ever need to learn. But there is so much more to discover! You can create spreadsheet-like formulas in a WordPerfect table that can perform just about any type of calculation you can imagine.
Up until now, you've typed formulas "by hand". For simple formulas, it's the quickest way. The alternative is to create formulas using the Formula toolbar, which is especially helpful when you need to create formulas with the built-in functions.
To insert functions with the Formula Toolbar:
- Choose Table > Formula Toolbar. WordPerfect displays the Formula toolbar (see Figure 2).

- Position the insertion point in the cell where you want the formula (for example, in column D of the third row).
- Click in the Formula Edit box (to the right of the blue check mark button) to begin the formula edit process.
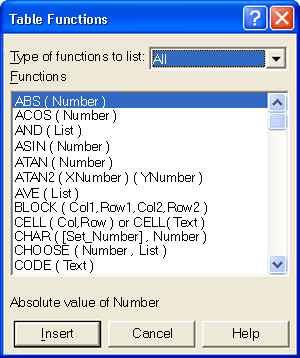
- Click the Functions button to open the Table Functions dialog box (see Figure 3).

- Scroll through the list of functions, or if you prefer, open the drop-down list and select a specific type.
- Select a function from the list. Notice the brief description that appears under the list box.
- Choose Insert to place the function in the Formula Edit box.
- Complete the function by filling in the missing information. For example, if you are using the PMT function, enter the interest rate, present value and the number of periods.
- Click the blue arrow to accept the formula and insert it into the cell.
When you are using the Formula toolbar, you can type the cell addresses and math operators, or you can use the mouse to click in the cells that you want to include. For example, you could type +A3*C2. Or you could type a plus sign, click in cell A3, type the asterisk, and then click in cell C2. The result is the same. I prefer the mouse method since I don't have to remember the exact cell addresses.
Tip: WordPerfect has more than 500 built-in functions. For more information on the functions and how to insert them into a formula, search for "table functions" in the Help Index.
Creating a Link to a Quattro Pro® Spreadsheet
If you are already familiar with spreadsheet programs, you may prefer to do your calculations in Quattro Pro, then copy them into WordPerfect. That's fine - more power to you!
When you're ready to copy the information over, you need to decide between a link or a simple copy. If you set up a link, the information in your document will be automatically updated whenever the spreadsheet is changed. The alternative is to create a copy of the information that is independent of the spreadsheet, so you can edit it freely without affecting the original file.
When you are ready to bring the information into WordPerfect, consider creating a named range for the cells that you want to link to. At the very least, jot down the cell addresses for the range that you want to use so you'll be ready when you set up the link.
To create a link to a spreadsheet:
- Choose Insert > Spreadsheet/Database.
- Choose Import if you want to create a copy of the information, or choose Create Link to create a link.
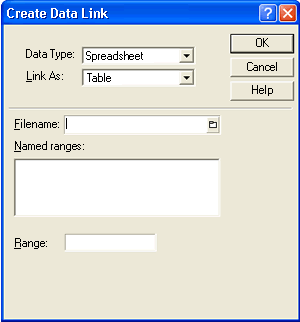
- In the Create Data Link dialog box (see Figure 4) or the Import Data dialog box, click the Files button next to the Filenametext box to browse for the spreadsheet file.
- When you locate the Quattro Pro file, double-click it to insert the filename in the Create Data Link or Import Data dialog box.
- If you have named ranges in the file, they will appear in the Named Ranges list box. If necessary, select a named range. Otherwise, type the cell address range that you want to use in the Range text box.
- Choose OK to import, or create a link to the Quattro Pro data.

If this seems like way too much information, just keep in mind that as long as you understand that you can do these things in a WordPerfect table, rather than in another program, you're ahead of the game. When the time comes, you can be confident that all the tools you need are right here in WordPerfect.
Was this article helpful?
Tell us how we can improve it.