WordPerfect supports a five-level table of contents. Although any text that you mark in the document can be added to a table of contents, the most common entries are chapter names and section headings.
You can automate the process of marking headings for a table of contents by using WordPerfect's heading styles, or by adding the mark text codes to your own heading styles. (I'll get back to that later in this section.)
Creating a table of contents entry is simple: You select the text that you want to appear (in most cases, a heading), and then choose the appropriate table of contents level. WordPerfect surrounds the selected text with Mark Text codes. When you generate the table, WordPerfect grabs the text between the Mark Text codes, positions it in the correct table of contents level, and inserts a current page number next to it.
Marking Text
Selecting text for a table of contents can be a little tricky. You have to make sure that you don't include formatting codes, such as bold or italic, within the Mark Text codes. Otherwise, those codes affect the format of that entry and can potentially cause problems with other entries. If you do get some codes by accident, you'll know right away because after you generate the table, you'll be able to see that certain entries are formatted differently.
To select text for a table of contents entry, follow these steps:
1. Choose Tools, Reference, Table of Contents to display the Table of Contents tab of the Reference Tools dialog box
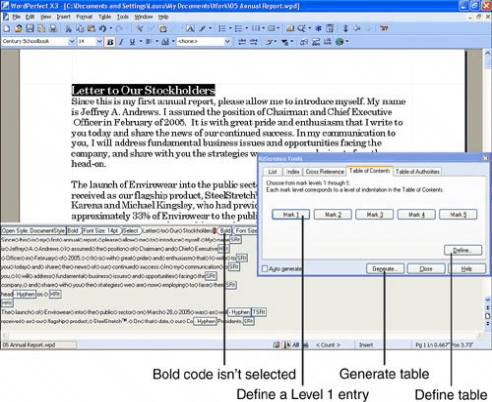
2. Turn on Reveal Codes (press Alt+F3) and select the text that you want included in the table.
Start selecting at the first letter of text and stop at the last letter so you don't accidentally include a formatting code.
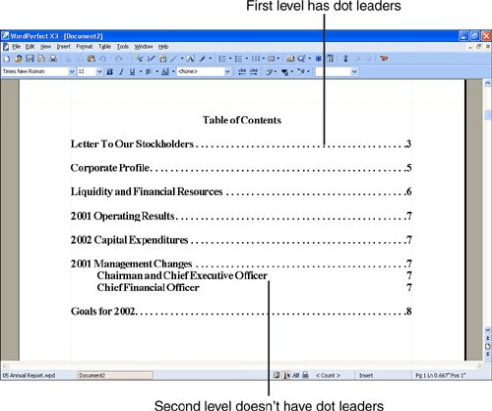
3. Click one of the Mark buttons (refer to Figure 16.2) to mark this selection for a particular level in the table. For example, click Mark 1 to mark this entry for the first level in the table. Each table of contents level is indented by one more tab stop, so the second, third, fourth, and fifth levels are really sublevels of Level 1.
WordPerfect inserts a mark text code [Mrk Txt T.O.C.] on each side of the selection. To expand the code so you can see the level for the entry, click the code in Reveal Codes. When you're finished marking text, you're ready to define where the table should be placed and how the entries should appear.
Using Heading Styles to Mark Text
WordPerfect's heading styles (Heading 1, Heading 2, Heading 3, and so on) include codes that mark the text for a table of contents. There are five heading styles, just as there are five levels in a table of contents. If you use these heading styles for your headings, you don't have to mark the text for the table of contents. All you have to do is define the table and generate it.
In many cases, the outline styles are used to create headings. You can create custom outline styles with table of contents codes so that headings created with the styles are automatically marked for a table of contents.
When you create the new style, it contains all the codes of the existing style so you don't have to worry about getting the right codes in place.
To create a customized outline style:
1. Choose Insert, Outline/Bullets & Numbering.
2. Select the outline style that you used in the document, and then choose Edit.
3. Select the level that you want to edit in the list, and then click Create Style.
4. Type a name for this new style you are creating in the Style Name text box.
5. If necessary, place a check mark in the Show 'Off Codes' check box.
6. Click right before the Codes to the Left Are ONCodes to the Right Are OFF code. Hold down the Shift key, and then press the right arrow to move past the Off code.
7. From the Styles Editor menu choose Tools, Reference, Table of Contents to display the Table of Contents tab of the Reference Tools dialog.
8. Click a Mark button to mark the heading text for a particular level in the table.
9. Choose OK to close the Reference Tools dialog box. One [Mrk Txt T.O.C.] code is inserted in the On side and another on the Off side.
10. If necessary, repeat steps 39 for other outline levels.
Defining Tables
You can define a table of contents whenever you like before or after you've marked the entries. Defining the table is a two-part process. First, you create a page for the table, which in most cases is at the top of the document. Second, you define how you want the table of contents to look. You choose the number of levels and the position and format of the page number that goes along with each entry. You can also make global changes to the way table of contents entries are formatted by editing the five table of contents styles (one for each level).
Follow these steps to define a table of contents:
1. If necessary, create a new page and type a title for the table of contents.
2. Click on the line where you want the first entry to appear (usually 23 lines down from the title).
3. If the Table of Contents tab of the Reference Tools dialog box is displayed, click Define.
Otherwise, choose Tools, Reference, Table of Contents to display the dialog box, and then click Define. The Define Table of Contents dialog box appears (see Figure 16.3).
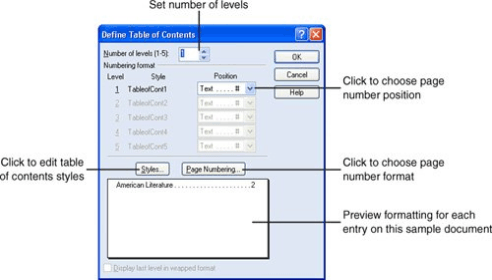
4. Type the number, or click the spinner arrows to set the Number of Levels (15).
5. Click the drop-down arrow for each available level and choose a page number position. (Depending on what you choose in step 4, some of the levels might not be available.)
6. Click Page Numbering to open the Page Number Format dialog box (see Figure 16.4). Select the document's page number format, or create a custom page number format, and then click OK.
7. To edit the table of contents styles, click Styles. Select one of the TableofCont styles, and then click Edit. Click OK to return to the Define Table of Contents dialog box when you are finished making your changes.
8. Click OK. WordPerfect inserts the text "Table of Contents will generate here".
Now you've defined the table of contents so that when you generate the table, the table of contents entries have a place to go. You're almost done. Now you need to do two more things:
So that the first page of text following the table of contents starts on a new page, it might be necessary to insert a hard page at the end of the table of contents.
Reset page numbering to 1 if you don't want the table of contents pages included in the page count. Also, if you've formatted the table of contents page numbers in Roman numerals, you might want to switch to Arabic numerals for the body text.
Generating Tables
When you generate a document, WordPerfect compiles all the document references and creates tables, lists, and indexes. Generating a document takes a lot of processing power, so before you begin, save the document. Better safe than sorry, I always say.
When you generate a document, all the document references (that is, the table of contents, the table of authorities, the index, lists, and cross-references) are generated at once. When you regenerate a document, the old tables, lists, and indexes are deleted from the document and rebuilt. This way, any entries that you've deleted are removed.
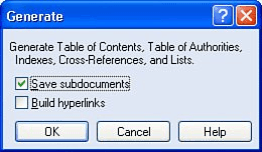
To generate a document, click the Generate button in the Reference Tools dialog box, or choose Tools, Reference, Generate. Or, you can press Ctrl+F9. The Generate dialog box appears:
NOTE:
If the Save Subdocuments check box is enabled, the Generate feature updates the document references in subdocuments. This can be extremely time-consuming because WordPerfect must open each subdocument, generate the references, and then save the subdocument. If you have links to subdocuments in this document, and you don't want to generate them, deselect Save Subdocuments in the Generate dialog box.
Click OK to generate the table of contents.
Was this article helpful?
Tell us how we can improve it.