Q: Why does text disappear when I'm typing in a table?
A: For one reason or another, you're out of space. But don't worry, your text isn't gone — WordPerfect stores the text and codes it as Hidden Text. When more space becomes available, the text is no longer coded as Hidden Text, and it moves into the table where you can see it. The following situations are the most common causes of disappearing text:
Too much text in a cell. If the text in a cell fills up a page, any additional text is stored as Hidden Text. To find possible solutions, jump ahead to the last question in this tutorial ("How can I reduce the amount of spacing in and around my table?"), or review the answer to the previous question ("Why did a row move down to the next page?").
A fixed row height. By default, row height in a table is set to Auto. This option allows WordPerfect to set the row height automatically, depending on the content of the row cells. If you know how long the entry will be, you can set a fixed row height. To do this, chooseTable > Format, click the Row tab, and choose Fixed (in the Row height section). Then, type the height in inches. Fixed row heights are used frequently in form documents, such as invoices, inventory lists, and applications.
Unusually large cell margins. Check the Row and Column margins (choose Table > Format, and click the Row or Column tab). The default setting for row margins is .083 on the top and .040 on the bottom; the default setting for column margins is .083 on the left and .083 on the right. Your settings should be set to the defaults or smaller to maximize the amount of space in the cells.
Q: Is there a way to prevent unauthorized or accidental changes to certain cells in a table?
A: Sure thing! You can lock the cells that you don't want modified. Simply click in the cell (or select a group of cells), and then chooseTable > Format. On the Cell page, enable the Lock cell to prevent changes check box, and choose OK.
Caution: Do not lock all of the cells in a table because you won't be able to unlock them. In order to access the Properties for Table Format dialog box, you need to have at least one unlocked cell that you can click. From the Cell page of the dialog box, you can disable the Lock cell to prevent changes check box.
Q: Can I rotate the text in my column headings?
A: Yes! Click in the cell that you want to rotate, and choose Table > Format. On the Cell page, make a selection from the Rotatedrop-down list. The sample cell in the dialog box shows you how the heading will look when it's rotated (see Figure 3).
You can rotate text only in 90-degree increments. If you need a more precise rotation, consider creating the heading in Presentations™. You can insert the heading as a graphic above your table or in the top row, with all of the cells joined together into one big cell (select the row, and choose Table > Join > QuickJoin).
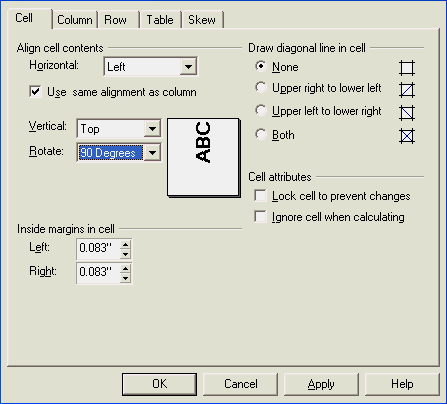
Figure 3
The sample cell in the Properties for Table Format dialog box dynamically reflects the selections you make, so you can preview the results.
Q: Can I place text next to a table?
A: Absolutely. There are at least three ways to do this: (1) Create a large cell by joining cells in a column and removing the lines; (2) place the table in one column and the text in another column; or (3) place the table in a graphic box, and let the text wrap around the table. The following considerations can help you decide which method to use.
Although you can easily create a large cell on the left or right side of a table, doing so does not cause the text to flow around the table. The first line of the text lines up with the first row of the table, and any text that extends beyond the last row of the table wraps within the cell margins.
You can place tables in columns. Here again, the text wraps within the column margins. If you don't need the text to wrap around the table, you can just create a large cell and use columns.
The most flexible option, however, is to place the table in a graphic box so that the text can wrap around the box. The disadvantage of this method is that you have to edit the graphic before you can change any of the information in the table. (To edit the graphic, double-click the box.)
Q: How can I create a table that automatically increases in size as information is inserted during a merge?
A: Just add the REPEATROW merge command to the rightmost cell in the table row that contains the field codes for the merge. Here is an example:
| Name | Address | Contribution | YTD Contribution |
| FIELD(Name) | FIELD(Address) | FIELD(Contrib) | FIELD(YTD) REPEATROW |
Q: How can I reduce the amount of spacing in and around my table:
A: First, get rid of those extra hard returns (HRt)! They can cause the table rows to be wider than they need to be. Turn on Reveal Codes (Alt + F3), and delete any hard returns that you find. A row is always as tall as the tallest cell, so you need to check every cell in the row.
Second, consider changing the orientation of the table. If you have many columns, you might want to change to landscape orientation by changing the paper size to 11 × 8½ inches. Landscape orientation gives you more room for columns, but less room for rows. The default, portrait orientation, allows more rows on a page, but fewer columns.
Third, try reducing the top and bottom margins of the document. You might be able to get those stray lines on page 2 to move up to page 1.
Fourth, resize the columns so that the descriptive columns are larger. The text won't wrap as much, and the row will be smaller. Numeric columns can be sized so they are just large enough for the entries. The quickest way to resize a column is to position the mouse over the vertical line between the columns. When the sizing pointer appears, click and drag the mouse.
Fifth, try switching to a smaller font. Keep in mind that for small type sizes, sans serif fonts (for example, Arial and Lucida Sans) are easier to read.
Finally, adjust the row and column margins. Row margins control the space between the text and the top and bottom (horizontal) lines of a cell. Column margins control the space between the text and the right and left (vertical) lines of a cell. To adjust row margins, choose Table > Format, click the Row tab, and set the controls in the Row margins section. To adjust column margins, choose Table > Format, click the Column tab, and set the controls in the Inside margins in column section. When setting the row margins, you can use a smaller bottom margin, because the font has "leading," which is the built-in space at the bottom of a character. If you remove the horizontal lines in the table, you can set the row margins to zero.
Note: Be sure you check out two previous tutorials in WordPerfect Expert: creating forms with tables and creating formulas in tables.
Was this article helpful?
Tell us how we can improve it.