Putting Together an Annual Holiday Letter
by Laura Acklen
www.wpwriter.com
A newsletter is a great way to update your friends, family and business clients on what you've been up to. This year, prepare to make your newsletter a long-standing tradition by setting up the look and layout you want. In the years to come, you'll spend less time designing your letters, and more time sharing your news.
This tutorial explains how to create a newsletter layout, with two columns, a fancy title, and pictures. Even better, you'll create styles for the title and the body text in your letter. The styles you create for this newsletter can be used the next time you do a newsletter to speed everything up. In fact, you can use these styles in any document you choose.
Creating the title
If you are using decorative paper for your letter, you might want to whip out a ruler and measure the space available for text. Depending on the style of your paper, you may not want to include a title in your holiday letter. Besides, it's easy enough to add a title later, especially if you save the format as a style.
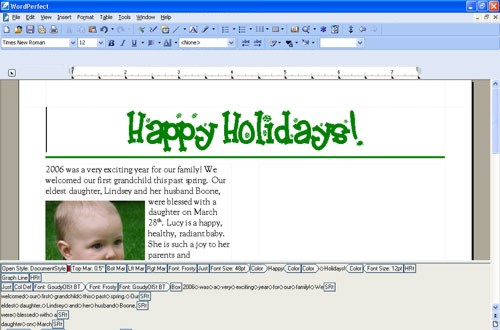
If necessary, choose Format > Margins, and adjust the margins in your document. Type the title for your letter, then choose a decorative font and a suitable font size. If you want to change the color of the title, select the text, press F9 (or choose Format > Font), and choose a color from the color palette. Choose OK to close the Font dialog box. The figure below shows the title in 48-point Frosty font, in green.
To add a line to separate the title from the body of the letter, press Ctrl+F11 (or choose Insert > Line > Horizontal Line). The default horizontal line is quite thin; if you'd like to make it a bit thicker, click the line to select it, and drag one of the vertical sizing handles to enlarge or reduce its width (see Figure 1).
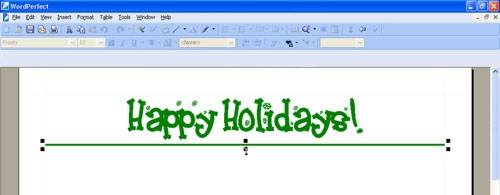
Use the sizing handles that appear around a line to increase or decrease its width and length.
Setting up the columns
Newsletters are normally used to update readers on your activities. In that respect, they are no different than a newspaper - they are designed to communicate information in a visually pleasing way. For this reason, columns are often used to format body text.
There are two ways to apply columns to a page: You can set up the columns first, and then type your text, or you can type your text, and then format it into columns. In this letter, you'll set up the columns first. Place the insertion point where you want the columns to start (one or two lines below the title). Click the Columns picker on the toolbar, and then choose the number of columns you want (see Figure 2).
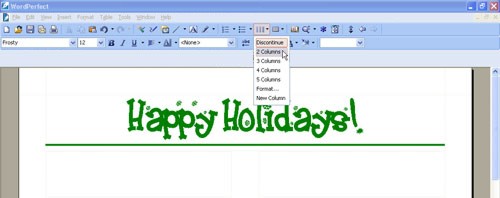
The quickest way to set up columns is by clicking the Columns button on the toolbar, and choosing the number of columns you want.
You may see some faint guidelines that show you the dimensions of the columns (they aren't visible on all monitors). When the insertion point is in a column, the column margins are displayed, as well as the amount of space, referred to as the gutter, between them (see Figure 3). You can adjust the columns by using the guidelines; adjust the width of the gutter by using the ruler. ChooseView > Ruler to display the ruler.
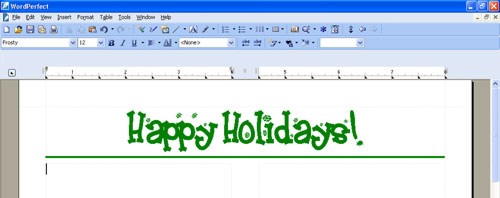
If the insertion point rests inside a column, the column's dimensions display on the ruler.
Start typing your letter, select the text, and then experiment with different fonts until you find the look you want. Figure 4 shows the text in Goudy OlSt BT (similar to Goudy Old Style). If you are going to print the letter in color, consider experimenting with the color of the text — just for fun. If you are going to print the letter on decorative paper, try matching the text with one of the colors in the paper.
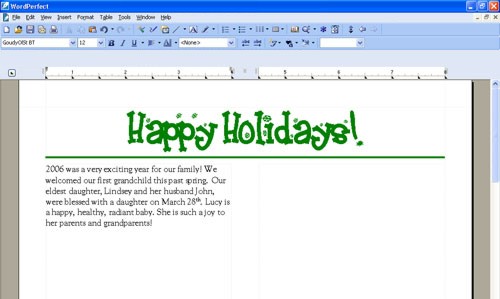
Experiment with the font, font size, and text color in the first paragraph of your letter to acheive the look you want.
Tip: For more information on working with text in columns, see my article titled "Columns Basics." This article was originally published on Corel's Officecommunity.com site. It is now available only on my web site.
Adding pictures
No newsletter is complete without photos. There are no exceptions. Fear not - it's fairly simple to add them. If you know where to find the pictures you have stored on your computer, you can easily insert them into your letter. From there, you can resize your pictures and place them exactly where you want them.
Place the insertion point where you want the picture to appear. Choose Insert > Graphics/Pictures > From File to open the Insert Image dialog box. Browse to the folder where the picture is stored. Select the file, then choose Insert.
WordPerfect converts the picture and inserts it into the letter. Now, chances are the picture isn't the exact size you want, nor is it in theexact location you want. Not a problem. First, select the picture. Sizing handles should appear around it. Now, move your pointer over one of the corner sizing handles. The pointer should change to a double-headed arrow. Click and drag to resize the picture. This method of clicking and dragging a corner sizing handle lets you resize images without affecting their proportions.
To move the picture, select it and drag it to a new location (see Figure 5).

When the pointer changes to a four-sided arrow, click and drag the image to a new location.
Creating a style from previously formatted text
Now, here's the good part. You can take advantage of the tweaking and fiddling you did with the fonts, font sizes, text color, margin settings, column settings, and so on, and you can use those settings in next year's holiday letter. How? By creating a style. A style is just a combination of formatting attributes that you can save and use over and over again.The beauty of styles is that you can create them based on the formatting you've already applied to your document. This method of working with existing text is much easier than creating styles from scratch in the Style Editor.
First, you'll turn on Reveal Codes to display the formatting codes contained in your letter.
You need to be able to see the codes you are selecting, so that you copy only the formatting you want to save in the style. ChooseView > Reveal Codes, or press Alt+F3. Press Ctrl+Home twice to place the insertion point at the very top of the document. In the Reveal Codes window, you'll see a red square (which represents the insertion point), formatting codes, and the text you've typed in the letter.
The [Open Style: DocumentStyle] code is the first code in any document, and it cannot be deleted. Immediately after this code are the formatting codes that were created as you adjusted the margins, added columns, changed the font and font size, and applied color to the text. The codes for the title are next, followed by the codes for the horizontal line (see Figure 6). These are the codes you need to copy to create the title style.
Reveal Codes allow you to view the text and formatting codes in your document. You can easily select the text and codes you want to save as a style.
Press F8 to turn on Select. Press the right arrow key to move the cursor past the [Graph Line] code. Press Ctrl+C to copy the codes. Now, choose Format > Styles > Create, to open the Styles Editor. Type a name for the style in the Style Name box. If you like, type a detailed description of the style in the Description box. Click in the Contents box, and then press Ctrl+V to paste the codes (see Figure 7). Voila! You've created a style you can use again and again. Choose OK, Close.
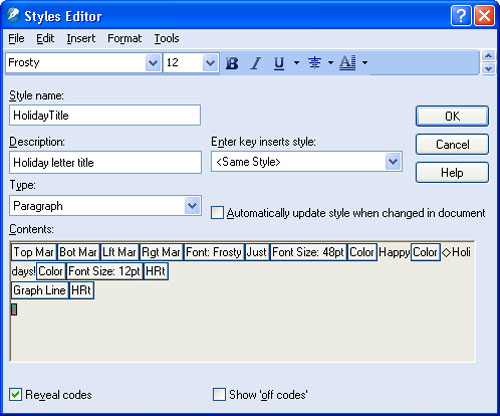
You can paste the text and codes into the Contents box.
Now, let's do the same thing for the body text in your letter. Place the insertion point before the [Col Def ] code. Press F8 to turn on Select, and press the right arrow key to move the cursor past the font, font size, and text color codes you want to include in the style. Press Ctrl+C to copy the codes. Choose Format > Styles > Create,to open the Styles Editor. Type a name for the style in the Style Name box. Again, you can type a detailed description of the style in the Description box. Click in the Contents box, and then pressCtrl+V to paste the codes. Choose OK, Close.
Tip: For more information on working in Reveal Codes, see the tutorial "Getting the Most Out of Reveal Codes in WordPerfect."
Was this article helpful?
Tell us how we can improve it.