Troubleshooting the WordPerfect Print subsystem might be required if you are having issues launching WordPerfect, issues with WordPerfect printing too slow or not printing at all. This article is a guide to troubleshoot the WordPerfect Print subsystem. ","
It is recommended that you test WordPerfect after each section of this article.
Clear the print queue
In many cases, a jammed print queue will prevent WordPerfect from opening or will cause the application to stall while attempting to print. Before doing anything else, verify that the print queue is clear. To do this, follow the instructions below:
- Browse to your Control Panel and select Printers (or Printers & Faxes)
- Open the printer you are trying to print to. If there appear to be any jobs stuck here, click on the Printer menu and select Cancel All Documents. Perform the same step for each printer installed on your system.
- Open WordPerfect and try printing again.
Remove any offline printers
When trying to initialize its print engine, WordPerfect will retrieve page definitions from all your printers to evaluate if your printer can print the document being processed. If there are any printers that are listed as Offline or Unable to Connect, then WordPerfect might experience a delay while initializing the print engine.
- Browse to your Control Panel and select Printers (or Printers and Faxes)
- Right-Click on any printer listed as Offline or Unable to Connect
- Select Delete
- Repeat this procedure for all printers listed as Offline or Unable to Connect
Restore WordPerfect stored printer information:
WordPerfect stores some printer specific information. WordPerfect may not print as expected if this information is not synchronized with the printer. To restore this information, the WordPerfect print engine must be restored to its factory defaults.
This section involves modifying the Windows Registry. It is recommended that you back up your registry before proceeding with this step. Click here for important information about backing up the Windows Registry.
This process involves working with the Windows Registry. As such it is critical to back it up first. Here's how:
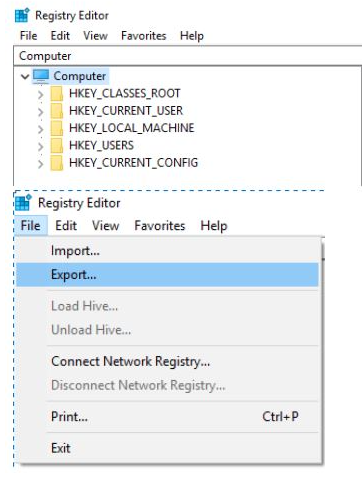
- In the Windows Search type "Regedit" or press WIN+R and type "Regedit"
- Locate Computer by scrolling to the very top of the left side of the registry
- Once found, select the registry key in the left pane so that it becomes highlighted.
- From the Registry Editor menu, choose File and then Export. You can also right-click or tap-and-hold the key and then choose Export.
- In the new window that appears, double-check that the Export range selected is set to ALL
- Once you're sure you'll be backing up what you expected, choose a location to save the registry backup file to.
- (We usually recommend choosing the Desktop or the Documents folder)
- In the File name text field, you may want to name it something like Complete Registry Backup / Reg_Backup
- Select Save
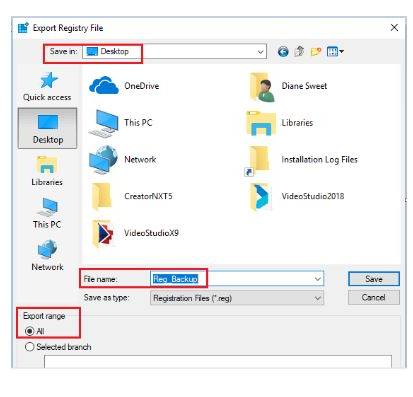
- Once complete, a new file with the REG file extension will be created in the location you selected
Windows 8.1, 10 and 11
- Check your version number in WordPerfect by clicking Help, About WordPerfect. In Step 6, you will need the part before the decimal. So Version: 21.0.0.81 is 21.
- Press WinKey + R on the keyboard to open the Run dialog. Type Regedit in the Open box and click on OK.
- Scroll up to the top of your screen until you see ‘My Computer’
- Browse to HKEY_CURRENT_USER\\SOFTWARE\\Corel
- Right click on Corel and choose Export. Save the file as "Corel Registry Backup.reg"
- Right-click on the folder ‘PrintEngine’ and go down and left click on ‘Rename’. Change the name to PrintEngineOld
- If you don't see a list of entries indented under Corel, double click on the word Corel and then perform step 6.
- Browse to HKEY_CURRENT_USER\\SOFTWARE\\Corel\\WordPerfect\\21
- Replace 21 with your version number from Step 1.
- Right-click on the folder ‘Envelope’ and go down and left click on ‘Rename’. Change the name to EnvelopeOld
- NOTE: The 'Envelope' entry may not be present on all systems. If it is not present proceed to the next step.
- Scroll up to the top of your screen until you see 'My Computer'.
- Click on the ‘˅‘ to close the folder ‘HKEY_CURRENT_USER’ (or double-click on the words ‘HKEY_CURRENT_USER’)
- Click View, Refresh.
- Close the registry editor.
Windows 7
- Check your version number in WordPerfect by clicking Help, About WordPerfect. In Step 6, you will need the part before the decimal. So Version: 21.0.0.81 is 21.
- Click on Start all programs, accessories and click on Run. Type Regedit in the Open box and click on OK.
- Scroll up to the top of your screen until you see ‘My Computer’
- Browse to HKEY_CURRENT_USER\\SOFTWARE\\Corel
- Right click on Corel and choose Export. Save the file as "Corel Registry Backup.reg"
- Right click on the folder ‘PrintEngine’ and go down and left click on ‘Rename’. Change the name to PrintEngineOld.
- If you don't see a list of entries indented under Corel, double click on the word Corel and then perform step 6.
- Browse to HKEY_CURRENT_USER\\SOFTWARE\\Corel\\WordPerfect\\21
- Replace 21 with your version number from Step 1.
- Right click on the folder ‘Envelope’ and go down and left click on ‘Rename’. Change the name to EnvelopeOld
- Scroll up to the top of your screen until you see 'My Computer'.
- Click on the ‘-‘ to close the folder ‘HKEY_CURRENT_USER’ (or double-click on the words ‘HKEY_CURRENT_USER’)
- Click View, Refresh.
- Close the registry editor.
Remove the printer driver
In many cases, WordPerfect will hang for long periods of time while its trying to communicate with a particular printer driver. This can sometimes be rather evident if the printer driver happens to be a network printer, or if the network printer is not hooked up to the computer. In order to troubleshoot this kind of problem, you will need to remove your printer drivers to rule this out.
NOTE: Before proceeding, it is recommended that you download the latest drivers from your printer manufacturer’s website so that you can re-install the printer. If you have Windows 95, Windows 98 or Windows ME, you might also require your Windows CD.
- Click on Start
- Click on Settings and than Printers
NOTE: If you have Windows XP, you might be able to select Printers and Faxes directly from the Start Menu - Right-click on your printer, and select Delete to remove the printer.
NOTE: If you happen to have network printers, start with any drivers that may be offline or you can no longer connect to. Fax drivers, Adobe® Distiller, PaperPort® are also considered printer drivers by WordPerfect and could also be causing problems. If you happen to have PaperPort v7.0, please visit PaperPort’s website at http://www.scansoft.com and obtain the latest Service Pack for your product which addresses known compatibility issues with WordPerfect.
Disabling Startup Items
- Click on Start and go up to Run. Type msconfig into the Open: box and click on Ok.
- Click on the Startup tab at the top of the screen.
- Remove all the checkmarks and click on Ok.
- Restart your computer and try WordPerfect again.
Add an emulation driver
Sometimes a different driver altogether might need to be installed to troubleshoot the Print subsystem. In this example, we will use an Apple LaserWriter; a generic PostScript printer. Contact your printer manufacturer to see if your printer has PostScript capabilities. If it is the case, than you can use almost any PostScript driver with your printer, even if it is not for the same model.
- Browse to your Printer’s Control Panel and double-click on Add Printer
- Click on the Next button
- Select Local Printer and ensure that the Automatically Detect and Install My Plug And Play Printer option is unchecked
- Click on the Next button
- Ensure that LPT1 is selected then click on the Next button
- Select Apple as the manufacturer
- Select the Apple LaserWriter 12/640 in the printers list
- Click on the Next button
- Select Yes to make the Apple printer your default printer
- Click on the Next button
- Select the option Do Not Share This Printer and click Next
- Select No to print a test page then click Next
- Click Finish to complete the installation of the printer driver
- Launch WordPerfect and Test
Enable Bidirectional Support for the Printer
If bidirectional support isn't enabled you may experience printing issues with WordPerfect. To enable this feature follow these steps.
- Browse to your Printer’s Control Panel
- Right click on your Printer, select Properties
- Click the Ports tab
- Check "Enable bidirectional support"
- Click Ok
- Launch WordPerfect and Test
Was this article helpful?
Tell us how we can improve it.