Inserting a watermark
You can insert a watermark, which is a lightly shaded image, behind text and other graphics on a page. Watermarks are used as a background for text. WordPerfect® allows you to create watermarks from an image on file or from a clipart image. You can have a maximum of two watermarks in each document. You can adjust the shading of watermarks within each document to make them lighter or darker. You can also suppress or delete a watermark.
To insert a watermark by using a clipart image
- Click the top of the first page where you want the watermark to display.
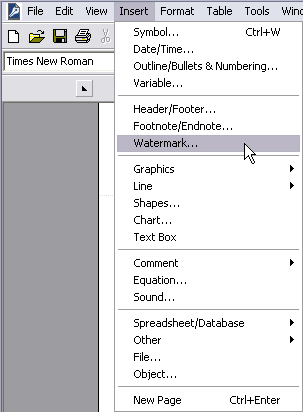
- Click Insert > Watermark.
- Enable one of the following options:
- Watermark A
- Watermark B
- Watermark A
If you want to align the watermark with the document margins, enable the Align with document margins check box.
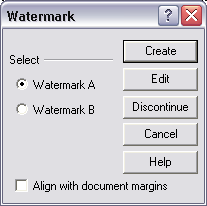
- Click Create.
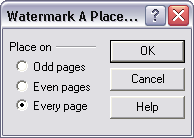
- Click the Watermark placement button on the property bar.

- Enable one of the following options:
- Odd pages — prints the watermark on odd pages
- Even pages — prints the watermark on even pages
- Every page — prints the watermark on all pages
- Odd pages — prints the watermark on odd pages
- Click Insert > Graphics > Clipart to open the Scrapbook™.
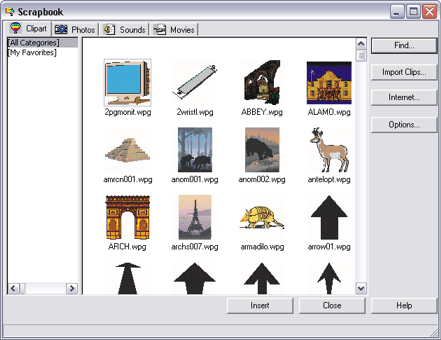
- Choose a clipart image, click Insert, and close the Scrapbook.
- Click File > Close.
To insert a watermark by using an image from a file
- Click the top of the first page where you want the watermark to display.
- Click Insert > Watermark.
- Enable one of the following options:
- Watermark A
- Watermark B
- Watermark A
If you want to align the watermark with the document margins, enable the Align with document margins check box.
- Click Create.
- Click the Watermark placement button on the property bar.
- Enable one of the following options:
- Odd pages — prints the watermark on odd pages
- Even pages — prints the watermark on even pages
- Every page — prints the watermark on all pages
- Odd pages — prints the watermark on odd pages
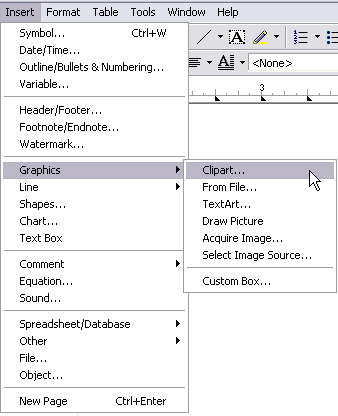
- Click Insert > Graphics > From file.
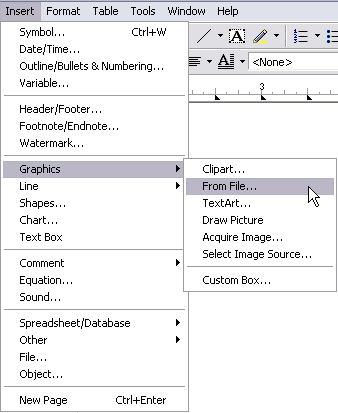
- Double-click the folder in which the image is stored, and double-click the image.
- Click File > Close.
To adjust the shading of a watermark
- Click the top of the first page where the watermark displays.
- Click Insert > Watermark.
- Enable one of the following options:
- Watermark A
- Watermark B
- Watermark A
- Click Edit.
- Click the Watermark shading button on the property bar.

- Type values in the following boxes:
- Text shading
- Image shading
- Text shading
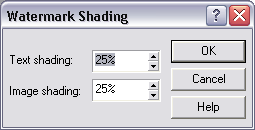
- Click OK.
- Click File > Close.
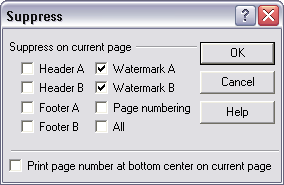
To suppress a watermark
- Click Format > Page > Suppress.
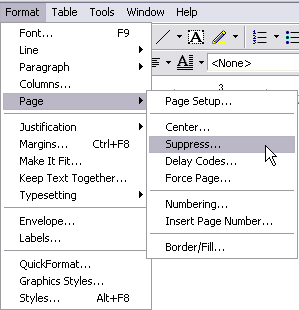
- Enable one or both of the following check boxes:
- Watermark A
- Watermark B
- Watermark A
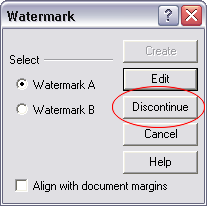
To delete a watermark
- Click the top of the first page where the watermark displays.
- Click Insert > Watermark.
- Enable one of the following options:
- Watermark A
- Watermark B
- Watermark A
- Click Discontinue.
Was this article helpful?
Tell us how we can improve it.