


What you will learn:
- Accessing the video options panel
- Adjusting and resetting the color options
- Adjusting video speed, length, and direction of payback
- Fading video in or out
- Splitting audio from video
The Options panel
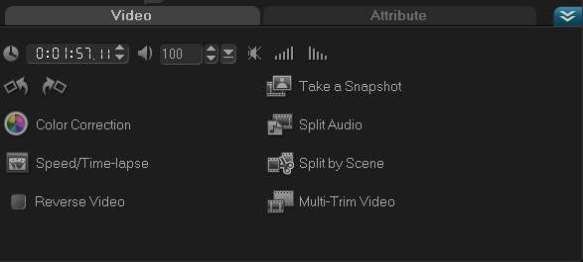
The most common video adjustments can be made in the Options panel, where you can make changes to color levels, hue and saturation, white balance, video speed, and
orientation.
Accessing the Options panel
Do any of the following in the Edit Step panel:
Click the Open Options Panel button
Double-click a video clip.
Right-click a video clip, and choose Open Options Panel.
Adjusting colour options
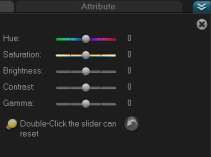
Clicking Color Correction gives you access to a range of settings for easily adjusting the hue, saturation, brightness, contrast and gamma. If you dont like an adjustment, youcan undo all changes or simply reset a single slider with a double-click.
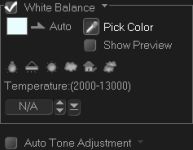
Checking the White Balance option box gives you access to the color-temperature controls. VideoStudio X4 also has a tool for automatically adjusting the video color tone. These features might require a little experimentation before your video clip looks the way you want.
Adjusting video speed, length and direction
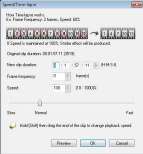
Clicking the Speed/Time-lapse button gives you access to features that allow you to speed up or slow down a video. In the Speed/Time-lapse dialog box, you can specify a clips running time, determine how many frames per second to remove, or adjust clip speed simply by moving the Speed slider. Any changes you make with the Speed slider are automatically updated in other Speed/Time-lapse controls, and any changes you make to any of the controls is reflected in the Speed slider.
Reversing your video
Checking the Reverse Video option box plays a clip backwards. If a video contains audio, its a good idea to split the audio track from the clip before reversing it.
Fading audio in and out
You can create smooth transitions by clicking the Fade In or Fade Out buttons to have background music start and end gradually.
Splitting audio
You can separate an audio track from a video clip by clicking the Split Audio button. This allows you to manipulate the audio totally independent of the video.
There are more controls on the Options panel, such as Multi Trim and Split by Scene, that are covered in separate tutorials.
If you have enjoyed this tutorial, be sure to check out the other tutorials that are available in the Discovery Center. If you have any ideas for tutorials or projects that you would like to see in the future, please leave us some Feedback.
Was this article helpful?
Tell us how we can improve it.