


Introduction
Create an Ultra HD (4K) videothe latest format in video technologyfor the ultimate video viewing experience.
What You Will Learn
Some newer video cameras offer higher video resolutions such as 4K resolution (with 3840 x 2160 pixels) and 2.7K resolution (with 2704 x 1524 pixels) in a widescreen aspect ratio. The 4K resolution is also called Ultra HD which is four times higher than the standard High-Definition resolution of 1080p (1920 x 1080 pixels).
In this video tutorial, you will learn how to:
- Prepare VideoStudio for editing Ultra High-Definition footage
- Create an Ultra HD (4K resolution) project
Prepare VideoStudio for Ultra High-Definition Editing
Before you begin, you may want to configure some settings in VideoStudio that will help you optimize the performance of your system when dealing with High-Definition videos.
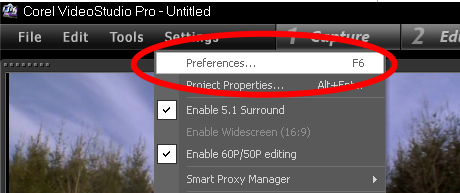
1. On the Settings menu, click on Preferences.
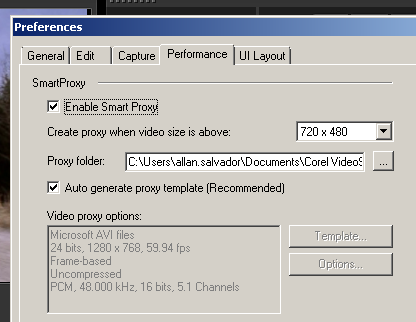
2. Go to the Performance tab and enable Smart Proxy. This will create a copy of your HD video file with a much lower resolution, so that when you edit and preview your HD video, the video with lower resolution (or what is called a proxy file) will be used as a substitute for the original HD video. Smart Proxy allows for a smoother and faster editing experience when working with HD files.
3. Next, enable the Hardware Decoder and Hardware Encoder accelerations to perform much faster processing when editing and exporting your project into a new video format.
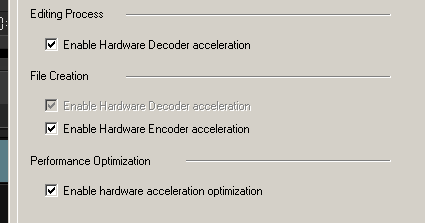
4. Enable the Performance Optimization as well. If your computer doesn't support these settings, you will see the hardware acceleration options grayed out.
5.Click on OK when done.
Create an Ultra HD (4K resolution) Project
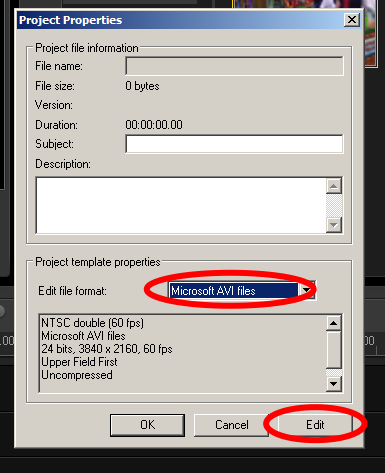
1. Now, start creating your Ultra HD (4K) video by going to Settings > Project Properties.

2. From the Edit file format drop-down list, select Microsoft AVI files and then click on the Edit button.
3.On the Project Options dialog box, go to the General tab and enter the following settings:
a.Data Track: Audio and Video
b.Frame rate: 59.94 fps
c.Frame Type: Frame-based
d. Frame size: 3840x2160
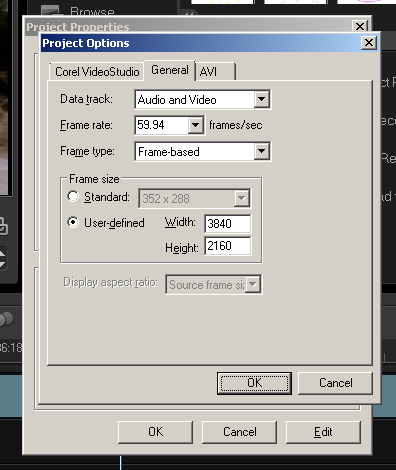
4. Click on OK 3 times when done.
5. From the Library panel, select an HD video file and drag it into the Timeline.
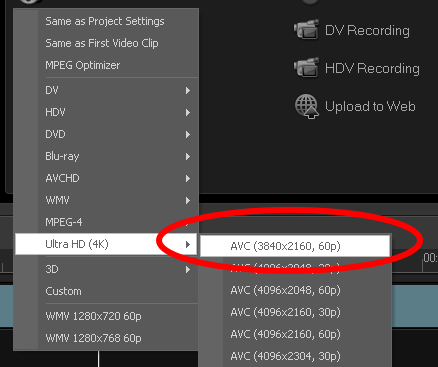
6. When youre ready to export your Ultra HD (4K) project, go to the Share step and choose the format that you would like to export your project as. For this example, go to Create Video File and select Ultra HD (4K) > AVC (3840 x 2160, 60p).
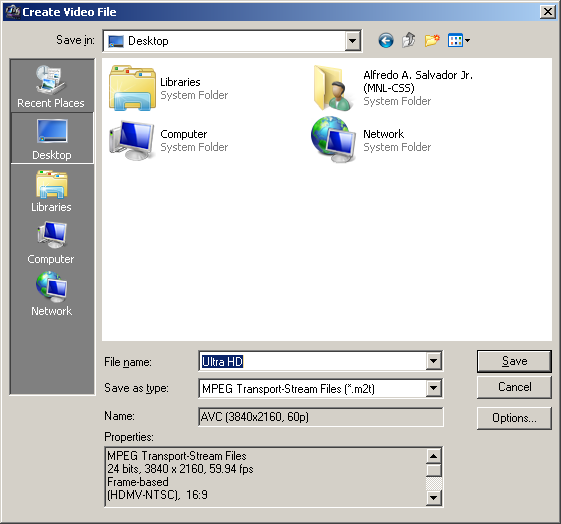
7. Name your project and click Save. VideoStudio will start rendering your project.
8. Once your project has been rendered, the video will be placed in your library and will start playing in the Preview panel.
And thats how you create an Ultra HD (4K) video in Corel VideoStudio Pro X6. Thank you for watching.
If you enjoyed this tutorial, be sure to check out the other tutorials that are available at the Discovery Center. If you have any ideas for tutorials or projects that you would like to see in the future, please leave us some Feedback.
Was this article helpful?
Tell us how we can improve it.