Painting Portraits from Photos in Corel® Painter™
By Karen Sperling
Many professional photographers offer their clients painted portraits, which they create in Corel® Painter™, based on an original photo. If you're a professional photographer, or a hobbyist who wants to paint portraits of your kids or grandkids, you can try painting portraits with Corel Painter! This tutorial includes a few simple steps, which incorporate some basic art concepts, for painting portraits in Corel Painter.
Painting out details
When painting, the first concept to keep in mind is that a painting has less details than a photo. Therefore, I like to start a portrait by painting out the details of the face by using a Blender.
To paint out the face details
- From the Brush Selector bar, I choose the Blenders category and the Just Add Water variant.
- On the Property bar, I lower the Size slider setting and blend the irises and the corners of the eyes to eliminate some of the details.
- From the Brush Selector bar, I choose the Chalk category, and the Sharp Chalk variant.
- On the Property bar, I lower both the Size and Opacity slider settings, and then paint highlights in the eyes.
Outlining irises
One popular technique found in painted portraits today is outlining the irises. To achieve this look, I paint the iris outline by picking up the color of the iris and then outlining the iris with a color that is a shade darker.
To outline irises
- I press Option (Mac OS®) or Alt (Windows®), and click the iris to pick up the color.
- From the Colors palette, I choose a shade that is slightly darker than the iris color.
- From the Brush Selector bar, I choose the Chalk category and the Sharp Chalk variant.
- Next, I outline the iris with the darker color.
Painting shadows
In painted portraits, there is the concept that the brows and the area above the eyes cast a shadow. To achieve this look in Corel Painter, I paint a shadow across the top of the eyes using a Digital Watercolor brush.
To paint a shadow across the top of the eyes
- From the Brush Selector bar, I choose the Digital Watercolor category and the New Simple Water variant.
- On the Property bar, I lower the Size and Opacity slider settings.
- I press Option Mac (OS) or Alt (Windows), and click the iris to pick up the color.
- I choose a darker shade in the Colors palette and then paint across the top of the eye.
- Next, I open the Layers menu and choose the Dry Watercolor layer.
- From the Brush Selector bar, I choose the Blenders category and the Just Add Water variant.
- I then proceed to blend out the distinguishable line between the darker top part and the lighter bottom part of the eye.
Adding catchlight to eyes
The next art concept that I apply to portraits is to add light to the bottom of the eyes. The term for this is catchlight.
To add catchlight in Corel Painter
- I start by choosing the Photo brush category and the Dodge variant.
- On the Property bar, I lower the Opacity slider.
- Next, I lighten the irises by painting them.
If the dodging makes the irises too white, I paint back the color using the New Simple Water variant from the Digital Watercolor category. You can then dry the watercolors (Layers menu).
In theory, the catchlight comes from the light source hitting the top of the eye. The rule of thumb is to paint the catchlight on part of the pupil and part of the iris. You can use the Sharp Chalk variant from the Chalk category or the Digital Airbrush variant from the Airbrushes category to paint the catchlight. To achieve a more subtle result, you can try lowering the opacity.
Adding contrast
To make my portraits more dramatic, I apply the art concept of contrast. I achieve contrast by heightening the highlights and shadows that I see in the photo by painting them in the portrait. For instance, I paint highlights on the face with the Digital Airbrush set to low opacity.
To add contrast to a photo
- Press Option (Mac OS) or Alt (Windows), and click on a highlight to pick up its color.
- Choose a lighter tone of the same color from the Colors palette and paint where you see highlights in the photo.
- You can then blend the color using the Just Add Water brush variant.
To add contrast to lips
For the lips, the art concept is that the upper lip is darker than the lower one because the light hits the lower one and the upper one is in shadow.
- With the Digital Airbrush set to low Size and Opacity settings, press Option (Mac OS) or Alt (Windows), and click on the upper lip.
- Choose a darker tone from the Colors palette and paint on the upper lip. Then press Ctrl (Mac OS) or Alt (Windows), and click on the lower lip.
- Choose a lighter tone and paint. I often reduce the size settings even more.
- Then press Ctrl (Mac OS) or Alt (Windows), click on a dark tone and paint the area between the lips and their outlines.
To fix edges
- Press Ctrl (Mac OS) or Alt (Windows), and click on the color of an area other than the lips (like the chin, for example), and paint next to the lips to adjust them. This is a technique called negative painting, where you paint around an area to give it emphasis.
- Then use the Just Add Water brush to blend.
- I paint the highlight on the bottom lip with the Dodge and blend with the Blenders' Grainy Water.
To paint hair
The art concept for hair is to paint areas of color and to suggest the details of the hair strands.
- I begin by painting the hair with Just Add Water brush variant on a low opacity setting to blend strands, creating areas of color based on highlights and shadows in the photo.
- Then with the Oils, Smeary Round variant chosen, I press Ctrl (Mac OS) or Alt (Windows), click a highlight, choose a lighter tone in the Colors palette, and paint.
- I choose darker tones and paint the shadows in a similar way. Then I blend some more with the Just Add Water variant.
- I repeat the process until I have areas of color with suggestions of hair strands. I add highlights in the hair by painting with the Dodge. I deepen tones in the hair by painting with the New Simple Water variant.

And there you have it! Steps (and art concepts) for painting portraits from photos in Corel Painter. Now all you need is some practice, and you'll be painting from your photos before you can say Michelangelo!
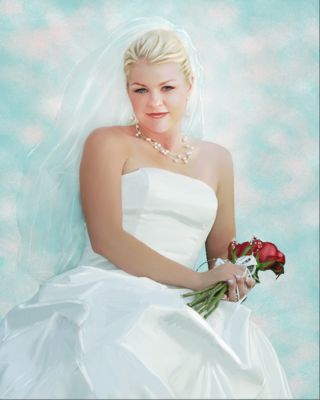
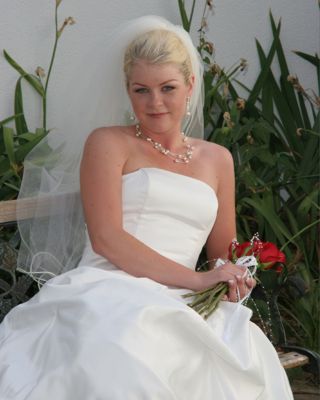
Painting by Karen Sperling from a photo by Michelle Lamberth.
Karen Sperling is the original Corel Painter expert. She wrote the first manual when the software debuted in 1991 and the manuals for several subsequent versions. She has written three Corel Painter books and her fourth, Painting for Photographers, about turning photos into paintings using Corel Painter and Adobe® Photoshop®, is due out soon. She publishes a monthly Corel Painter tutorial e-zine, Artistry Tips and Tricks, and teaches Corel Painter in her Artistry Painting for Photographers retreats. Karen is also an artist and a photographer. Her art has been exhibited in a gallery in New York's prestigious Chelsea art section and during Art Basel Miami, the biggest art show in the United States. Her art is held in private collections around the world. To see examples of Karen Sperling's art and photography, and for information about her Corel Painter tutorials, books and classes, visit Karen's web sites: http://artistrymag.com and http://karensperling.com.
Was this article helpful?
Tell us how we can improve it.