Improving Performance of Custom Brushes in Painter 12
Painter delivers an incredible amount of power to create brushes of all kinds. There are many different brush technologies available, each with various options. Part of the power of Painter is the ability to create custom brushes with all of these options available.
When I create custom brushes, I usually take a few minutes to tweak the settings to optimize my brush speed. There are many ways to do this, and I would like to share just a few of the quick and easy tricks I use to optimize the performance of my brush variants.
Depending on which brush technology you are using for your brush, some of there tricks may not apply. Also, depending on your particular hardware or system configurations, your results will vary from mine.
1. Spacing (spacing and min spacing)
If your brush is a "stamp" brush, meaning that is is a brush which "stamps" bitmaps in sequence, then spacing will have a huge impact on performance. Here is an example of how you can tweak spacing to improve performance.
Using the "Acrylics - Wet Acrylic" brush, I resize the brush radius from 30 to 200 pixels. The brush is now obviously slower than it was at 30.
If I open the "Spacing" panel in the brush controls I see the following settings:
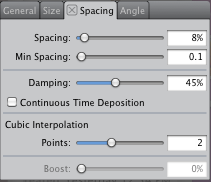
I then increase the minimum spacing between each "stamp" to 20 pixels. Since the brush radius is 200, using a min distance of 20 still looks good.
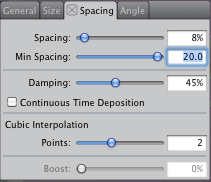
Using a benchmark test, I can now measure that the brush is 171% faster. Pretty good for one adjustment! Let's see if we can do better…
I now adjust the spacing between the stamps from 8% to 15%. I find that anything above 15% loses the "look" of the brush.
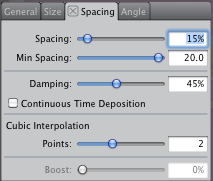
Using my benchmark test, I see that the brush is now just over 200% faster. Not bad! The only thing I noticed is that the brush is not quite as opaque. So I increase my opacity from 73% to 90%.
There you go, with a few adjustments, my 200 pixel brush is about twice a fast.
For better brush performance, you want to use the highest values possible for spacing and minimum spacing, while still maintaining your brush "look" so that the "stamps" are not too far apart. So start with high values, and work your way down until you like the look of the brush.
2. Boost
Boost is similar to spacing, but is used for brushes that are not "stamp" brushes. Increasing the boost setting, will increase the distance between each connection point in your brush stroke. In Painter 12, the boost slider is located on the spacing panel.
Consider this example, using the "Acrylics - Thick Acrylic Round" variant:
I resize the brush radius from 30 to 200 pixels, and again I notice that it is slower than it was at 30.
I set boost to 15%. Notice that spacing is disabled, because this is not a "stamp" brush, whereas the boost slider is now enabled instead.
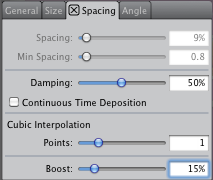
Using a benchmark test, I can measure that my brush is now 293% faster. That's almost 3 times faster!
Again the trick here is to use the highest "boost" setting that will still give you the look of the brush you desire. If you don't like how your brush looks, just bring the boost slider down until you find the best setting for both performance and brush look.
3. Feature
Depending on the brush technology used for your brush, the "feature" control can have different meanings.
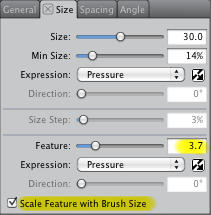
In this example, "Acrylics - Thick Acrylic Round", feature is the density of the bristles. The denser the brush, the slower it will be because it needs to compute and render more bristles marks.
If I resize this brush from 30 to 200 pixels, I notice that my "feature" setting is automatically scaled from 3.7 to 9.6. This is thanks to a new option in Painter 12, which allows brushes to automatically maintain bristle density as you resize them. This is called "Scale Feature with Brush Size".
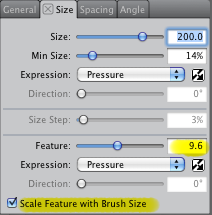
Note that a HIGHER FEATURE = LOWER BRISTLE DENSITY
But without this new option, my "feature" setting would have stayed at 3.7. If I measure the performance difference from having feature at 3.7 vs 9.6 using my benchmark test, I can see that the brush is a little over 6x faster! That is a huge difference.
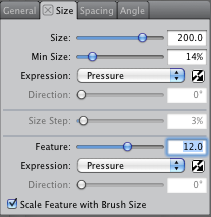
Sometimes though you still want to manually tweak the "feature" setting to get the exact bristle look you want. The key here is to increase feature as high as you can (basically decreasing bristle density), while still keeping the brush looking like you want it.
In this case, I like the look of my brush with a "feature" of 12.0. This gives me a brush that is about 1.4x faster than using a feature of 9.6. And the brush is almost 9x times faster than using a feature of 3.7, which would have happened without the new automatic "Scale feature with Brush Size" option.
4. Multicore
The last setting that I wanted to mention, which can really affect brush performance is the new "multicore" option.
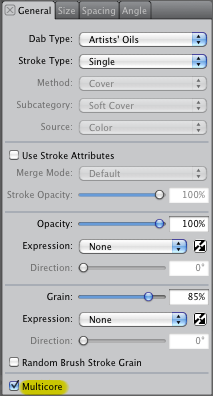
If you enable this setting, Painter will distribute the brush "work" to the multiple cores on your computer. For many brushes, this can help performance. However, in some cases, enabling multicore can actually reduce performance. For example, if your brush uses a small radius, or if the brush is not complex enough, then the cost of enabling multicore could be greater than the benefit.
Painter comes with most brushes with this option enabled. However, some brushes have it disabled because in our test systems we found that it would not help for those brushes.
For this example I will use the "Acrylics - Clumpy Brush" variant. If I resize the brush to 400 pixels and measure the performance using my benchmark test, I can see that enabling the multicore option makes my brush approximately3.5x faster.
My recommendation here is to simply try it. If you feel the brush is the same or faster, then I would leave the multicore option on. Otherwise, just turn it off for that brush.
Summary
With just a few minor adjustments to spacing (and min spacing), boost, feature and multicore, you can make a really big impact on your brush performance with little visual impact.
This is especially useful when increasing the size of you brushes.
If you have comments or questions, please send them along!
In the meantime, happy "FAST" painting 
Chris
Was this article helpful?
Tell us how we can improve it.