Hardcore Customization Part 2 - Customizing Menus
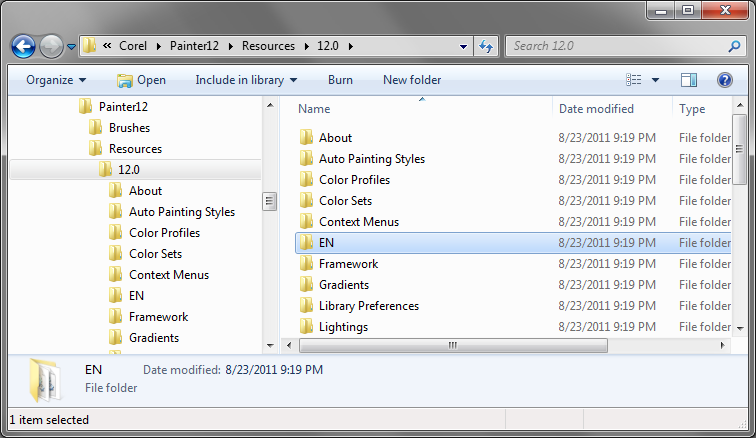
In this post, I’ll show you how to customize Painter’s menu structure. To begin, you need to locate the folder that holds the resources specific to your particular language. Chances are, if you're reading this post, you'll be interested in the English language resources. To find the English resources, you'll need to look in a folder parallel to the Framework folder. (Please refer back to Part 1 for help on finding the Framework folder.) If you've found the Framework folder, navigate one level higher in the tree. At this level, you should find be able to select the EN folder on Windows or English.lproj on the Mac. (If you’re running a localized version of Painter, you’ll want the folder that corresponds to your language. Example, JP = Japanese).
Changing the text in a menu item:
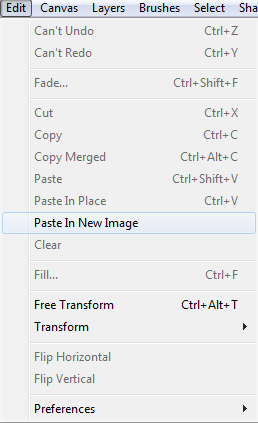
Now, let’s say you’re familiar with another program that has a feature called New from Clipboard that creates a new document based on the current contents of the clipboard. In Painter, this feature is called Paste in New Image. Maybe you’re frequently overlooking this feature in Painter because the name is different than you’re expecting. In this case, it might be worth renaming the menu item.
WARNING: Changes of this nature are not supported by Corel. You can render Painter unusable if you make a mistake. Make sure that you have backups of any files that you modify. MODIFICATIONS OF PAINTER XML FILES IS DONE AT YOUR OWN RISK.
Here’s how you’d do that:
- Open EN/MenuStrings.xml in a text editor. (Notepad on Windows or TextEdit on Mac should be fine).
- Search for the text you’d like to replace. (“Paste In New Image”)
- You should find a line that looks like
- Replace the text in between the quotes after value. Ex.:
- Save the file. (Note: If you don’t have write permissions for this file, you may have to save it first on your desktop and then manually copy the updated file back to its original location.)
- Re-launch Painter
That’s it!

Moving a menu Item:
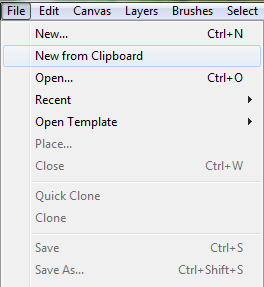
Extending the previous example, let’s say that you’d like to put that menu item in a different menu dropdown. Logically, you might want to put New from Clipboard in the File menu below the normal New... command.
To do this:
- Open EN/CommandBars.xml in a text editor.
- Search in CommandBars.xml for the menu item you’d like to move. Now, this can be difficult as this is a big file and is difficult to navigate. Matters are complicated by the fact that Painter uses special keys to identify menu items, not normal English text. Remember the key field from MenuStrings.xml? That’s the same key you’ll need in this file. For “Paste In New Image”, the key is Paste_In_New_Image.
- You should find the line:
- Cut that line from the Edit menu
- Find the File menu block. To find the File menu, look in MenuStrings.xml for a menu command that's already in the File menu. (New... for example.) Make note of the key associated with that menu item and search for that key in CommandBars.xml. Paste the line from step 3 somewhere in to the File menu block. Finding menu items in CommandBars.xml will get easier the more you work with the file. You'll start to recognize the patterns and should begin to be able to read the keys with some practice.
- You should now have something that looks like this:
- Save and re-launch Painter:
Creating your own menu
If this level of customization is not enough for you, you can push Painter even further by creating your own top-level menu dropdown.
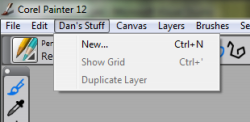
You can copy as many menu items in here as you’d like. You can have duplicates of menu items. You can keep a copy of a menu item in its original location. It’s up to you to decide how you’d like to structure things. In this example, I will create a "My Stuff" menu holding a few of my favorite menu options.
Here’s how to create your own menu:
- From the Framework folder, open the file called ItemData.xml. This file lists all the menu bars and menu items available to Painter.
- At the bottom of this file, we're going to define our own custom menu bar. To do this, add a new itemData entry. For your new entry, you need to create your own guid entry. Start with "MenuOther|" then append your any name you'd like, just keep it sorter than 20 characters.
For example: - Next, add a flyoutBarRef property to the itemData entry from step 2. You can name this anything you'd like.
For example: - From the EN folder, open the file called CommandBars.xml. This file defines the arrangement and content of alll the menus in Painter.
- Near the top of the file, you should see a section titled "MainPainterMenuBar". Add a reference to your new menu bar. Like this:
- From the EN folder, open the file called MenuStrings.xml. In here, we'll add the text to display for our new menu.
- Search MenuStrings.xml for "MenuOther". At the bottom of the category, just before the tag, add a new entry for the menu bar:
- Save all your modified files & relaunch Painter
At this point, you've defined a container to hold other menu items. It won't get interesting until we add our own menu items.
To add menu items to your new menu flyout:
- From the EN folder, open the file called CommandBars.xml.
- You need to define the menu that will drop down. This is done by adding a commandBarData entry to the end of CommandBars.xml (right before the tag). Like this:
- Next copy and paste any itemData entries that you want in to your new menu.
Like this:
This adds the command New..., Show Grid, and Duplicate Layer to our new menu.
That's it! Now you can make any kind of menus you'd like. Let me know if you have any trouble.
Was this article helpful?
Tell us how we can improve it.