

by Anand DixitCorelDRAW Master
In my graphic design business, I have a few clients in the construction industry who need sales brochures to promote the new developments that they're building. The floor plans for these projects, created by architects using computer-aided design (CAD) software, are technically perfect, but wouldn't mean much to the average person. Rather than creating promotional materials from scratch, I use CorelDRAW to reuse the floor plans to produce brochures that give prospective home buyers a better look at the layout of the house. Architects, being artists at heart, can also use a variety of CorelDRAW tools and features to beautify their work.
Most CAD programs support the use of a single art-board or page, allowing for the creation of technical drawings for several different housing units in a single file. I split all such designs in CAD files so that each DWG file, the native format for AutoCAD drawings, contains only the plan that I want to use in CorelDRAW.
Importing or opening DWG files in CorelDRAW
When I open or import DWG files in CorelDRAW, I enable the Maintain layers and pages check box in the Open Drawing or Import dialog boxes, which keeps all layers intact. This allows me to separate the layers that I need for the brochure from the ones I don't. I use the Object Manager docker to delete or disable the printing or viewing of layers that contain information that wouldn't be in a sales brochure, such as plumbing layouts, drainage lines, or structural columns.
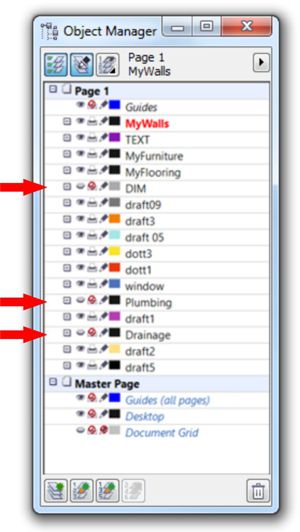
The Object Manager docker, with some layers set to non-visible and non-printing
Creating closed objects to fill the colors
After I've imported or opened the file, I deal with any open paths in the drawing, which is a key consideration when working with CAD files in CorelDRAW. Closing open paths allows me to fill elements in the CAD drawing with color, which is critical given that I'm creating a marketing piece. There are a few ways to close open paths. The one that's right for you depends on the version of CorelDRAW you're using.
For someone working with CorelDRAW 12 or earlier, closing paths can be time-consuming. You must combine all lines to form single curve and then join all nodes to form a closed shape using the Shape tool.
If you're working with CorelDRAW X3 or later, this task becomes a lot simpler. In my 20 years as a user, one of biggest time-saving features I've seen added to CorelDRAW is the Smart Fill tool. It was introduced in CorelDRAW X3, and it allows you to fill an area defined by open curves. So long as the overlapping curves create an enclosed shape, you can use the Smart Fill tool to set the outline and fill for the area. When I don't get the results I had expected, I switch to the wireframe view (View menu > Wireframe) to ensure that the curves are touching one another.
Just to have more control over the objects in the file, I create a separate layer for all shapes created with Smart Fill tool. In the example below, I created new layers for the walls, furniture, and flooring.
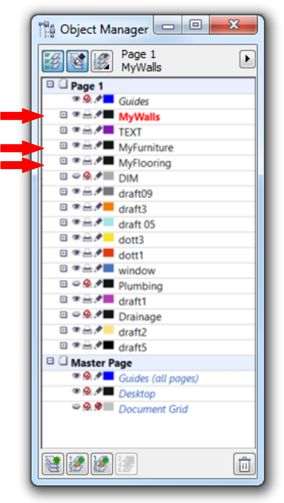
The Object Manager docker, with extra layers created to simplify managing the brochure layout
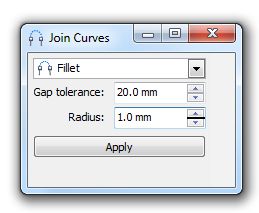
A third option is available to users of CorelDRAW X5 or later. The Join Curves feature (Arrange menu > Join Curves) automatically joins selected curves to create a single shape. Settings in the Join Curves docker let you set the gap tolerance between nodes and curves and choose an option for how you want to join nodes. What I like best about this feature is the onscreen preview that shows me how the different options will look.
After I've closed all the paths, it's time to start make the floor plans more visually appealing. I'll fill elements in the drawing with color and import vector clipart into drawing to represent furniture.
Creating and adding symbols
Sometimes I'll import some vector clipart that came with CorelDRAW to represent the furniture; other times I'll create furniture symbols in CorelDRAW. Then, I'll fill the furniture symbol or clipart to match the brochure's color scheme. There are often a few different floor plans for each housing unit, so I experiment with the positioning of the furniture until I get it right.
CorelDRAW has a feature that I often use at this stage in the design of a sales brochure. The Symbol Manager docker (Edit > Symbol > Symbol Manager) gives me convenient access to all symbol functionality. When I find a piece of vector clipart that I want to reuse as furniture, I simply drag it onto the Symbol Manager docker to create a symbol that I can rename. In the example below, I created symbols for sofas, beds, plants, and a wash basin. Adding a symbol to the brochure is as easy as dragging it from the Symbol Manager docker to the drawing. I can even resize, rotate, or stretch a symbol after I've inserted it into a drawing without affecting other instances of that symbol.
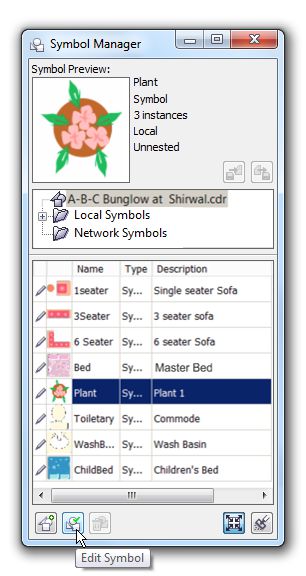
The Symbol Manager docker, with symbols created from vector clipart
Getting creative with symbols
One of the most useful and fun things about using symbols is the flexibility they offer when you want to modify one. For example, I might want to change a symbol's color or tweak its shape. It's as easy as selecting a symbol in the docker (or already in use in a drawing) and clicking the Edit Symbol button, making my changes, and clicking Edit > Symbol > Finish Editing Symbol. All instances of the edited symbol are instantly updated.
Conveniently, user-created symbols stay with a CDR file, so anyone who opens the drawing can work with those symbols. And if I think there's a chance I might need symbols I've created in future designs, I save them for easy reuse. Keep in mind that any symbol can be converted back to a normal object by right-clicking it and choosing Revert to Objects.
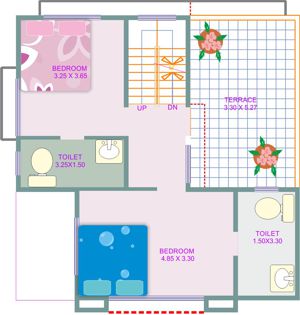
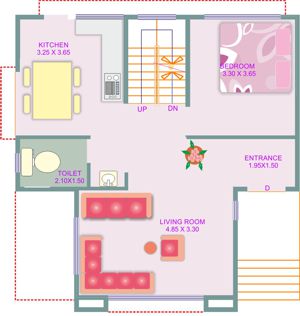
The beautified floor plans in the sales brochure look like this:
Was this article helpful?
Tell us how we can improve it.