3D button in Three Steps
What you will Learn:
- Ellipse tool
- Interactive Fountain fill tool
- Export for Web dialog box
For this project as it is going to be for the web, we will start by creating a new document, and we will use the Web preset.
The Web preset not only can be used for creating aWeb layout, it can also be used for creating wallpaper from an image or for creating a background for a presentation slide deck. This preset includes the following items:
- Units of measure set to pixels (px)
- Primary Color mode set to RGB
- Rendering resolution set to 96 dpi.
Using a preset can save you time during the setup process and make it easier to start designing projects.
Drawing the Button
After creating a new document by selecting File> New, and selecting Webfrom the Presetdestination, click OK.
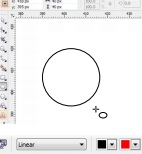
1. Creating an ellipse in CorelDRAW is very straight forward. From the Toolbox on the left side of the screen, select the Ellipse tool, it is the 8th tool from the top. Create an ellipse that is 40 pixels in diameter. You can verify the diameter by looking at the interactive property bar as you draw. Holding the Ctrlkey down while you create the ellipse will constrain it to a perfect circle.
2. With the ellipse still selected, click on the Interactive Fill tool in the toolbox. This is the last tool. Drag diagonally across the ellipse to apply a linear fountain fill. With the fountain fill control handles still selected, click on the red color swatch in the color palette.
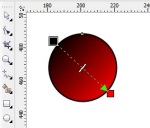
3. Duplicate this ellipse and resize it to 33px; then on the Interactive property bar, set the Angle of rotation to 180 and press Enter. If the
duplicated circle is offset from the rst one then ensure both circles are selected and type C and then E to align them perfectly on center.
CorelDRAW allows you to export to the three common le formats used in Web design. Determining which format is best for a design that you may be working on greatly depends on the requirements for the le. Here is a brief explanation of each le type.
What File Format Is Best
- GIF: GIF images are best used for line drawings, text, images with few colors, or images with sharp edges, such as scanned black and white images or logos. GIF offers several advanced graphic options, including setting a single color to be shown as transparent, interlaced images, and animation. It also lets you create custom palettes for the image.
- PNG: PNG les are best for various image types, including photos and line drawings. The PNG le format (unlike the GIF and JPEG formats) supports the alpha channel or soft transparency. This allows you to save transparent images with soft edges and high quality.
- JPEG: Photos and scanned images are best exported as JPEG les. JPEG les use le compression to store an approximation of an image, which results in some loss of image data, but does not compromise the quality of most photographs. You can choose the image quality when you save an imagethe higher the image quality, the larger the le size.
For this type of image, it is recommended to use PNG.
That concludes this article.
Where to go from here
Now that you have the basic button created it is easy to add text or symbol characters to indicate what the purpose of the button is. You could also use this same button to decorate a garment that you are drawing or use it as a starting point for creating a screw head. The next step is to export the le out.
Export for Web
The Export for Web dialog box provides a single access point for common export controls, eliminating the need to open additional dialog boxes when preparing a le for export. It also lets you compare the results of various lter settings before you commit to an output format, making it easier to achieve the best results.
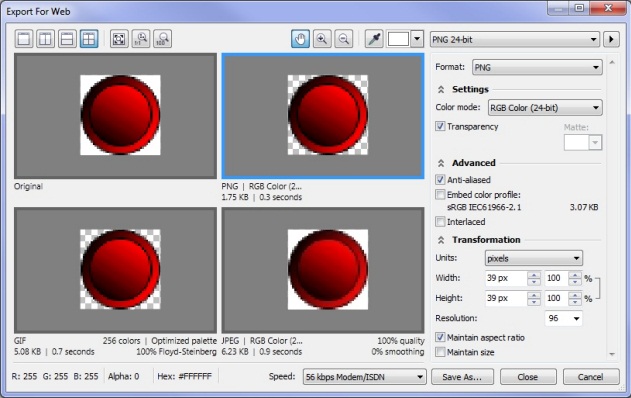
You can select parameters for various Web suitable formats, and feedback provides the anticipated file size and projected download time based on the transfer rate that you dictate.
This article and others can be found in the book entitled Bring it Home with CorelDRAW - An guide to In-House Graphic Design by Roger Wambolt.

You can view the video tutorial of this article in the Discovery Center
If you have enjoyed this tutorial, be sure to check out the other tutorials that are available in the Discovery Center. If you have any ideas for tutorials or projects that you would like to see in the future, e-mail Discovery.Center@corel.com.
Was this article helpful?
Tell us how we can improve it.