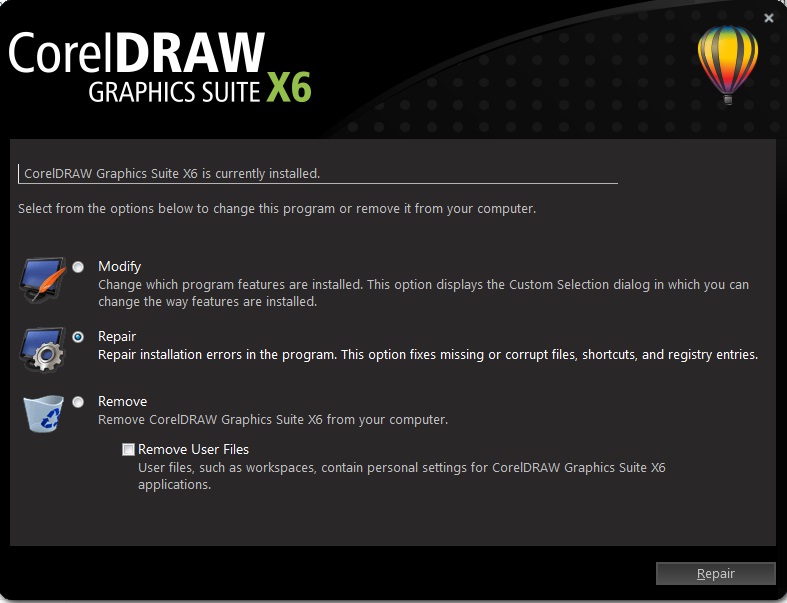
Repairing the installation of CorelDRAW Graphics Suite X6
Faulty installation can result to crashing and freezing of the program. This can also cause specific features to not function correctly or not function at all.
For Disc and Download versions:
Option 1'
Windows Vista/7
1. Make sure CorelDRAW Graphics Suite X6 is not running or open.
2. Click on START on Windows Taskbar
3. Go to Control Panel >> Programs>> Programs and Features
4. Make a right click on CorelDRAW Graphics Suite X6
5. Select Uninstall/Change
6. CorelDRAW Graphics Suite X6 splash screen will come up
7. Select Repair Option >> Click on REPAIR
Windows XP
1. Make sure CorelDRAW Graphics Suite X6 is not running or open.
2. Click on START on Windows Taskbar
3. Go to Control Panel >> Add or Remove Programs
4. Select CorelDRAW Graphics Suite X6
5.Click on Change/remove
6. CorelDRAW Graphics Suite X6 splash screen will come up
7. Select Repair Option >> Click on REPAIR
Disc version
Option 2
1. Insert the disc
2. Auto Play pop up box will come up
3. Click on Run autorun.exe
4. Select Repair option on the splash screen
5. Click on REPAIR
Download version
Option 2
1. Locate the saved installation files of CorelDRAW Graphics Suite X6
The default location is the Downloads folder.
Windows Vista/7 >> C:\Users\User Name\Downloads
Windows XP>> C:\Documents and Settings\User Name\My Documents\Downloads
2.Run thesavedexecutable (.exe) file by double clicking on it
3.CorelDRAW Graphics Suite X6 splashscreen will be available
4. Select Repair option on the splash screen
5. Click on REPAIR
CorelDRAW Graphics Suite X6 splash screen is shown in Figure 1.

Figure 1
Was this article helpful?
Tell us how we can improve it.