This guide explains how to connect your analog stereo equipment (e.g., turntable, cassette tape player, etc.) to your computer via the Roxio audio capture USB device, and how to use the LP and Tape Assistant program to digitize and enhance your favorite recordings from these sources. You can also connect digital audio players, such as mp3 players or smartphones, to the Roxio audio capture USB device as long as they have analog outputs, such as a 3.5mm headphone jack.
Let’s get started.
The Hardware
The main hardware comes in the form of the Roxio Audio Capture USB box, which allows the analog signal coming from your stereo to be fed into a USB port on your computer.
The Roxio Audio Capture USB box comes with a 15-foot RCA cable, which is needed to hook up your stereo equipment to the capture box. Insert the plugs from one end of the cable into the left (L) and right (R) ports on the capture box and insert the other end into the Audio Out ports on your stereo receiver. Be sure to match the white plugs to the white ports and the red plugs to the red ports.
The Roxio Audio Capture USB box also comes with a USB data cable. Plug the flatter, rectangular end (USB-A) into a USB 2.0 or USB 3.0 port on your computer, and plug the other end (USB-B) into the Audio Capture USB box.
A mini-jack to RCA adapter is also supplied with the package. Use this cable if your audio equipment does not have RCA ports (e.g., mp3 player, smartphone, etc.). Plug the mini-jack (A) into the headphone jack on your tape player or other audio device and the plugs on other end (B) into the 15-foot RCA cable. Be sure to match the red and white plugs.
RCA cable connector. Use this connector to link a turntable directly to the 15-foot RCA cable. (The turntable must have a preamplifier.)
Connecting your audio source
The illustration below should give you the general idea of a typical setup.

Follow these steps to connect a turntable or tape player to your computer:
- Connect one end of the provided 15-foot RCA cable to the audio-in ports of the Roxio Audio Capture USB device.
- The ports are labeled with the letters L (left) and R (right).
- Connect the other end of the RCA cable to the audio-out ports on your stereo or preamplifier.
- Do not connect directly to a turntable unless the turntable includes a pre-amplifier.
- If your stereo does not have RCA connectors, we have provided a mini-jack to RCA adaptor.
- Connect one end of the provided USB cable to the Roxio Audio Capture USB device and the other end to a USB 2.0 or USB 3.0 port on your computer.
Converting an LP or Tape
Converting LPs and tapes is a three-step process. To wit:
- Record
- Identify and enhance
- Output as MP3 files.
This topic explains how to use the LP and Tape Assistant to complete each step. If you haven’t connected an LP or tape player to your computer, do so now.
Step 1: Record
- Launch Creator NXT or Easy CD & DVD Burning by clicking their shortcut icon on your desktop screen or from the Start menu.
- On the left side of the window, you’ll notice three tabs Home, Data/Copy, Video/Movies, Music/Audio, and Photo. Click Music/Audio.
- A set of project links is displayed in the main window. Click Digitize LPs and Tapes under the Import projects set.
- The LP and Tape Assistant opens beneath the Recording Setup guide.
- Review the Setup guide, if desired. When you are ready, close the guide.
- In the Capture From drop-down list, select Line (USB Multimedia Audio Device).
- Once you begin recording, a new track will be created whenever a period of silence is encountered lasting more than 1.2 seconds.
- To change the track detection settings, click Advanced Options and select Track Detection. Click Help for more information.
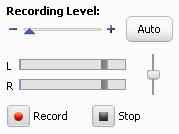
- To optimize the recording volume, play a loud portion of the audio from your LP or tape and click Auto.

"I don't hear anything"
Once you connect the Roxio Audio Capture USB device to your computer via its USB cable, all sounds are "hijacked" by the capture device. If you cannot hear the LP or tape as it is being recorded, follow these steps:
- Plug your headphones or computer speakers into the Line Out port on the Roxio Audio Capture USB box.
- Open the Windows Control Panel. In Windows 10 or 11, type in "control panel" in Search.
- Click Hardware and Sound > Sound.
- If you have the Control Panel set to Classic View or set to one of the Icon views, select the Sound icon.
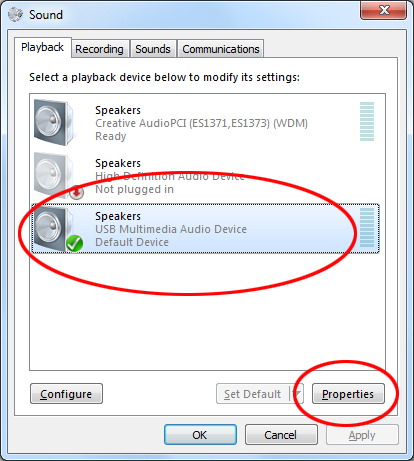
- Under the Playback tab, select the speakers connected to the USB Multimedia Audio Device, and click Properties.

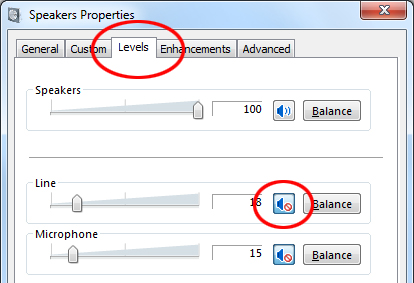
- Click the Levels tab. Set the Mute/Unmute button for Line to Unmute, and adjust the volume to the desired level.

- Click OK.
- Reset your LP or tape to the desired starting position.
- Use the controls on your audio equipment to play the LP or tape.
- On the LP and Tape Assistant, click Record to begin recording.
- When you are done recording, click Stop.
- Click Next.
Step 2: Identify and enhance
This screen displays a visual representation of each song and includes tools to:
- Adjust the breaks between songs (if needed),
- Identify each song,
- Clean up any flaws,
- And remove sections of unwanted audio.
Once you are ready to dive in, proceed to these next points:
- To adjust the break between songs, click the appropriate track separator and drag it left to shorten the break, or drag it right to make the break longer. Track separators are circled in the illustration below.

- To identify songs, click Tags. The Audio Tag Editor opens. You can add song information manually or click Music ID to gather information automatically from an online music database. For more information about using the Audio Tag Editor, click Help. When you are finished, click Done.
- To enhance your songs, click Clean, Enhance, or Equalizer. Each button opens tools to improve the quality of your recordings.
- To delete a track, select its title in the Tracks bar, and click the Delete button (
 ).
). - When you are ready to output your songs, click Next.
Step 3: Output as MP3 files
Now you will convert your recording into MP3 files.
- Use the checkboxes next to each track title to select the tracks you want to output.
- Click Export Tracks to open the Export Tracks dialog box.
- Choose MP3 (good quality) from the Output settings drop-down menu.
- Click the Browse button, and select the location where you want the files saved.
- Click Export.
Congratulations! You have just recorded your first set of tracks and converted them to a playable format on your computer.
Was this article helpful?
Tell us how we can improve it.