Disc image file: what it is and why create one
Instead of recording a project to disc, you can save it as a disc image file. A disc image file is a single file, saved on your hard disk, which contains all the data and formatting information needed to create a CD, DVD, or Blu-ray disc. Image files contain all source data (as opposed to saved Toast projects which contain only references to the data).
You may also want to save a disc image file to avoid having to use a blank disc. Mounted image files appear and behave like an actual disc in your computer. For example, you can create a disc image for a DVD-Video project and preview the output using the DVD player in your Mac without having to burn it to disc. If you are satisfied with the results, you can then burn this image file to a disc. If not, you can simply delete the file and start again, and you have avoided wasting a disc.
Disc image files have an added benefit of being faster to access than a disc in your drive and may offer longer battery life for notebook users.
Note: Toast 20 saves disc image files as ".toast" files
How to save a disc image file
You can save your video disc project (e.g., DVD, Blu-ray, or HD-DVD) to a ".toast" disc image file with these simple steps:
- In the Toast 20 Burn window, complete your video disc project;
- Once you are satisfied with the project, go to the "Output Settings" panel;
- Click on the "Destination" drop-down list (by default, it displays your DVD recorder) and select "Disc Image";
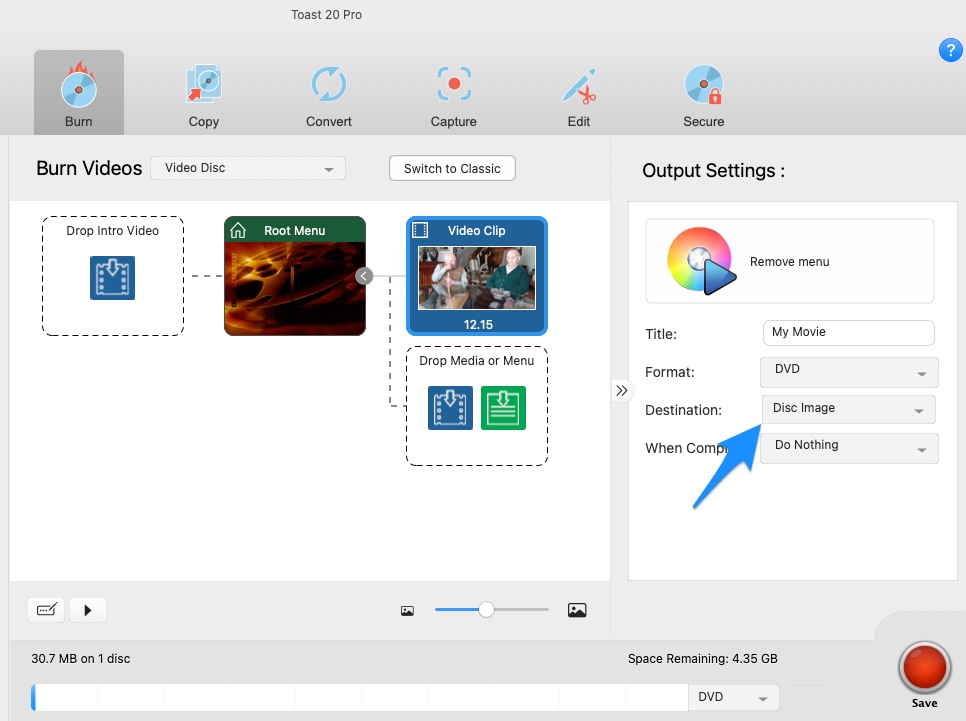
- Click on the "Save" button at the bottom right-hand corner of the window;
- If you have not named your project yet, you will be prompted to - do so and click OK;
- You will then be prompted to name the disc image file itself and set the save location - do so and click on "Save".
- A progress window will come up on your screen showing the completion percentage.
- An audible "bing" will play once the process is completed.
Convert a .toast image file to .iso image file
Toast disc image files (.toast) are actually ISO image files with a .toast file extension. So, simply renaming the .toast file extension to .iso will give you an ISO disc image file. It will behave exactly as an ISO image file and can be used as such. To convert your Toast disc image file to an ISO disc image file, follow these steps:
- Using Finder, locate your toast disc image file
- Right-click on the .toast image file and select Rename;
- Highlight the .toast file extension and replace it with .iso;
- Hit Enter on your keyboard, or click on any blank space in the Finder window;
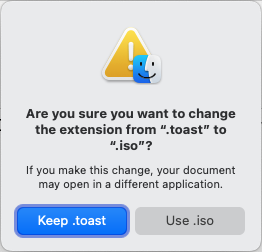
- A dialog box will come up asking if you want to keep the .toast extension or use .iso. Select the latter.
- You now have an ISO disc image file
Note: You can use the reverse process to restore the file to a .toast disc image file.
How to use a disc image file
Before you can use the disc image file you created, you will first need to "mount" it. Mounted disc images behave like an actual physical disc inserted into your optical drive and appear on the Desktop.
If this is the first time you are mounting an image file after installing Toast, Toast will prompt you to enter the administrator password. Once you have done this, you no longer need to enter the password to mount an image file. If you do not have administrator privileges, you will not be able to mount image files with Toast.
There are two ways you can mount the disc image file:
- From the Toast 20 menu
- By double-clicking on the ".toast" file
Mount a disc image from the Toast 20 menu
- From the menu, choose Utilities > Mount Disc Image.
- Select the image file you want to open.
- Click Open.
An icon of a disc appears on your Desktop when the image is mounted.
Mount a disc image by double-clicking the file
- Navigate to where the disc image file was saved
- Simply double-click on the file
Unmounting the disc image
When you are done using the disc image, you can "unmount" it, which corresponds to ejecting a physical disc. To do so, simply drag the disc or drive icon from the Desktop to the Trash in the Dock.
Was this article helpful?
Tell us how we can improve it.