Video Copy & Convert vs File Converter
With the introduction of Creator NXT 9, Roxio's main media file converter, Video Copy & Convert, got replaced by another program called simply File Converter. It serves the same purpose as the old program, for the most part, but sports a completely re-worked user interface. While it converts many audio and video file formats, File Converter does not have the ability to convert DVD video. As the DVD (and Blu-ray) video disc has gone out of favor due to the popularity of cloud-based media streaming, conversion support for this format has been dropped from the new program. But if you still have lots of DVD discs you would like to convert to digital files, do not despair as there is still a way to convert them in Creator NXT 9.
Converting your DVD video discs
To convert your DVD to digital file, you will use the VideoWave program in Creator NXT 9, as it does support the DVD video format. All you need to do, basically, is to import your DVD video file (you can use either the IFO or VOB files contained in the VIDEO_TS folder) and use VideoWave's export function to convert the video to your preferred output format.
Follow these steps to convert your DVD video:
- Launch your Creator NXT 9 program;
- From the Home screen, click on the Video | Movies tab on the left-hand side;

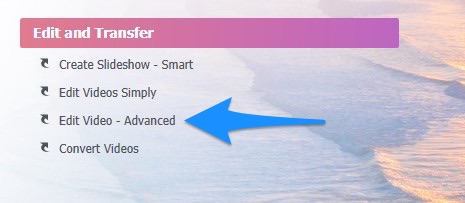
- Under the Edit and Transfer section, click on Edit Video - Advanced. This launches VideoWave;
- Choose to create a new production, in normal (4:3) screen format;
- In VideoWave, use the Media Selector to open your DVD disc;
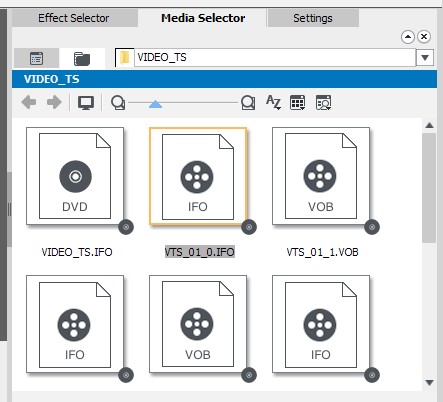
- Pick an IFO or VOB file inside the disc's VIDEO_TS folder, then drag and drop it onto the Production Editor timeline. If your DVD contains more than one movie, you will be prompted to select which ones you want to add; or, all of them.
Note: IFO and VOB are file name extensions, and are hidden by default. You will need to configure Windows to show file name extensions to be able to see them. - At this point, if you wish to do so, you can make some edits to the video before exporting it.
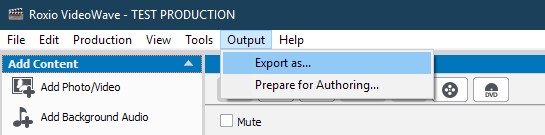
Note: In this article, I will not touch on any of the edit functions but will go straight to exporting. If you wish to learn about the editing features, please refer to the user guide. - When you are ready to export the production, click on Output on the menu bar, then Export As.
You will be prompted to save your production first. Go ahead and do so; - In the Make Movie dialog box that comes up, choose your preferences. You will find a brief description of each of the available options by clicking on the Help button on the bottom right-hand corner;
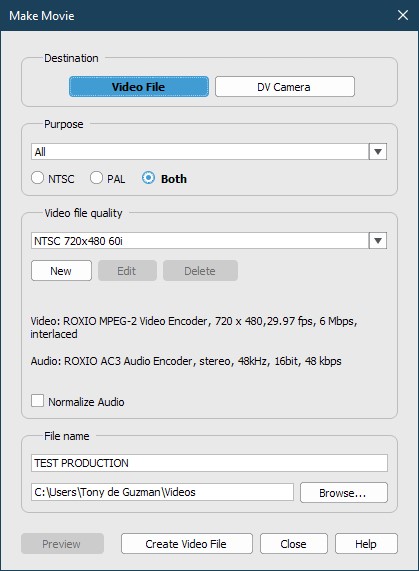
- One you have selected your preferences, enter a file name for the exported file and select a destination folder. Or you can leave it as it is, but take note of the location so you know where to look once the export is complete.
- When you are ready, click on the Create Video File button.
- Once the export process has completed, you will be returned to the Make Movie dialog box. Click the Close button to close it.
That's it! You have now converted your DVD video to a digital file, which you can use for either backing up purposes or sharing with others.
Was this article helpful?
Tell us how we can improve it.