Making a DVD or BD video disc
MyDVD is integrated into Toast as the default burning mode for video discs. You can create multimedia disc projects, complete with menus and music.
How to create a video disc project: overview
You can create and customize your video project in a number of ways. The basic steps for creating a project are:
- Choose a template.
- Add submenus to organize your videos.
- Add media.
- In Edit mode, type names for the menu and submenu lists.
Optional customizations let you:
- Add chapter points to videos (helpful for longer videos).
- Change the background picture used for the template.
- Edit the menu layout
- Change the menu background music.
Before you start
It’s a good idea to think about how you want to organize your media before you create your project. MyDVD uses a tree structure and submenus to organize projects. Let’s take a look at an example project.
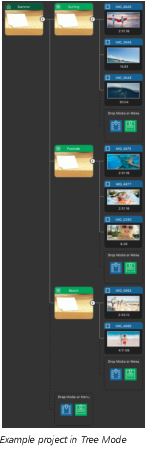
Example: I have a quite a few video clips from a weekend trip. For my project, I decide to include the best clips from three different activities. My main menu title will be “Summer Vacation”, and I will create submenus for each activity:
- Surfing (3 video clips)
- Poolside (3 video clips)
- Beach (2 video clips)
In the example, the main menu template I chose from the Theme tab of the Media Browser can accommodate up to four items per menu and submenus follow the same structure. If you have more than four videos for any one group, you can create a substructure that suits the project. In the example described, if there were nine surfing videos, another submenu based on participants could be created: Mom (3 videos), Dad (2 videos) and Kids (4 videos).
![]() Note: Some templates accommodate a maximum of two items per menu, others accommodate three or four items. The number is predetermined, so choose a template that works for your content needs.
Note: Some templates accommodate a maximum of two items per menu, others accommodate three or four items. The number is predetermined, so choose a template that works for your content needs.
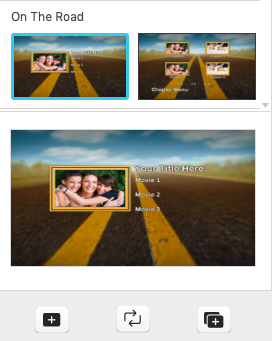
On Themes tab, the thumbnail for main and sub menus displays on the left. The thumbnail on the right is a chapter menu (chapters are often used in longer videos). If you click a thumbnail, a blue outline appears around the selected thumbnail, and the selected menu can be previewed at the bottom of the panel. The template shown above can accommodate up to three items per menu (indicated by Movie 1, Movie 2, Movie 3).
To burn a video disc (DVD or BD disc)
- In Toast, choose Burn tab, and in the Burn Videos area, choose one of the following:
- DVD
- Blu-ray Disc (available in some versions only)
- HD on DVD
- In the Media Browser, click the Theme tab, and choose a template.
If you want to create your own template, click the plus button below Design new template. For more information, see Designing video disc templates - Drag the template from the Media Browser to the Root Menu box in the Tree Mode area.
- In the Media Browser panel, click the Media tab, and navigate to the video files you want.
- In the Tree Mode area, decide how to organize your project to accommodate your media. Do any of the following:
- To specify a title to the main menu, click Root Menu, and type a new name.
- To add a submenu, click the Submenu icon
 . Click Sub Menu, and type a new name.
 - To remove a menu, hover over the thumbnail for the menu that you want to delete, and click the Delete icon
 in the upper right corner.
Note: You can drag the Zoom slider below the Tree Mode area to change the zoom level for the tree view.
- When your structure is set, drag your each media file from the Media Browser to the Add Media icon
 you want.
 - Complete any additional editing. For more information, see To add chapters to a video and To edit menu layout, background imagery, or music.
- Verify the disc capacity for the project by checking the Project size bar at the bottom of the window and checking the Disc size drop-down menu to the right of the bar.
- Click the Preview Disc button
 (below the Tree View area) to view and test the menu setup and video playback.
 - When you are happy with your project, in the Output Settings area, type a title, choose a format and destination, and set a When Complete action.
- Click the red Burn button.
![]() Note: You can mix-and-match or change a menu theme in your project by dragging a new menu theme from the Themes tab to the menu you want to change in the Tree area. To apply a selected template to the entire project, click the Apply theme to all menus button
Note: You can mix-and-match or change a menu theme in your project by dragging a new menu theme from the Themes tab to the menu you want to change in the Tree area. To apply a selected template to the entire project, click the Apply theme to all menus button ![]()
To add chapters to a video
- In the Tree panel, click the thumbnail of the video to which you want to add chapters.
- Click the Chapter icon
 in the lower-right corner of the thumbnail.
A Chapters tab opens in the Media Browser. - On the Chapters page, do one of the following:
- Below the video preview, drag the scrubber along the time bar or use the playback controls to set the chapter position, and click Add chapter button
 .
.
Note: The button is unavailable if you have less than 10 secs between chapter points or between the start and end of the video. - In the Automatically create chapters area, set time intervals for chapters by entering values for the Minutes and Seconds, and click the Create Chapters button
 .
.
The chapter points and thumbnails are added to the tree.
- Below the video preview, drag the scrubber along the time bar or use the playback controls to set the chapter position, and click Add chapter button
To edit menu layout, background imagery, or music
- In the Tree area, click the thumbnail of the menu that you want to edit.
- Click the Edit button
 below the Tree area.
 - Do any of the following:
- To change the menu layout, click an object in the Edit area, and drag the object to a new position.
- To change the menu music, click Add Music and navigate to the audio file that you want to use.
- To change the background image, click Add Background Image, and navigate to the image file you want to use.
- To review your changes, click the Play button
 .
. - When you are finished, click the Edit button to view Tree area.
![]() Note: You can remove a custom song or image from your project by clicking the Remove button
Note: You can remove a custom song or image from your project by clicking the Remove button  to the right of the song name or image name below the Edit area.
Was this article helpful?
Tell us how we can improve it.