How to Perform a Clean Reinstallation of CorelDRAW Graphics (2024 and Later)
If you are experiencing issues with CorelDRAW Graphics Suite, such as launch errors or crashing, and you have tried the basic troubleshooting (including restarting the program and/or the computer, or resetting the workspace), a clean reinstallation can often fix the problem. This process involves manually removing all program components from your system before reinstalling the software from a fresh download.
Important Notes Before You Begin
-
Back Up Your Files: Before proceeding, ensure you have backed up any custom workspaces, templates, or preferences from your CorelDRAW installation.
-
Have Your Credentials Ready: Make sure you have your serial key, or the email address and password associated with your Corel account, as you will need them to authenticate the software after reinstallation.
-
Hidden Folders: This procedure requires accessing hidden system folders. The most reliable way to open them is by typing the path directly into the File Explorer address bar.
Step-by-Step Procedure
-
Standard Uninstallation
-
First, if there are any pending Windows updates, be sure to apply them and restart your computer.
-
Press the Windows + R keys to open the Run dialog.
-
Type appwiz.cpl and press Enter. This will open the Programs and Features window.
-
Locate and uninstall the following programs from the list:
-
CorelDRAW Graphics Suite (your version number)
-
Corel Graphics - Windows Shell Extension
-
Ghostscript GPS (your version number)
-
-
After the uninstallation is complete, restart your computer.
-
-
Manual File Cleanup
-
After the uninstall, you'll need to manually delete any leftover files and folders.
-
Show hidden files and folders in Windows.
-
Open File Explorer 📁 from the taskbar. Select View > Show, then select Hidden items to view hidden files and folders.
-
-
Visually inspect the following locations for any remaining CorelDRAW files and folders and delete them. Look specifically for folders with your version number.
-
C:\Program Files\Corel\CorelDRAW Graphics Suite -
C:\Users\<username>\AppData\Roaming\Corel\CorelDRAW Graphics (version) -
C:\Users\<username>\AppData\Roaming\Corel\Databases (it's recommended to simply rename this to "Databases.old" instead of deleting) -
C:\Users\<username>\AppData\Roaming\Corel\Messages -
C:\ProgramData\Corel\CorelDRAW Graphics Suite (version)
-
-
-
Removing Installer Components
-
This is a critical step to ensure a clean reinstallation. You must properly uninstall these hidden files; do not just delete them.
-
Navigate to the hidden folder
C:\Windows\Installerby typing the path directly into the File Explorer address bar or by using the Run command (Windows + R). -
Change the view to Details by clicking View in the menu and selecting "Details."
-
Right-click on the column headers and select Title to add this column.
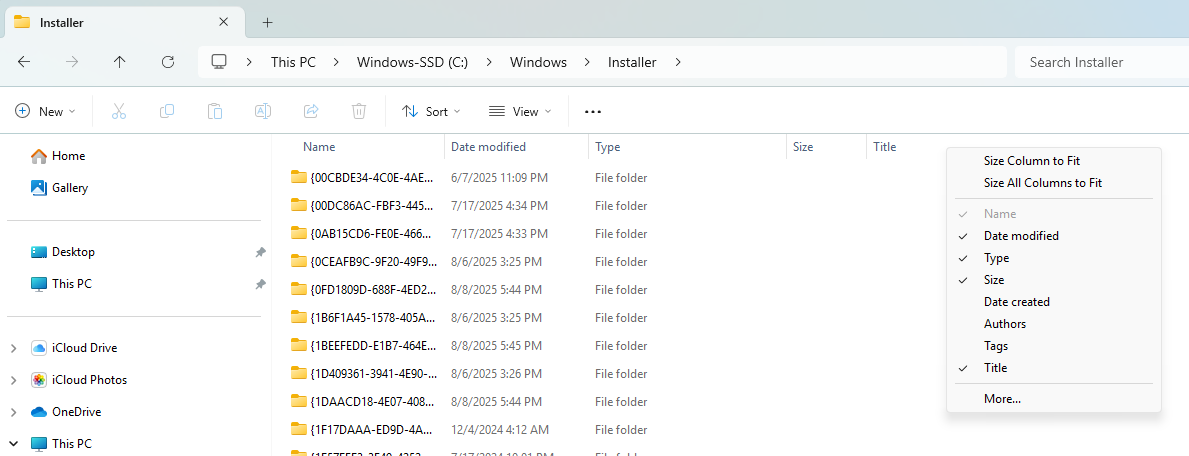
-
Click the Title heading to sort the files. Scroll down to find any entries that say "CorelDRAW Graphics Suite" in the Title column.
-
Important: Make sure you uninstall the CorelDraw Graphics Suite (version#) Core (x64) package first, if present, otherwise the other related
.msipackages may not uninstall properly. -
Right-click on each Corel package and select Uninstall. Repeat this until all CorelDRAW-related files are gone.
-
-
Removing Registry keys
-
Editing the Windows Registry can cause serious problems, including making your system unstable or unusable. It is critical to create a full backup before making any changes.
-
In the Registry Editor window, go to the File menu and select Export....
-
In the "Export Registry File" dialog box, navigate to a safe location like your Desktop or a USB drive.
-
In the "Export range" section, select All.
-
Give the file a descriptive name, such as
Registry_Backup_2025-08-28.reg. -
Click Save.
-
-
Open the Registry Editor
-
Press the Windows + R keys on your keyboard to open the Run dialog.
-
Type regedit and press Enter.
-
When prompted by User Account Control (UAC), click Yes.
-
- Navigate to the full path provided. Then, right-click on only the very last key (or subkey) in the path and select Delete.
⚠️When editing the registry, you must only delete the keys and values that are explicitly specified in the instructions⚠️-
Current User Keys (
HKEY_CURRENT_USER) - delete only the specified subkeys (end folder, not entire path) listed below-
HKEY_CURRENT_USER\Software\Corel\CorelDRAW\25 or 26 -
HKEY_CURRENT_USER\Software\Corel\stubframework\CorelDraw\25 or 26
-
-
Local Machine Keys (
HKEY_LOCAL_MACHINE)-
HKEY_LOCAL_MACHINE\SOFTWARE\Corel\CorelDRAW\25 or 26 -
HKEY_LOCAL_MACHINE\SOFTWARE\Corel\Setup\CorelDRAW Graphics Suite 2024 (or 2025)
-
-
-
-
Reinstallation
-
Restart your computer one more time to complete the cleanup process.
-
Download a fresh installer from the official Corel website.
-
https://www.coreldraw.com/en/pages/download/ -
Ensure you download the correct installer for your specific product (Graphics Suite or Technical Suite).
-
-
Install CorelDRAW. When prompted, use the exact same credentials you used for your previous installation. This is essential to ensure your license is recognized and your software is properly authenticated.
-
We hope this guide has been helpful. Your CorelDRAW software is now ready to use, providing you with a fresh start. If you encounter any further issues, please do not hesitate to contact Corel Technical Support.
Was this article helpful?
Tell us how we can improve it.