Getting the most out of Reveal Codes in WordPerfect
By Laura Acklen
www.wpwriter.com
You may be wondering: why does WordPerfect use codes to control the formatting of a document? It's because they give you unparalleled flexibility and maximum control over your documents. Other word-processing applications state that they give the same kind of "behind the scenes" look at a document, but only WordPerfect has Reveal Codes that allow you to easily edit and remove codes.
This tutorial will show you how to turn on Reveal Codes and how to edit the codes to adjust formatting and structure. You'll also learn how to remove unwanted or duplicate codes.
Inserting codes
No matter what you do—whether you're inserting a blank line, changing the font, inserting a table, creating an envelope, adding a page border, or customizing a graphic— every change you make in a WordPerfect document can be traced back to a code. You can see it, move it, and even delete it if you want.
Turning on Reveal Codes
I strongly recommend that users new to WordPerfect turn on Reveal Codes frequently to observe how codes are inserted as they work on a document. There are several ways to turn on Reveal Codes, so pick your favorite and stick with it: press Alt+F3; click View,Reveal Codes; or click and drag the Reveal Codes bar up into the document.
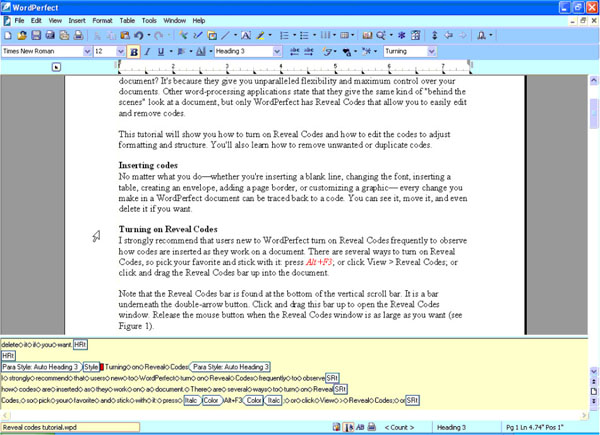
Note that the Reveal Codes bar is found at the bottom of the vertical scroll bar. It is a bar underneath the double-arrow button. Click and drag this bar up to open the Reveal Codes window. Release the mouse button when the Reveal Codes window is as large as you want (see Figure 1).

When you turn on Reveal Codes, the document window is split into two sections.
The scoop on codes
As you can see in Figure 1, when you turn on Reveal Codes, the document window is split into two sections. The lower section displays the document text along with its codes. You read through codes just like you read a book—from left to right. A code takes effect where it is placed and remains in effect until another matching code is reached. For example, if you change the top margin, the change stays in effect until the end of the document, or until another top margin code is found.
There are two kinds of codes: paired and open. Paired codes have an On code and an Off code. These codes surround the text that is affected by them, so the On code is found at the beginning of that text and the Off code is found at the end. If you apply italics to a word in a paragraph, for example, you'll see an Italics On code and an Italics Off code on either side of the word. An open code, such as a margin change, stands alone.
Expanding and condensing codes
To make it easier to read through Reveal Codes, WordPerfect abbreviates most codes so you can tell what they are without getting bogged down by their specific settings. You can "expand" a code by moving the insertion point from the right to the left side. If you point at a code, a QuickTip appears, identifying the type of code.
For example, a page number position code displays as [Pg Num Pos]. When you move the insertion point over it, it changes to [Pg Num Pos: Bottom Center]. The QuickTip describes the code as "Page Number Position: Page number position setting". With all this help, you don't have to be a master in code-deciphering to get the job done.
Editing codes
Troubleshooting problems in other word-processing applications is like trying to find a needle in a haystack with a blindfold on! You may be able to determine what formatting is in place, but you're on your own to find out where to go to change it.
In WordPerfect, you can edit a code's settings in just one step. Open the Reveal Codes window and double-click the code. The corresponding dialog box opens so that you can quickly make the adjustments. When you click OK, your changes are saved in the code. A duplicate code is not inserted, so you don't have to worry about removing an extra code (or trying to figure out which code is the one you want to keep).
Deleting codes
In some cases, codes are inserted inadvertently. For example, let's say you opened a dialog box just to check its settings, and instead of clicking Cancel to close the dialog box, you clicked OK. Oops! You have just inserted a code. You have two options. If you notice your mistake right away, press Ctrl+Z or click the Undo button to reverse the last action you took on the document—in this case, the insertion of a code. If you realize it after you've continued to work for a while, however, you can just delete the code.
You can delete a code the same way you delete text—find the code, position the insertion point, and then press Delete (if the insertion point is to the left of the code) or Backspace (if the insertion point is to the right of the code). You can also delete a code by using the mouse to click and drag the code out of the Reveal Codes window.
Searching for codes
Sifting through Reveal Codes can make anyone feel like reaching for a pair of bifocals! A lot of codes are inserted at the top of a document, so look there first. Margin codes, on the other hand, usually appear at the top of the current page (for top/bottom margins) and at the beginning of the current paragraph (for left/right margins).
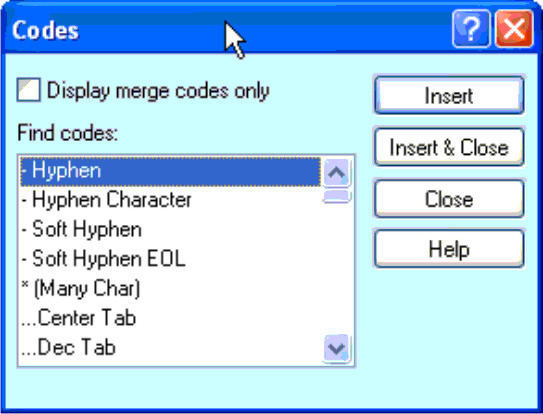
Don't wear out your eyes reading through the codes—WordPerfect can track them down for you with the Find feature. Click at the top of the document, and then click Edit, Find and Replace. In the Find and Replace dialog box that appears, click Match, Codes. The Codes dialog box appears (Figure 2). Scroll through the list available codes, and then select the code you want to search for. ClickInsert and Close to insert the code into the Find text box and close the Codes dialog box. Click Find Next to start searching for that code.

Choose the code(s) from the Codes dialog box to search for a single code or a combination of codes.
Changing the size of the Reveal Codes window
You can change the size of the current Reveal Codes window by clicking and dragging the gray bar between the Reveal Codes window and the document. Point to the border, and when the double-headed arrow appears, click and drag the border up or down in the document window.
Printing codes (versions 11 and 12 only)
In response to thousands of user requests, Corel added to WordPerfect 11 the ability to create a print-out of the document with the codes displayed. No more scrolling through a document to find an errant code! Simply print the affected pages and review the codes on paper. The codes are much bigger on the print-out, and they have a gray background that stands out from the document text.
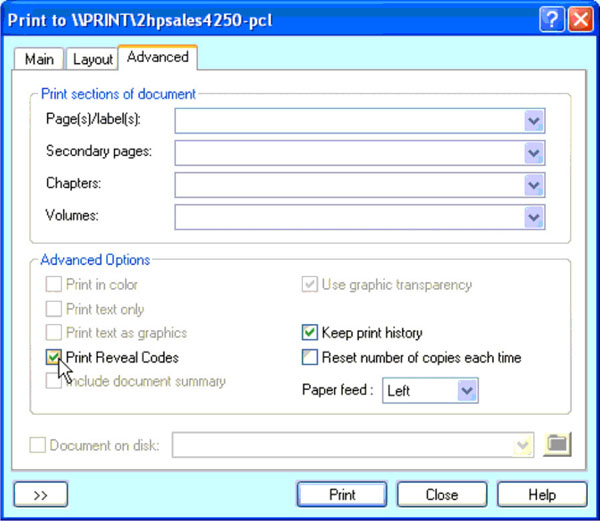
To print the codes with the document text, click File, Print. Select the pages that you want to print. Click the Advanced tab and enable the Print Reveal Codes check box. Click Print. Figure 4 shows an example of a page printed with the codes.

Printing the codes makes it easier to troubleshoot formatting problems.
The OpenStyle:DocumentStyle code
This code is automatically placed at the top of every document, and you can't delete it. Its purpose is to hold the codes that define the initial format for the document: margin settings, paper size, font—any formatting that you want in effect at the beginning of the document.
There are a couple of advantages to setting up your formatting in the DocumentStyle style code. First, you can't accidentally delete the codes. Second, instead of having a jumble of codes at the top of your document, you have a single style code that stays out of the way.
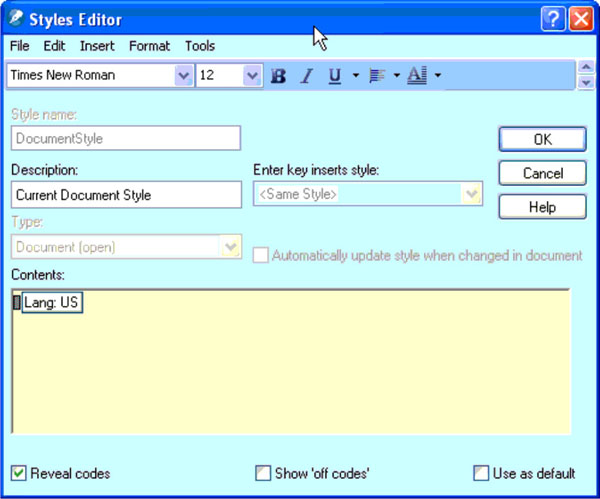
To add settings to this OpenStyle:DocumentStyle code, double-click the code. The Styles Editor appears (Figure 4) with its own menu bar. You can use this menu bar to insert codes into a style. The menus are abbreviated because only the options that can be applied in a style are available.

The Styles Editor has its own set of menus that contain only those commands that can be placed in a style.
In summary…
The Reveal Codes feature gives you unprecedented control over a document's formatting, layout, and structure. Clearly, Reveal Codes are the most powerful tool you have when it comes to troubleshooting a document. Now that you've had a chance to learn how to work with Reveal Codes, you'll be able to work on your documents with a new level of confidence.
Was this article helpful?
Tell us how we can improve it.