
Have you ever wanted to create circular shapes out of your images? This article explains on how to accomplish this task in a few simple steps...

1. Open the image that you want to edit
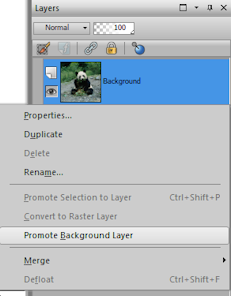
2. In the Layers Palette, right-click the picture and select "Promote Background Layer"
3. Click the Ellipse Tool in the Tools Toolbar or press the keyboard shortcut, the letter "Q" on your keyboard.
4. In the Tools-Options palette, disable or uncheck the "Anti-alias" checkbox but make sure that the "Create on vector" checkbox is enabled
5. Click and drag the ellipse on your image until the circular shape was created and the part that you want to cut out is covered.
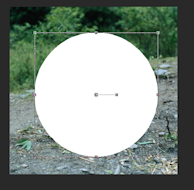
6. Adjust the selection using the handles around the shape
If the 'adjustment 'handles are disabled, you may use the Pick Tool to enable them.
7. Click Selections } From Vector Object
8. Click Image } Crop to selection
9. Right-click the vector shape layer on the Layers Palette then select Delete
10. Save the file
If you want to remove the white background to save the image with transparency, save the image as a PNG or GIF file.
Was this article helpful?
Tell us how we can improve it.