In some cases, WordPerfect's default installation may become corrupt or damaged preventing the application from launching or working properly. This document will restore factory defaults through a two-part process of renaming WordPerfect's registry entries and configuration files.
To restore the product to its factory defaults, follow the instructions listed below:
This article involves editing the Windows registry. When working with the registry, a backup MUST be completed. Here's how:
- In the Windows Search type "Regedit" or press WIN+R and type "Regedit"
- Locate Computer by scrolling to the very top of the left side of the registry
- Once found, select the registry key in the left pane so that it becomes highlighted.
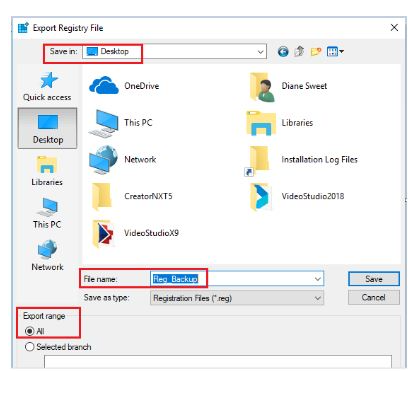
- From the Registry Editor menu, choose File and then Export. You can also right-click or tap-and-hold the key and then choose Export.

- In the new window that appears, double-check that the Export range selected is set to ALL
- Once you're sure you'll be backing up what you expected, choose a location to save the registry backup file to.
- (We usually recommend choosing the Desktop or the Documents folder)
- In the File name text field, you may want to name it something like Complete Registry Backup / Reg_Backup
- Select Save

- Once complete, a new file with the REG file extension will be created in the location you selected
First, make sure that all WordPerfect Office programs are closed. This is very important. If any of them are open, the reset process will not work as expected.
Part 1: Reset the WordPerfect Office registry entries:
- Click Start
- In Search, type Regedit
- In the search results, click Registry Editor.
- If you do not see only four or five items listed on the left:
- Press the left arrow on your keyboard repeatedly until you only see "Computer"
- Double-click on Computer to expand it.
- Double-click on HKEY_CURRENT_USER
- Double-click on Software
- Right click on Corel and choose Export.
- Save the file as "Corel-Backup.reg".
- The "Corel-Backup.reg" file contains a backup of the registry settings which we are about to reset. These can be imported again if needed.
- Right click on Corel and choose "Rename" from the context menu.
- Type "Corel-old" and press Enter to save the change
- NOTE: If there is a Corel-old, you can use Corel-Old-1, etc.
- Press Enter on your keyboard to save the change.
- Repeatedly press the left arrow key until you only have the Computer and the five HKEY items listed.
- Close the Registry Editor
Part 2: Reset the WordPerfect Office configuration files
- Click Start
- In Search, type %AppData% and press Enter. This will open the Application Data folder.
- Right click on Corel and choose Rename from the context menu.
- Type "Corel-old" and press Enter to save the change.
- NOTE: If Corel-old already exists, you can use another name like Corel-Old-1, etc.
- Close the Application Data Folder
NOTE: When you reopen any WordPerfect Office program, it will now be at factory default. You will be prompted to register. Our system will realize it's a duplicate and will not register you twice though.
Was this article helpful?
Tell us how we can improve it.