Opacity vs. opacity vs. opacity... ?
This is a topic that I often get questions on. Why are there multiple ways to control the opacity (opposite of transparency) of your brush, and what is the difference between them?
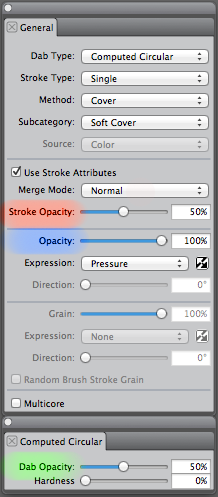
This question usually refers to these 3 controls, 2 of which are new for Painter 12.
- Brush opacity (in blue)
- Stroke Opacity (in red) (New in Painter 12)
- Dab opacity (in green) (New in Painter 12)
The confusion comes from the fact that Painter 12 introduces 2 new ways of controlling opacity. The first part of the question is easy to answer! The reason is that we want to give various creative ways to control the look of the brush. And even though these 3 controls have the word opacity as part of their name, they all do different effects.
So I will do my best at describing what is the difference between these 3 controls.
In a few words, you can of think the controls as:
1) Brush opacity - opacity of the paint being deposited, on a per dab basis (or per bristle basis for other brush types).
2) Dab opacity - opacity of you brush "tip" or dab.
3) Stroke opacity - opacity of the paint being deposited, on a per stroke basis.
1) Brush Opacity (legacy)
This control applies to the majority of brushes in Painter (unlike the 2 newer opacity controls, with only applies to specific brush options as you will see below). Using this control you can adjust the opacity of the paint as it is deposited onto the canvas.
For example, if you are using a dab-based brush, the opacity setting will be applied independently to each new dab created. If you are using instead a bristle-based brush, the opacity will be applied to each bristle that deposits colour.
This image demonstrates brush opacity on a dab-based brush.
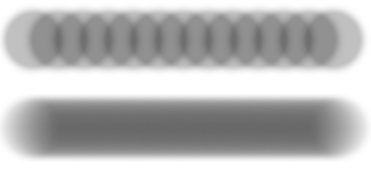
In the first stroke I have set dab-spacing at 50% and brush opacity at 25% to show that each dab is deposited with independent opacity. You can see the opacity of the paint "building-up" as each new dab is created.
In the second stroke, I reduced the spacing between the dabs (10%) and adjusted the brush opacity to 5%. This is a more typical brush configuration so that it is more difficult to see the dab overlaps as you make the stroke.
2) Dab opacity (new in Painter 12)
Dab opacity is only available to brushes using the computed circular dab type which is new for Painter 12. This dab-based brush is very similar to the circular dab, except that instead of choosing a tip-profile, you can control the edge softness and dab opacity.
In short, the dab opacity is the opacity of the bitmap that you will be painting with (your brush tip). For those who are familiar with captured dabs, this is similar to capturing dabs with some transparency.
This is different from the brush opacity (see above), which is the opacity of the "paint" that is deposited.
You can combine the dab opacity and the brush opacity on a single brush, and this gives you fine control over the look of your brush. This can be useful, for example, in limiting the maximum opacity of your brush (which would be limited by the dab opacity).
For example, consider the image below where the brush opacity is constant at 80%. In the first stroke, the dab opacity was 100% and in the second stroke the dab opacity was 10%.
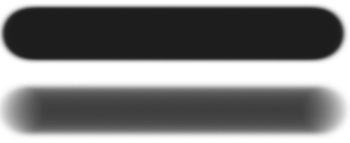
Instead of having a constant brush opacity in the strokes above, I could have used a tablet and hooked my brush opacity to pressure. This would allow a brush to have varying opacity (brush opacity) with a maximum opacity (dab opacity).
3) Stroke Opacity
Another new way you can control opacity in Painter 12 is with the stroke opacity. This is only available on brushes using the stroke attributes (when "use stroke attributes" checkbox is ON).
The difference with this one is that the opacity is applied to the paint of each stroke independently. This is similar to the brush opacity, where the opacity was applied to the paint, but on a dab level instead.
Consider this image.
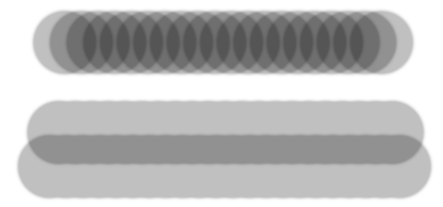
The first stroke was created with brush opacity at 25% and 50% spacing (and 100% stroke opacity). You can see that the paint of each dab is painted with independent brush opacity and will build-up in the stroke.
The second and third strokes were created with a brush using 100% brush opacity. However, the stroke opacity was 25% in this case. You can see that the paint of the dabs in each stroke has a constant opacity during the whole stroke. You can build up opacity by applying multiple strokes.
Hopefully this helps a bit in understanding the various ways you can control opacity in Painter. You could combine all 3 kinds of opacity in a single brush, for some ultimate opacity fun!
Myself, I think I will stick with brushes without transparency for a while and only use the opacity control in the layers palette 
Until next time, happy painting.
Was this article helpful?
Tell us how we can improve it.