This article involves editing the Windows registry. When working with the registry, a backup should be completed. This article from Microsoft describes how to back up the registry: https://support.microsoft.com/en-us/topic/how-to-back-up-and-restore-the-registry-in-windows-855140ad-e318-2a13-2829-d428a2ab0692
In some cases, AfterShot's default installation may become corrupt or damaged preventing the application from launching or working properly. This document will restore factory defaults through a two-part process of renaming AfterShot's registry entries and configuration files.
To restore the product to its factory defaults follow the instructions listed below:
First, make sure that AfterShot is closed. This is very important. If it is open, the reset process will not work as expected.
Part 1: Reset the AfterShot's registry entries:
- First, it is critical to create a backup of the registry in case anything goes wrong:
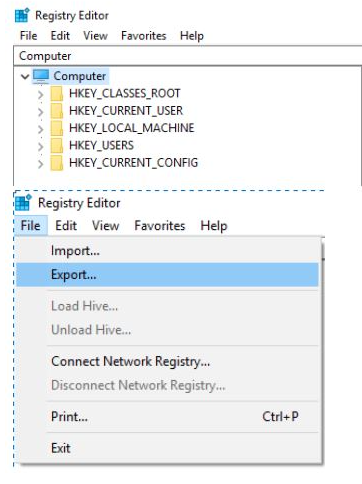
- In the Windows Search type "Regedit" or press WIN+R and type "Regedit"
- Locate Computer by scrolling to the very top of the left side of the registry
- Once found, select the registry key in the left pane so that it becomes highlighted.
- From the Registry Editor menu, choose File and then Export. You can also right-click or tap-and-hold the key and then choose Export.
- In the new window that appears, double-check that the Export range selected is set to ALL
- Once you're sure you'll be backing up what you expected, choose a location to save the registry backup file to.
- (We usually recommend choosing the Desktop or the Documents folder)
- In the File name text field, you may want to name it something like Complete Registry Backup / Reg_Backup
- Select Save
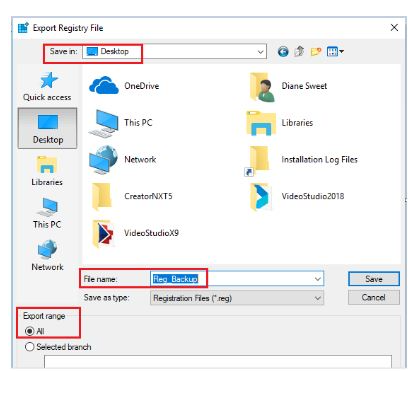
- Once complete, a new file with the REG file extension will be created in the location you selected
- Click Start
- In the Windows Search type "Regedit" or press WIN+R and type "Regedit"
- If you do not see only four or five items listed on the left:
- Press the left arrow on your keyboard repeatedly until you only see "Computer"
- Double-click on Computer to expand it.
- Double-click on HKEY_CURRENT_USER
- Double-click on Software
- Double-click on Corel
- Right click on AfterShot v3 (or AfterShot Pro v3 if you use AfterShot Pro) and choose "Rename" from the context menu.
- Type "AfterShot v3-old" or "AfterShot Pro v3-old". If there is a AfterShot v3-old, you can use AfterShot v3-Old-1, etc.
- Press Enter on your keyboard to save the change.
- Repeatedly press the left arrow key until you only have the Computer and the five HKEY items listed.
- Close the Registry Editor
Part 2: Reset the AfterShot / AfterShot Pro configuration files
- Click Start
- In Search, type %localappdata% and press Enter. This will open the Application Data folder.
- Double-click on Corel
- Right click on AfterShot or AfterShot Pro and choose Rename from the context menu.
- Type "AfterShot-old" or "AfterShot Pro-Old" and press enter to save the change.
- NOTE: If Corel-old already exists, you can use another name like Corel-Old-1, etc.
- Close the Application Data Folder
Part 3: Reset the Library to default
- Open a file browser Window by clicking Start and selecting Windows Explorer OR pressing Win+E on the keyboard
- Browse to your Pictures (or My Pictures) folder.
- Right-click on the "AfterShot Catalog 3" or "AfterShot Pro 3 Catalog" folder and choose Rename.
- Rename the catalog to "AfterShot Catalog 3-old" or "AfterShot Pro 3 Catalog-old". You may add a number to the end if the -old version is already present.
When you reopen AfterShot program, it will now be at factory default.
Was this article helpful?
Tell us how we can improve it.