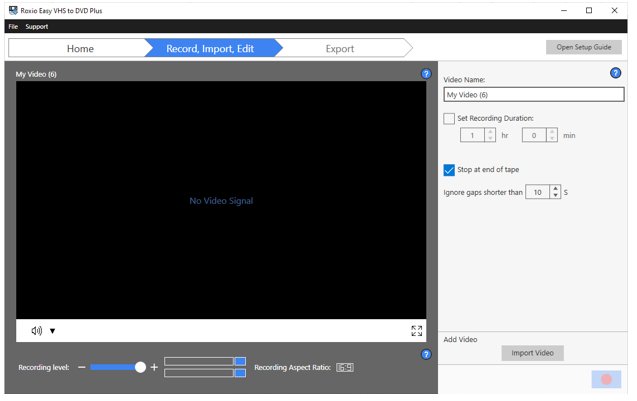
If you are unable to get any video signal from your VCR or camcorder (or other video playback device with analog outputs), and you get the on-screen message as shown in the screenshot below, there are a few things you need to check to verify that your setup was done correctly.
Note: the Easy VHS to DVD software (or Roxio Video Capture app) will only work with the bundled Roxio Video Capture USB device. It will not work with 3rd-party video capture devices. If you have been trying to use a 3rd-party capture device, please use the Roxio capture device instead.
To verify that your Easy VHS to DVD setup was done correctly, consider these very important points:
1. Make sure you followed the steps for hooking up the Roxio video capture USB device to your equipment exactly as shown on the Setup guide slides;
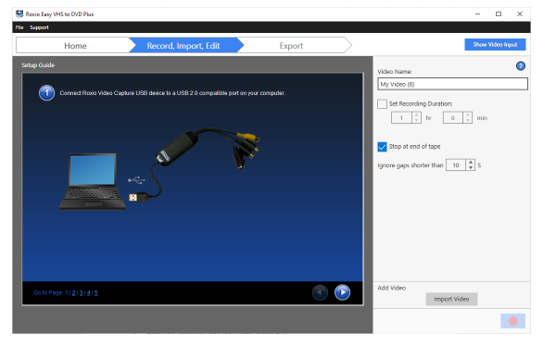
If you haven’t checked the Setup guide yet, please do, especially if you are a first-time user;
2. Make sure your Roxio video capture USB device is directly attached to a USB port on your computer, and not through a USB hub or USB data extension cable, as these could possibly be additional points of failure that you will have to deal with.
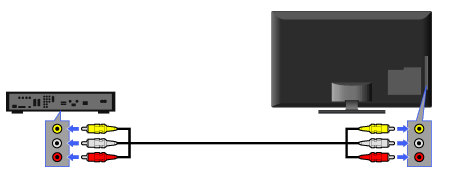
3. Test if the connection is good between the VCR/camcorder and the RCA composite cables by connecting the other end of the RCA cables directly to your TV. If you are getting clean and uninterrupted audio/video signal on the TV, good! Otherwise, you will first need to resolve this before connecting your equipment to the Roxio capture device and your computer. Consult your VCR/camcorder user manual for guidance.
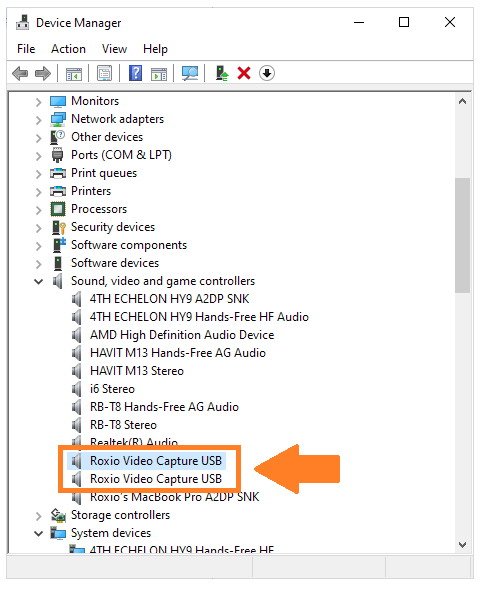
4. Test if the connection is good between your Roxio video capture USB device and your computer by checking your Device Manager. You can open the Device Manager window by typing “device manager” in the Windows Search box on your taskbar, selecting it from the search list, and hitting the Enter key on your keyboard. If the connection is good, Device Manager should detect the Roxio capture device, and there will be two entries for Roxio Video Capture USB listed under “Sound, video and game controllers”.
If the two items are not listed, make sure the Roxio capture device is plugged all the way in, and is not loose or wobbly. If the connection seems fine but the Roxio items are still not showing on the list, try attaching the capture device to a different USB port on your computer – try all available USB ports.
If the Roxio items still do not show up, verify that your other USB devices (e.g., USB flash drive, external HDD/SDD, etc.) work fine attached to those USB ports. If all other USB devices are being detected except the Roxio capture device, please contact Corel technical support.
If your setup is in accordance to all of the points made above, or you have made the necessary changes accordingly, and you still have no video signal in your Easy VHS to DVD preview screen, here are a few things to look at:
1. Camera Privacy settings
2. Device drivers;
3. Graphics card drivers;
4. Antivirus software;
5. User account.
Camera Privacy Settings
Before you can use Easy VHS to DVD Plus to record videos from your VCR or camcorder, the application will first need to be given permission to access your system camera. Not that Easy VHS to DVD Plus actually uses your computer’s built-in webcam, but the recording function itself is what the application needs to use. If you attach a recording device, such as the Roxio video capture USB device, this new device then takes over the function of your webcam. But if it does not have permission to access this function, then it cannot perform any recording task.
For Easy VHS to DVD Plus to access the system camera, it needs to be listed as one of the desktop apps allowed to do so. In the Windows Search box, type in “camera privacy settings”, select it from the search results, and hit enter. In the Camera settings window that comes up, scroll down to the section called “Allow desktop apps to access your camera” and make sure “Roxio Easy VHS to DVD” is listed, and the permission setting is switched to “On”.
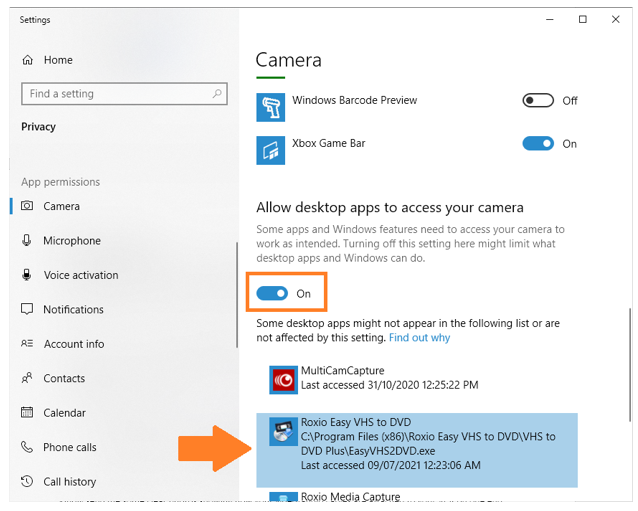
If the setting is switched off, simply click on it to turn it on.
But what if Roxio Easy VHS to DVD is not on the list of apps that are allowed to access your camera? This only means you have never successfully did a recording using this app previously. One thing to note is that Roxio Easy VHS to DVD will only appear on the list after a successful recording. So if you do not find the app listed here, proceed to the next section.
Microphone Privacy Settings
Easy VHS to DVD requires access to both the system camera and microphone to work properly. If the application only has access permission to the system camera, it will not work, and you will still get the "no video signal" status in the preview window. That said, after ensuring the camera privacy setting is enabled, proceed to checking the microphone privacy setting as well.
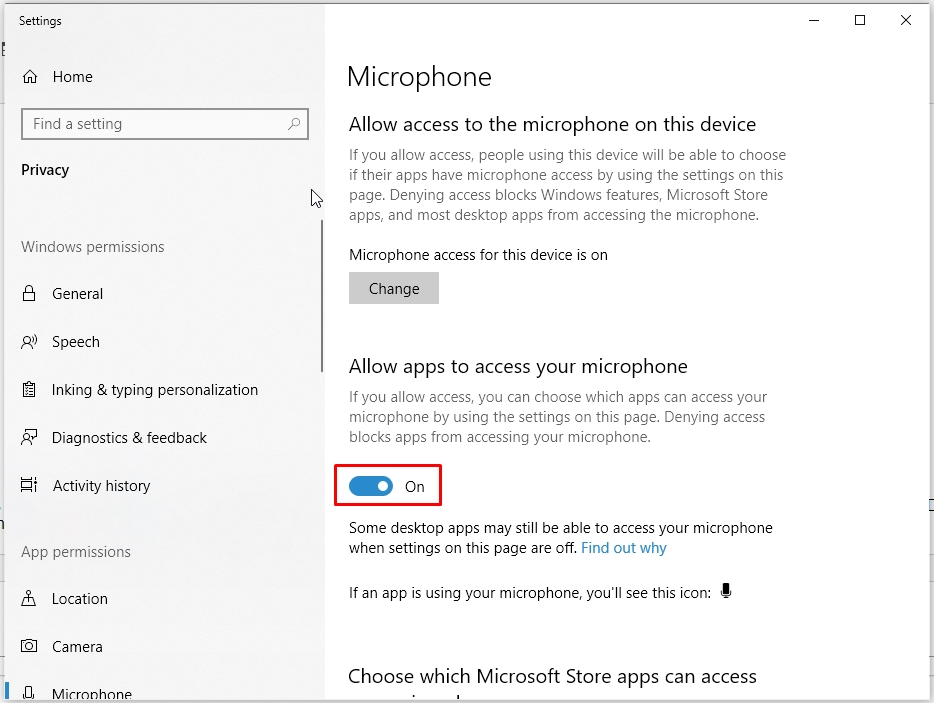
Make sure all toggle buttons are set to "On" for Microphone under "Allow apps to access your microphone" and "Allow desktop apps to access your microphone".
Device Drivers
A device driver is a small piece of software that serves as the middleman between a hardware device (such as the Roxio video capture USB device) and Windows. It allows Windows and the hardware device to communicate with each other. If the correct device driver is not installed, was not installed properly, or is corrupted, then this communication will not be possible, and you will not be able to use the device.
You can check device drivers in the Device Manager window, specifically under the Sound, video and game controllers section. As already shown previously, you are looking for two items called “Roxio Video Capture USB.” If none of them are listed, or you are only seeing one of them, check under the section called Other devices if they are there. If so, this means that their device drivers were not installed.
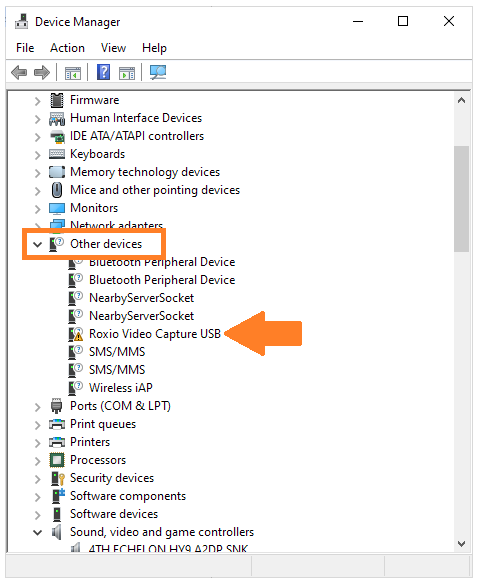
What if both Roxio Video Capture USB items are listed under the correct section, but one of them shows a yellow triangle with an exclamation point in its icon? This either means the device driver is corrupted or the device is not responding to the device driver.
In either of these cases, you can install (or reinstall) the necessary device drivers by going into your Easy VHS to DVD Plus installer folder, which may either be in your Downloads folder or on your Desktop, and run the Roxio Easy VHS to DVD installer file --this is the Roxio video capture device driver software, not to be confused with the main Easy VHS to DVD Plus application installer. If you no longer have a copy of the Easy VHS to DVD Plus installer, you can download a fresh copy here.
Reinstalling the Roxio video capture USB device drivers
1. Make sure Easy VHS to DVD Plus is not running. If it is, please exit out of it before proceeding;
2. Disconnect the Roxio video capture USB device from your computer’s USB port;
3. Go into the Easy VHS to DVD Plus installer folder and open the folder called VIDEOCAP_USB_30_X64 (if you have 64-bit Windows), or VIDEOCAP_USB_30_X86 (if you have 32-bit Windows);
4. You will see the installer file named Roxio Easy VHS to DVD.msi. Double-click on the file to run it and install the Roxio Video Capture USB device drivers;
Note: You will only see the file extension “.msi” if you have Windows set to show file name extensions.
5. If you get the screen below when you run the installer, select “Remove” and follow the on-screen instructions to completion. Reboot the computer and proceed to the next step;
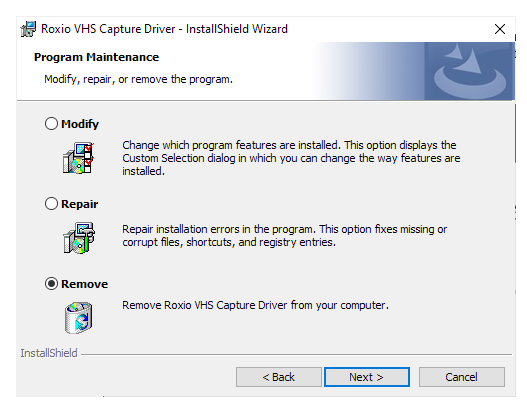
6. Repeat step #4 and follow the on-screen instructions to completion, click the Finish button to exit out the installer, then reboot your computer;
7. Once you are back in Windows, plug the Roxio capture device back in to the USB port and check Device Manager again. The two Roxio video capture USB items should now be listed under Sound, video and game controllers.
Launch Easy VHS to DVD Plus and see if you are getting a video signal now. Otherwise, proceed to the next section.
Graphics card drivers
Easy VHS to DVD Plus, being a video capture software, heavily relies on your graphics or video card. Thus, for optimal performance, your graphics card drivers need to be up-to-date. If they are several years old, it will not be able to properly work with your Easy VHS to DVD Plus software.
To check if you have updated drivers, follow the steps below.
1. Launch the DirectX Diagnostic Tool by typing “dxdiag” in the Windows Search box, selecting it from the search results, and hitting enter. A window similar to the one below will come up;
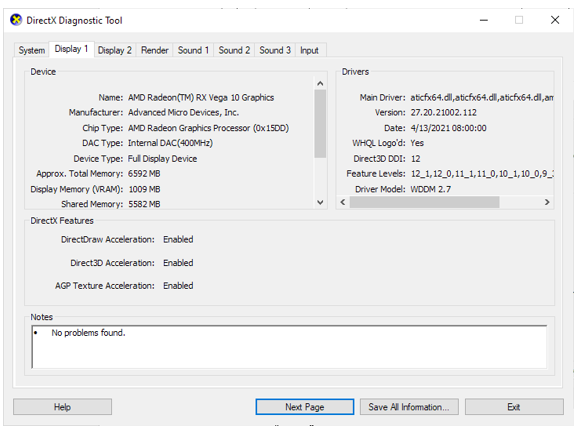
2. You will see a “Display” tab at the top portion of the window. How many Display tabs you have will depend on how many graphics cards (or graphics chips) you have in your system. In this example, there are two – one is integrated onto the microprocess or cpu, and the other is a discrete card. Click on the Display tab.
3. You will see the device driver date in the “Drivers” In this case, they are 2021 drivers and are the latest ones at the time of this writing. Do the same for the other Display tab if you have two.
4. If you have old drivers, say 2020 or earlier, find out the manufacturer’s name (shown in the “Device” box) and proceed to their website. It will only be a matter of doing a Google search to find out how to get to their website, as not many companies are in the business of manufacturing graphics chips, and are thus easily searchable.
Device driver downloads are usually under the Support > Downloads page of their website. Choose the option to automatically check the correct drivers for your system, wherein a small app will be installed on your computer to evaluate your system and find the appropriate drivers to download and install. If you require further assistance in finding and installing device drivers for your system, please contact your system manufacturer.
Antivirus software
Sometimes your antivirus software can prevent Easy VHS to DVD from functioning properly if it is blocking certain essential functions. This can happen for instance if the user inadvertently instructed the antivirus software to block a DLL file used by the software, prompted by a random pop-up on the screen --and the user simply wished to get rid of it right away and clicked on the first button they could get at. This can also happen if the real-time protection of the antivirus software is set too high that certain resources are being “overprotected”, rendering them inaccessible to the Easy VHS to DVD software.
To check if your antivirus software is causing the problem, temporarily disable its real-time protection “shields”, and see if the problem goes away. For instructions on how to do this for your particular antivirus software, please consult its Help documentation.
Your Windows user account
A problem with your Windows user account (or sign-in account) can also prevent the Easy VHS to DVD software from functioning properly. Conflicting software processes, or corrupted user files, can prevent Easy VHS to DVD from gaining access to necessary resources on your system. Figuring out what exactly is causing the trouble can be a very tedious task; and sometimes it is much simpler and more efficient to just create a new user account and test the software there.
For testing purposes, you will need to create a new user account that has Administrator privileges. Otherwise, the account might not have enough permissions to make the needed system changes for Easy VHS to DVD to function properly. Create a new Administrator account using the steps provided here. Once you have created the user account, sign in to it and see if the problem goes away. If so, you might want to consider migrating all your user files from the old account to this new one.
What if the issue persists?
If none of the above recommendations have fixed the “no video signal problem”, please contact technical support with the following information.
- What is the brand and exact model name of your VCR or camcorder?
- Were you able to record successfully before?
- If so, what changes were made to your computer before the issue started?
- What is the model number of your Roxio video capture USB device. You’ll find this on a sticker on the device itself, and it starts with either an “HU” or “UB”.
Clear photos showing how your video/audio cables are attached to your VCR on one end, and the Roxio video capture USB device on the other end will also help in analyzing the issue. Please attach the photos to your email to technical support.
Screenshots of your Device Manager, showing the list of items under the Sound, video and game controllers section, will also be needed, as well as the list of items under the Other devices section.
To get a screenshot, simply press the Windows key + Shift + S on your keyboard. Select to capture a full screen snip (you will see control buttons top-center of your screen), and it will be automatically saved to the Windows clipboard. Now, press Control + V in your email body to paste the screenshot.
Was this article helpful?
Tell us how we can improve it.